
Yosemite - Tunnel View
If you enjoy my posts, please consider signing up below to get email notifications of my latest posts. I will not share your email.

Yosemite - the Basics
The first time I visited Yosemite National Park, my children were only 1 and 4 years old. This was a tough trip because I wanted to hike, but to get into the mountains the trails are too long for little legs and the elevation gain makes it difficult to carry children. So my first bit of advice would be to wait until your kids are at least 5 if you like to hike into parks and see more than just the main viewpoints. If you have small children, I would suggest Badlands National Park and the Black Hills in South Dakota, or Arches and Zion National Parks in Utah. These parks have tons of fun, short, easy hikes for kids of all ages.


If you are not an avid hiker yourself, or you decide to try the park with younger children, below is a one day itinerary with minimal hiking. If you’re looking for the best multi-hour day hike, skip down to the next section.

If you look like this, reality is…you’re not going to make it up the mountains on this trip. There’s plenty of fun ways to spend the day, but if you like hiking, take a look at Arches National Park or Badlands National Park as an alternative vacation.
Yosemite Itinerary for the Non-Hiker
Head into the main part of the park first, and try to arrive early as parking fills up quickly. There is an easy-to-use bus that can move you from one part of the park to another, so it doesn’t matter where you park. If you want to plug a destination into your GPS, use the Half Dome Village or Yosemite Village, and then park when you find a spot.
The road within Yosemite is essentially a one-way loop. There are two types of buses. The Green buses go around the main part of the park and stop in order of numbers 1 through 19 and then circle back to stop 1. You’ll get a map with the bus stops when you enter the park. I promise, it’s easy to follow. The main places to shop are at the Yosemite Village (stop 2), Visitor Center (stops 5 and 9), and Half Dome Village (stop 13). The second bus is purple and it goes out to the El Capitan Picnic Area.

Yosemite Falls in early June - Incredible with the snow melt, but Tioga Road was still closed, which added several hours to our road trip.
Once you find a place to park, I’d suggest first heading to Lower Yosemite Falls (stop 6 on the Green Bus). There is a flat 1-mile loop trail out to the falls and back. Along the way, there are places to go down to Yosemite Creek below the falls, with rocks to take your shoes off and rest your feet in the water. There will be a bridge directly in front of lower falls. There are several paved trails that crisscross around this area. They all come out along the road. If you aren’t sure where you are, just keep walking until you get to the next bus stop.
Yosemite Falls is the tallest waterfall in North America, dropping 2,450ft, which can be incredible to watch. But if you want to see water falling, head to the park in late spring or early summer. The falls can dry up completely by the middle of summer.

Yosemite Falls in July - The great thing about traveling in July is that it’s plenty warm and all of the roads are open. The waterfalls might be a little lacking though.
Next, I’d recommend taking the Yosemite Valley Floor Tour: http://www.travelyosemite.com. This is a 2-hour ride along the valley floor in an open tram. It is something you will have to pay extra for, but you will get to enjoy the entire valley without having to worry about driving or looking for parking spots. The tram also goes up to Tunnel View, which is one of the best views in the park. They will stop there so you can get out to take pictures. Book your tickets before your trip though because they fill up early. The tour takes off from the Yosemite Valley Lodge (stop 8).

Tunnel View
Hit the shops after the tour and then head back to your car. Go back out on El Portal Road and head to the Bridalveil Falls trailhead. This trail is 0.5 miles round trip and it’s also relatively flat.

Bridalveil Falls also in June roaring from snow melt
One last stop I’d recommend is Glacier Point. This is an investment in time – it will take 45 minutes or so to get there from Bridalveil. But this view is incredible!

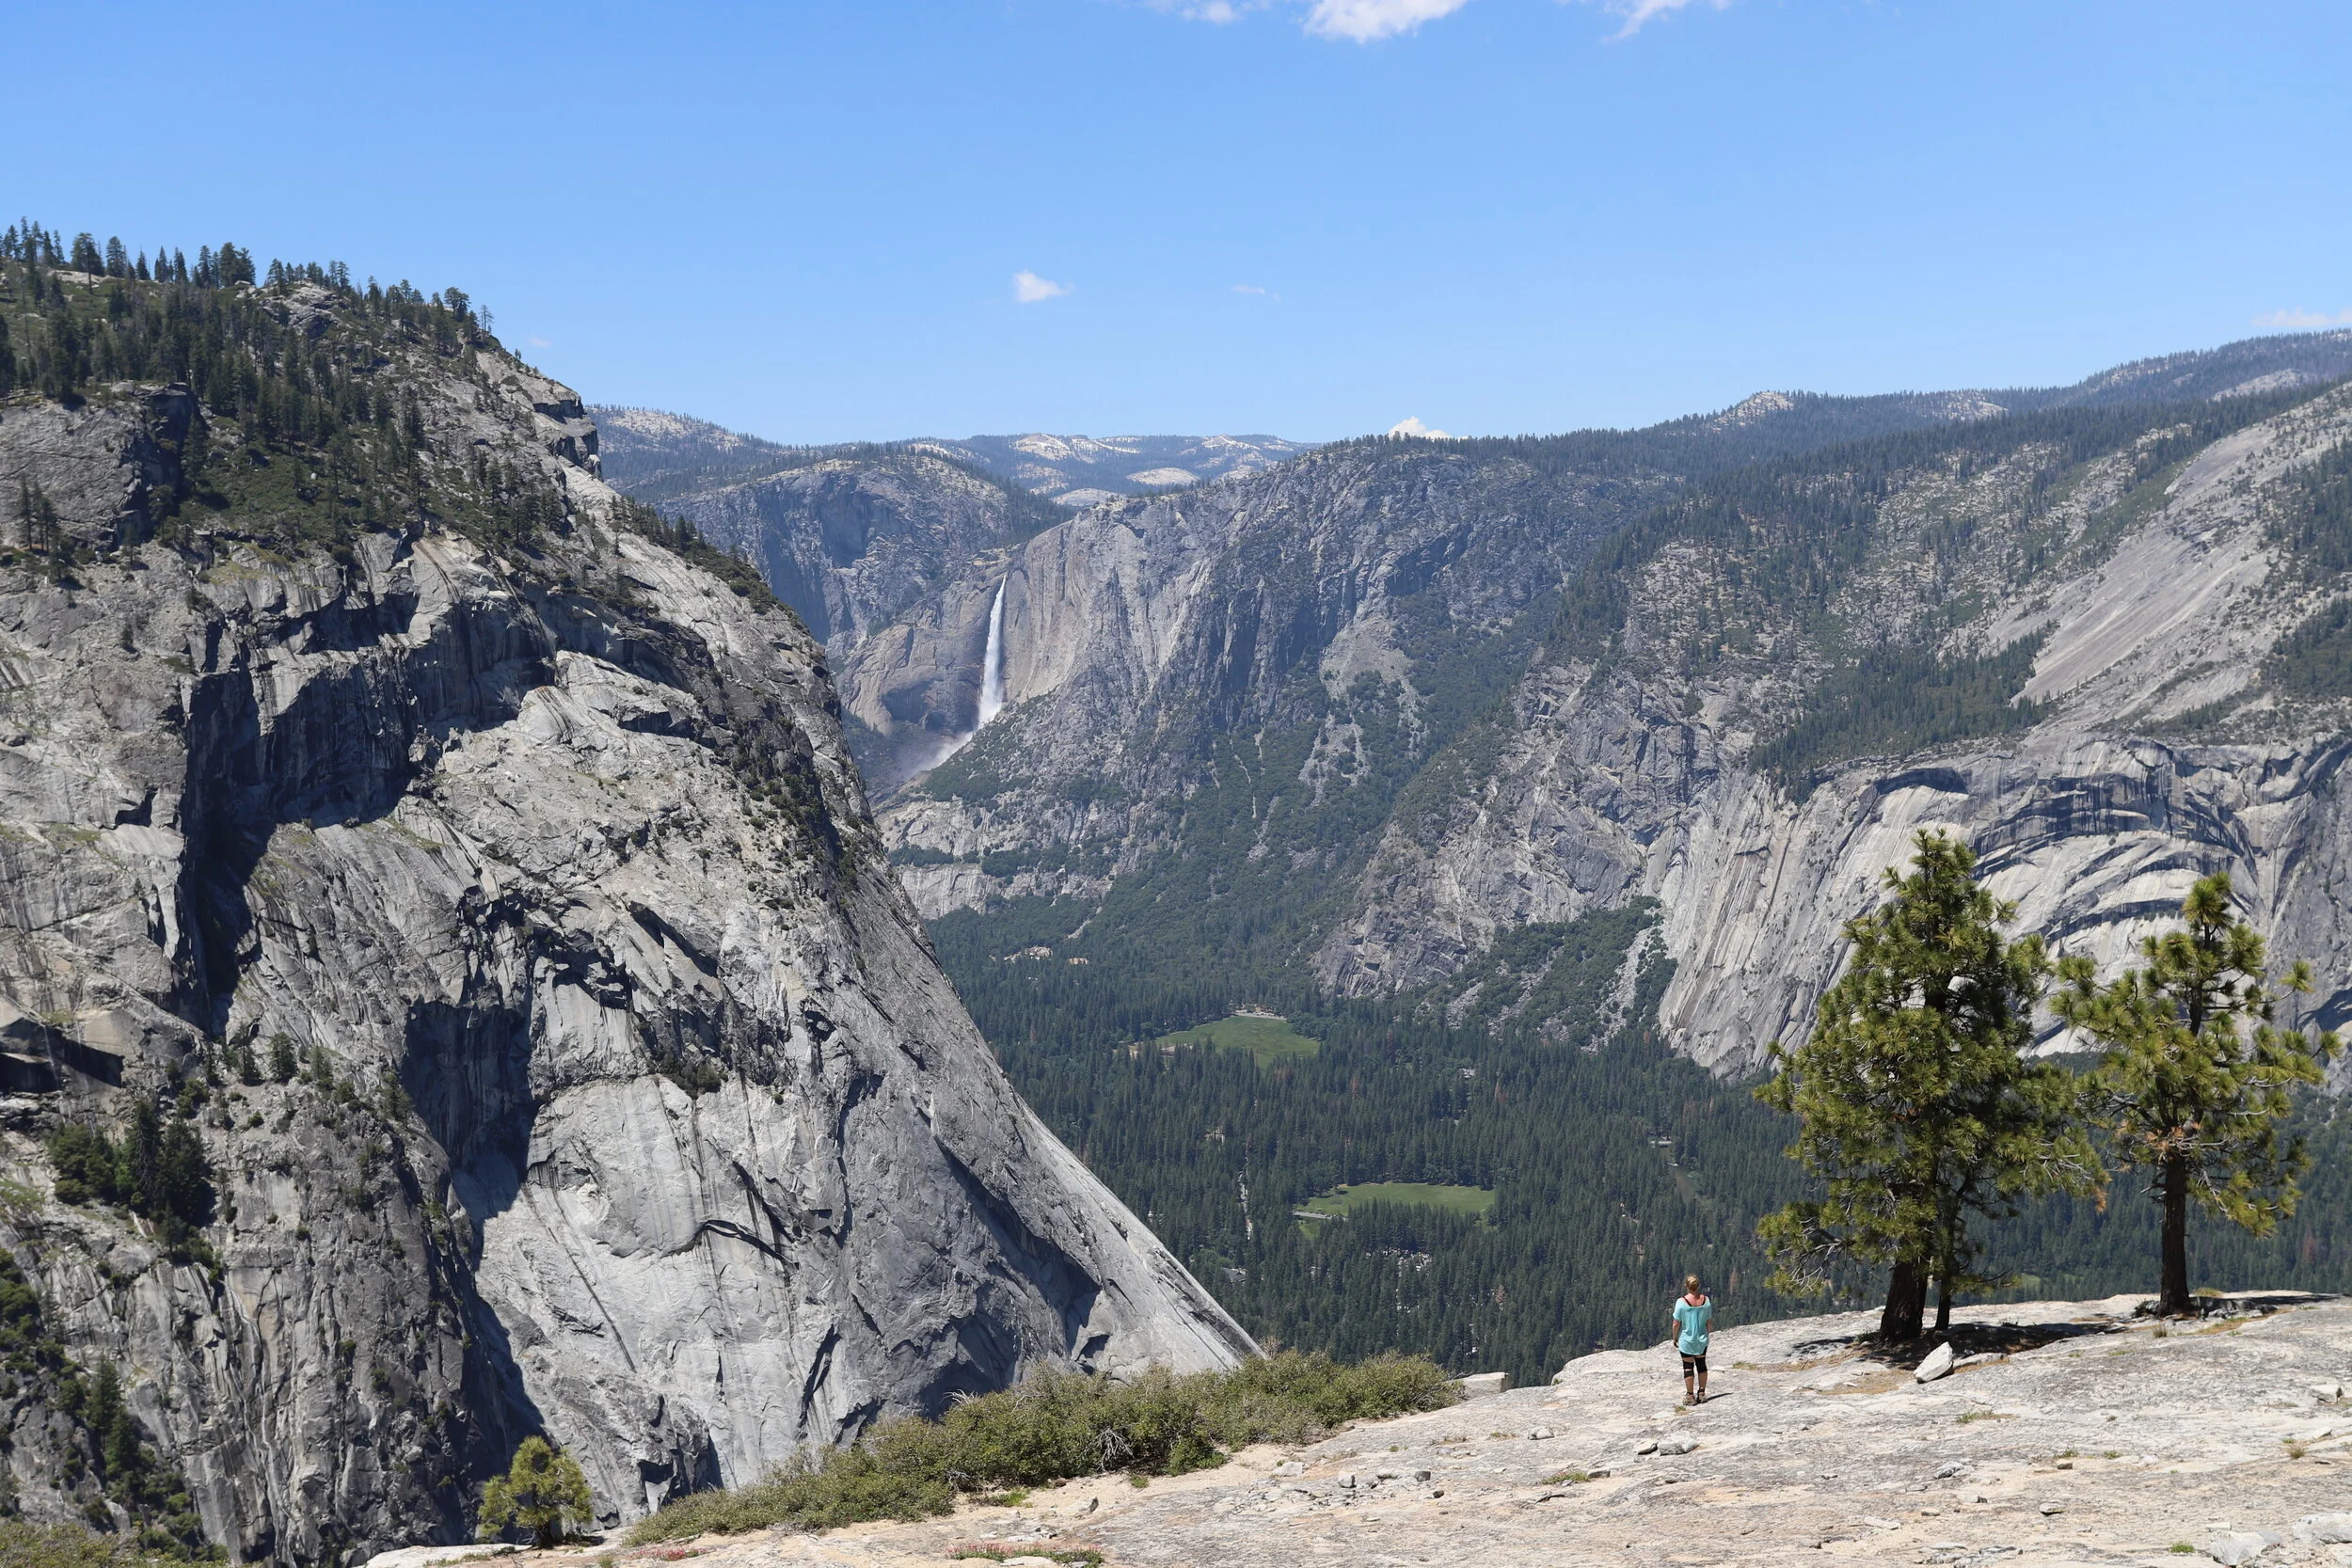
Glacier Point is the best the view in the park! Half Dome is in front. Cloud’s Rest is the mountain peak just to the left. The waterfalls on the right are Nevada (upper) and Vernal Falls (lower).
If you have a second day, I’d recommend driving down to Sequoia National Park (you’re on the right road if you’ve gone to Glacier Point). It’s a 3-hour and 45-minute drive, but this park has several short hikes, and the trees are huge. My son was only 4 when we went to Sequoia and he still talks about the trees. They were big enough to leave an impression.
Best Long Day Hike Option
If you want to get up into the mountains and do some real hiking, there are several options. One of the more popular trails is hiking to Half Dome and back, which you need a permit for that is difficult to obtain. This would not be the hike I recommend. I’m sure it’s beautiful at the top, but the entire trail up and back is cluttered with hikers, including the ascent up the cables where the line of people look like little ants. Additionally, this is a rough hike up – from Happy Isles to Half Dome is a 8-mile (one way) hike which includes an ascent of 4,800 feet.

This is Half Dome. You’ll see it in several pictures as it is visible from several parts of the Panorama Trail. The cables to the top are on the back side of the mountain (not visible in the picture).
Panorama to Mist Trail to Happy Isles
Instead I would suggest a cheater’s version to Yosemite hiking- Panorama to Mist Trail to Happy Isles - an 8-mile, mostly downhill hike past Illilouette Falls, Nevada Falls, and Vernal Falls, with stunning views of Half Dome along the way and smaller crowds along the first half of the trail.

Panorama Trail begins at Glacier Point. This is what the Panorama Trail looks out over for several miles. The pictures doe not do the views justice. The entire trail is gorgeous.
How do you get to the Panorama Trail?
The Panorama Trail starts at the top of Glacier Point, a 7,214ft mountain. What makes this the “cheater’s version” to hiking Yosemite is the assist up the mountain. You don’t have to hike up if you start at Glacier Point because there is a road. You can’t leave a car behind and be able to get back to it without hiking up, but you can leave your car at the bottom and pay to take a special bus up to Glacier Point in the morning.
Go to http://www.travelyosemite.com and buy a one-way bus tour ticket up to Glacier Point (Glacier Point Tour). Pick the earlier tour leaving at 8:30am so you’ve got plenty of time to complete this hike. When I wrote this post, the cost of the bus ticket was $28.50. (Note: if you want to hike up this mountain, just take the Four-Mile Trail. This trail is 4.8 miles one-way and ascends 3,200ft). The bus is a nice option.

Views of Nevada and Vernal Falls along the Panorama Trail
If you’re looking for an easier way to get up into the mountains this is the way to do it. This is still a long hike (8 miles), but most of it is downhill. A child of 10 or older should be able to do this hike in a day.
The bus will not run in the winter as the road to Glacier Point closes due to snow. Check the park’s website before you head out to make sure the road is open.

Map is from Gaia GPS with shading added to show the trail
What to Bring
Think about how much water you will need to drink, and then double it. Or better yet bring along a filtration and purification system in case you need it. This is going to be a long multi-hour hike and the only water sources are at Glacier Point and at Vernal Falls footbridge. The water sources are only seasonally available and they might be broken, so don’t rely on thinking you can refill (these are only available seasonally – don’t assume water will be available). Bring a map, compass, and/or GPS as there are a few trail intersections along the way. Also don’t forget sunscreen and basic first aid as you aren’t hiking a loop – once you start this trail, you need to be able to finish it.
Glacier Point

Don’t jump straight to the Panorama Trailhead just yet. Head up to the viewpoint first. You’ll see Half Dome, Cloud’s Rest, Nevada Falls and Vernal Falls. The view is nothing short of amazing. Even if you don’t plan on hiking, it’s worth the drive to see it.
Panorama Trail

The trailhead sign is in a weird spot. Don’t go off to the left, stay on the main trail that is pictured behind us (towards the right side of the picture)
We got confused at the beginning of this trail. The initial trailhead is well marked and then there is a small trail that branches off to the left. This small trail is not the trail, don’t take it. Stay on the marked gravel path and continue going up a few feet further. Once you walk up the trail to the top, it will be obvious which way to go.
This trail descends pretty rapidly. The trail mainly stays within a meadow meaning you are completely exposed to the sun. You have Yosemite Valley in front and to the left of you the entire way down. This trail is not near as busy as Happy Isle. We only saw two other hikers on our way down to Illilouette Falls.
In 1.4 miles there will be your first true trail split. Go left towards Illilouette Falls.
Illilouette Falls

View of Illilouette Falls from the spur trail. Half Dome is pictured in the center.
There is a small spur trail towards your left where you can get a beautiful view of these falls. You will see the falls from above as the trail crosses a bridge, but this spur trail is your best chance to see the falls.

I’m not sure why I was worried about crossing this river, but we were getting mis-information from hikers about having to cross on logs. This isn’t true. There is a very sturdy bridge near the top of Illiouette Falls.

Top of Illiouette Falls. This whole trail is incredible!
Panorama Trail
You will continue following the Panorama Trail after you cross the river at Illilouette Falls. This is the one point in the trail that you will have to go uphill. The trail will wrap around the mountain and once you get around it, it will descend again. On your way up, there is another beautiful overlook that you can see Yosemite Falls from. I can’t believe there is no name for this overlook, but there was no sign, and I haven’t been able to find a reference to it.
Panorama Trail looking back towards Glacier Point. Yosemite Falls is in the center of the picture.
From the first trail split prior to Illilouette Falls to the next trail split is 2.6 miles. On this second trail split, go towards Nevada Falls.
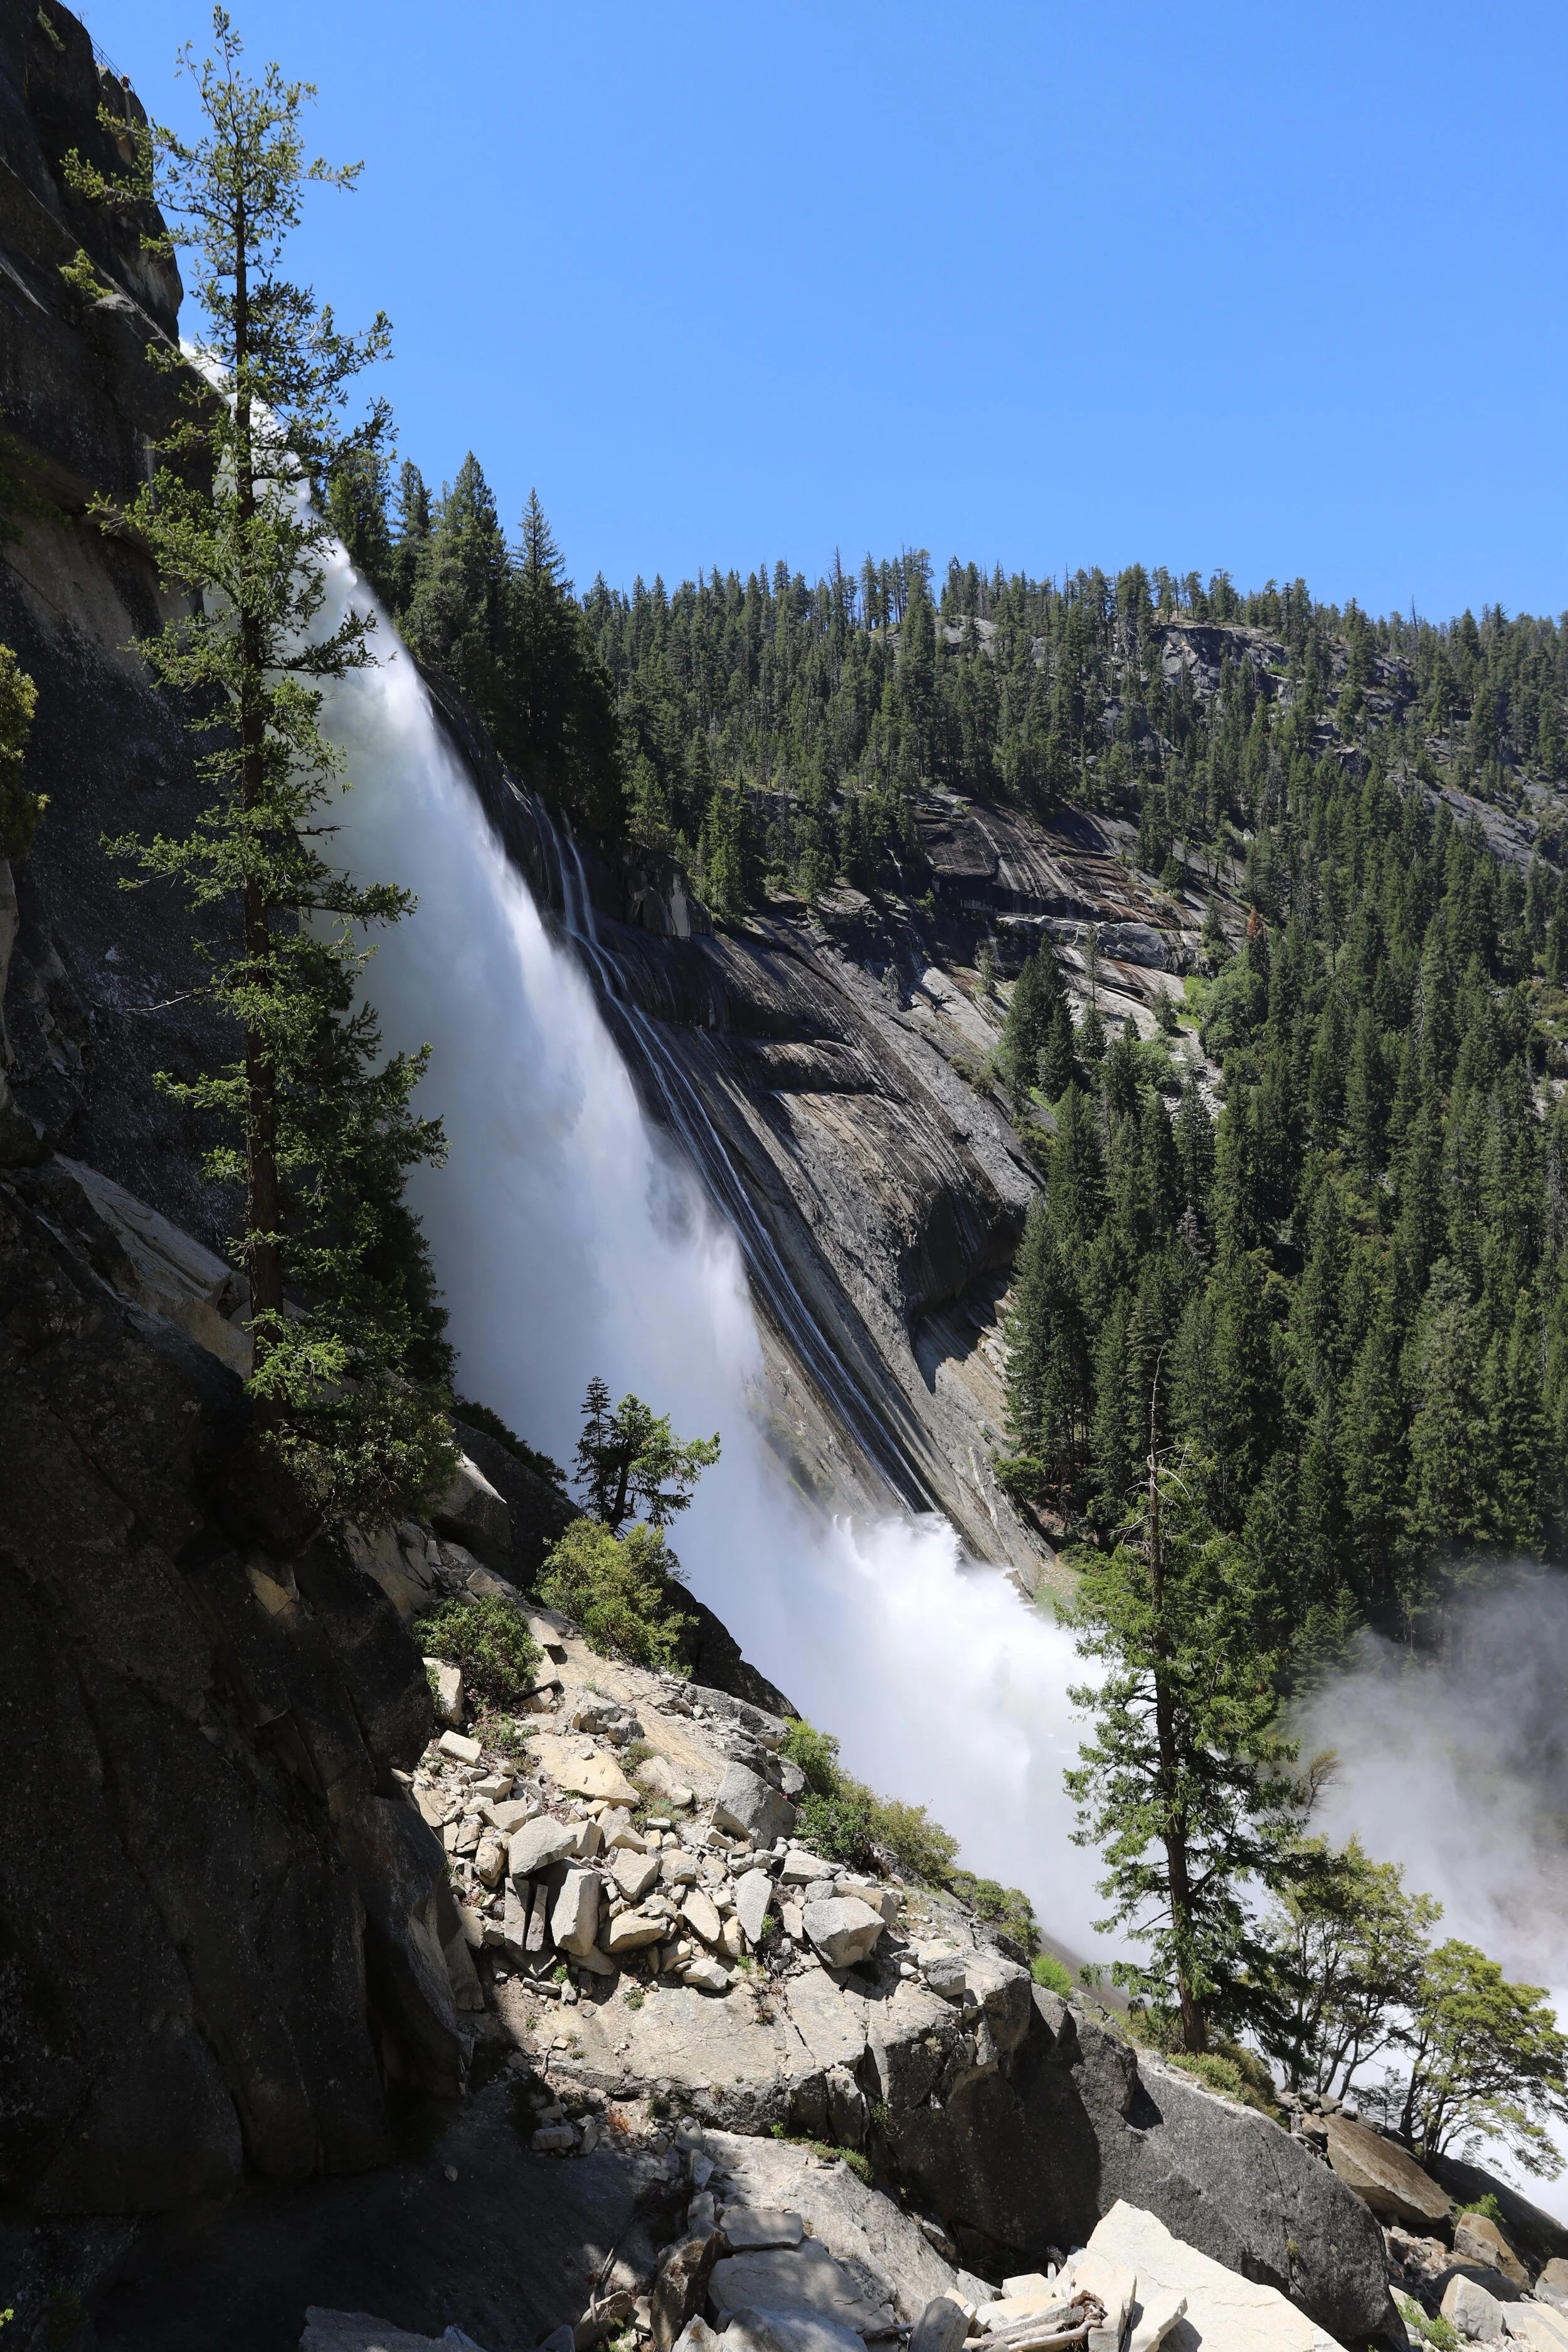
Nevada Falls
The last part of the Panorama Trail descends through several wooded switchbacks on its way to Nevada Falls. This section of the trail is 1.0 miles and has a fairy tale-like feeling. If you are there early enough in the summer, melting snow forms a small creek that flows down the mountain and there are points in the trail where you step over or around it, or hop across available rocks.

Hiking down to Nevada Falls. Half Dome is on the left, and the top of Nevada Falls is on the right.
At the bottom of the switchbacks, you will come to another trail split. The John Muir Trail will go to the left. Go right, and continue 0.4 miles to Nevada Falls.

This is the top of Nevada Falls. The water is flowing extremely fast here. The trail crosses over the river on another bridge.
There is another bridge that crosses Nevada Falls. We were there in early summer and the amount of water flowing over this waterfall made crossing this bridge intimidating.

Top of Nevada Falls
Little Yosemite Valley, Half Dome, and Cloud’s Rest

Half Dome as visible from hiking down the trail from Cloud’s Rest. The cables are on the right side of the mountain (closer towards the cliff face) if you are curious. You can see them in the picture if you look closely.
Just on the other side of Nevada Falls there will be a crowded trail split with a pretty nasty pit toilet. The reason this area is so crowded is that the trail to the right goes to Little Yosemite Valley (a backpacking campground – note: you need a permit to camp here), Half Dome (a popular day hike destination (which also requires a permit), and Cloud’s Rest (if you are heading here you should be backpacking, which as noted above also requires a permit). I’m a person that tends to do the harder thing that less people have done, so my husband and I avoided Half Dome and did a multi-day hike up to Cloud’s Rest. If you’ve got the time, I’d very much recommend this multi-day hike. See my below post if you’ve never tried backpacking before but might be lured into trying by our pictures. It’s very much worth the effort!

View from the top of Cloud’s Rest

Half Dome from Cloud’s Rest

Mist Trail
To continue on as a day hike, from this split do not go towards Yosemite Valley. Stay towards the left and follow the Mist Trail. From here to the end of the hike, unfortunately, it’s going to be really crowded. Take your time and enjoy the views, be patient with the hikers going up.
The Mist Trail comes down steep boulders alongside Nevada Falls. The trail might be wet, but this is not yet why the trail is called “Mist” Trail
The trail quickly descends towards the bottom of Nevada Falls. This trail will likely be slightly wet, but this is not yet why the trail is called “Mist Trail”. You will follow the trail for 1.1 miles before there will be another split.
Vernal Falls
The Mist Trail will cross the river again and you will stay towards the right. There is a view point from the top of Vernal Falls, but there is a safety fence in place, so the pictures won’t be quite as pretty as of Nevada Falls and Illilouette Falls.

Top of Vernal Falls
For the next 0.5 miles, as the trail descends alongside Vernal Falls, you will understand why the trail got its name “Mist Trail.” If you have poles, get them out for safety. The trail descends down large steep wet boulders. If may want a rain jacket and a cover for your bag. We were soaked by the end of this section of the trail!
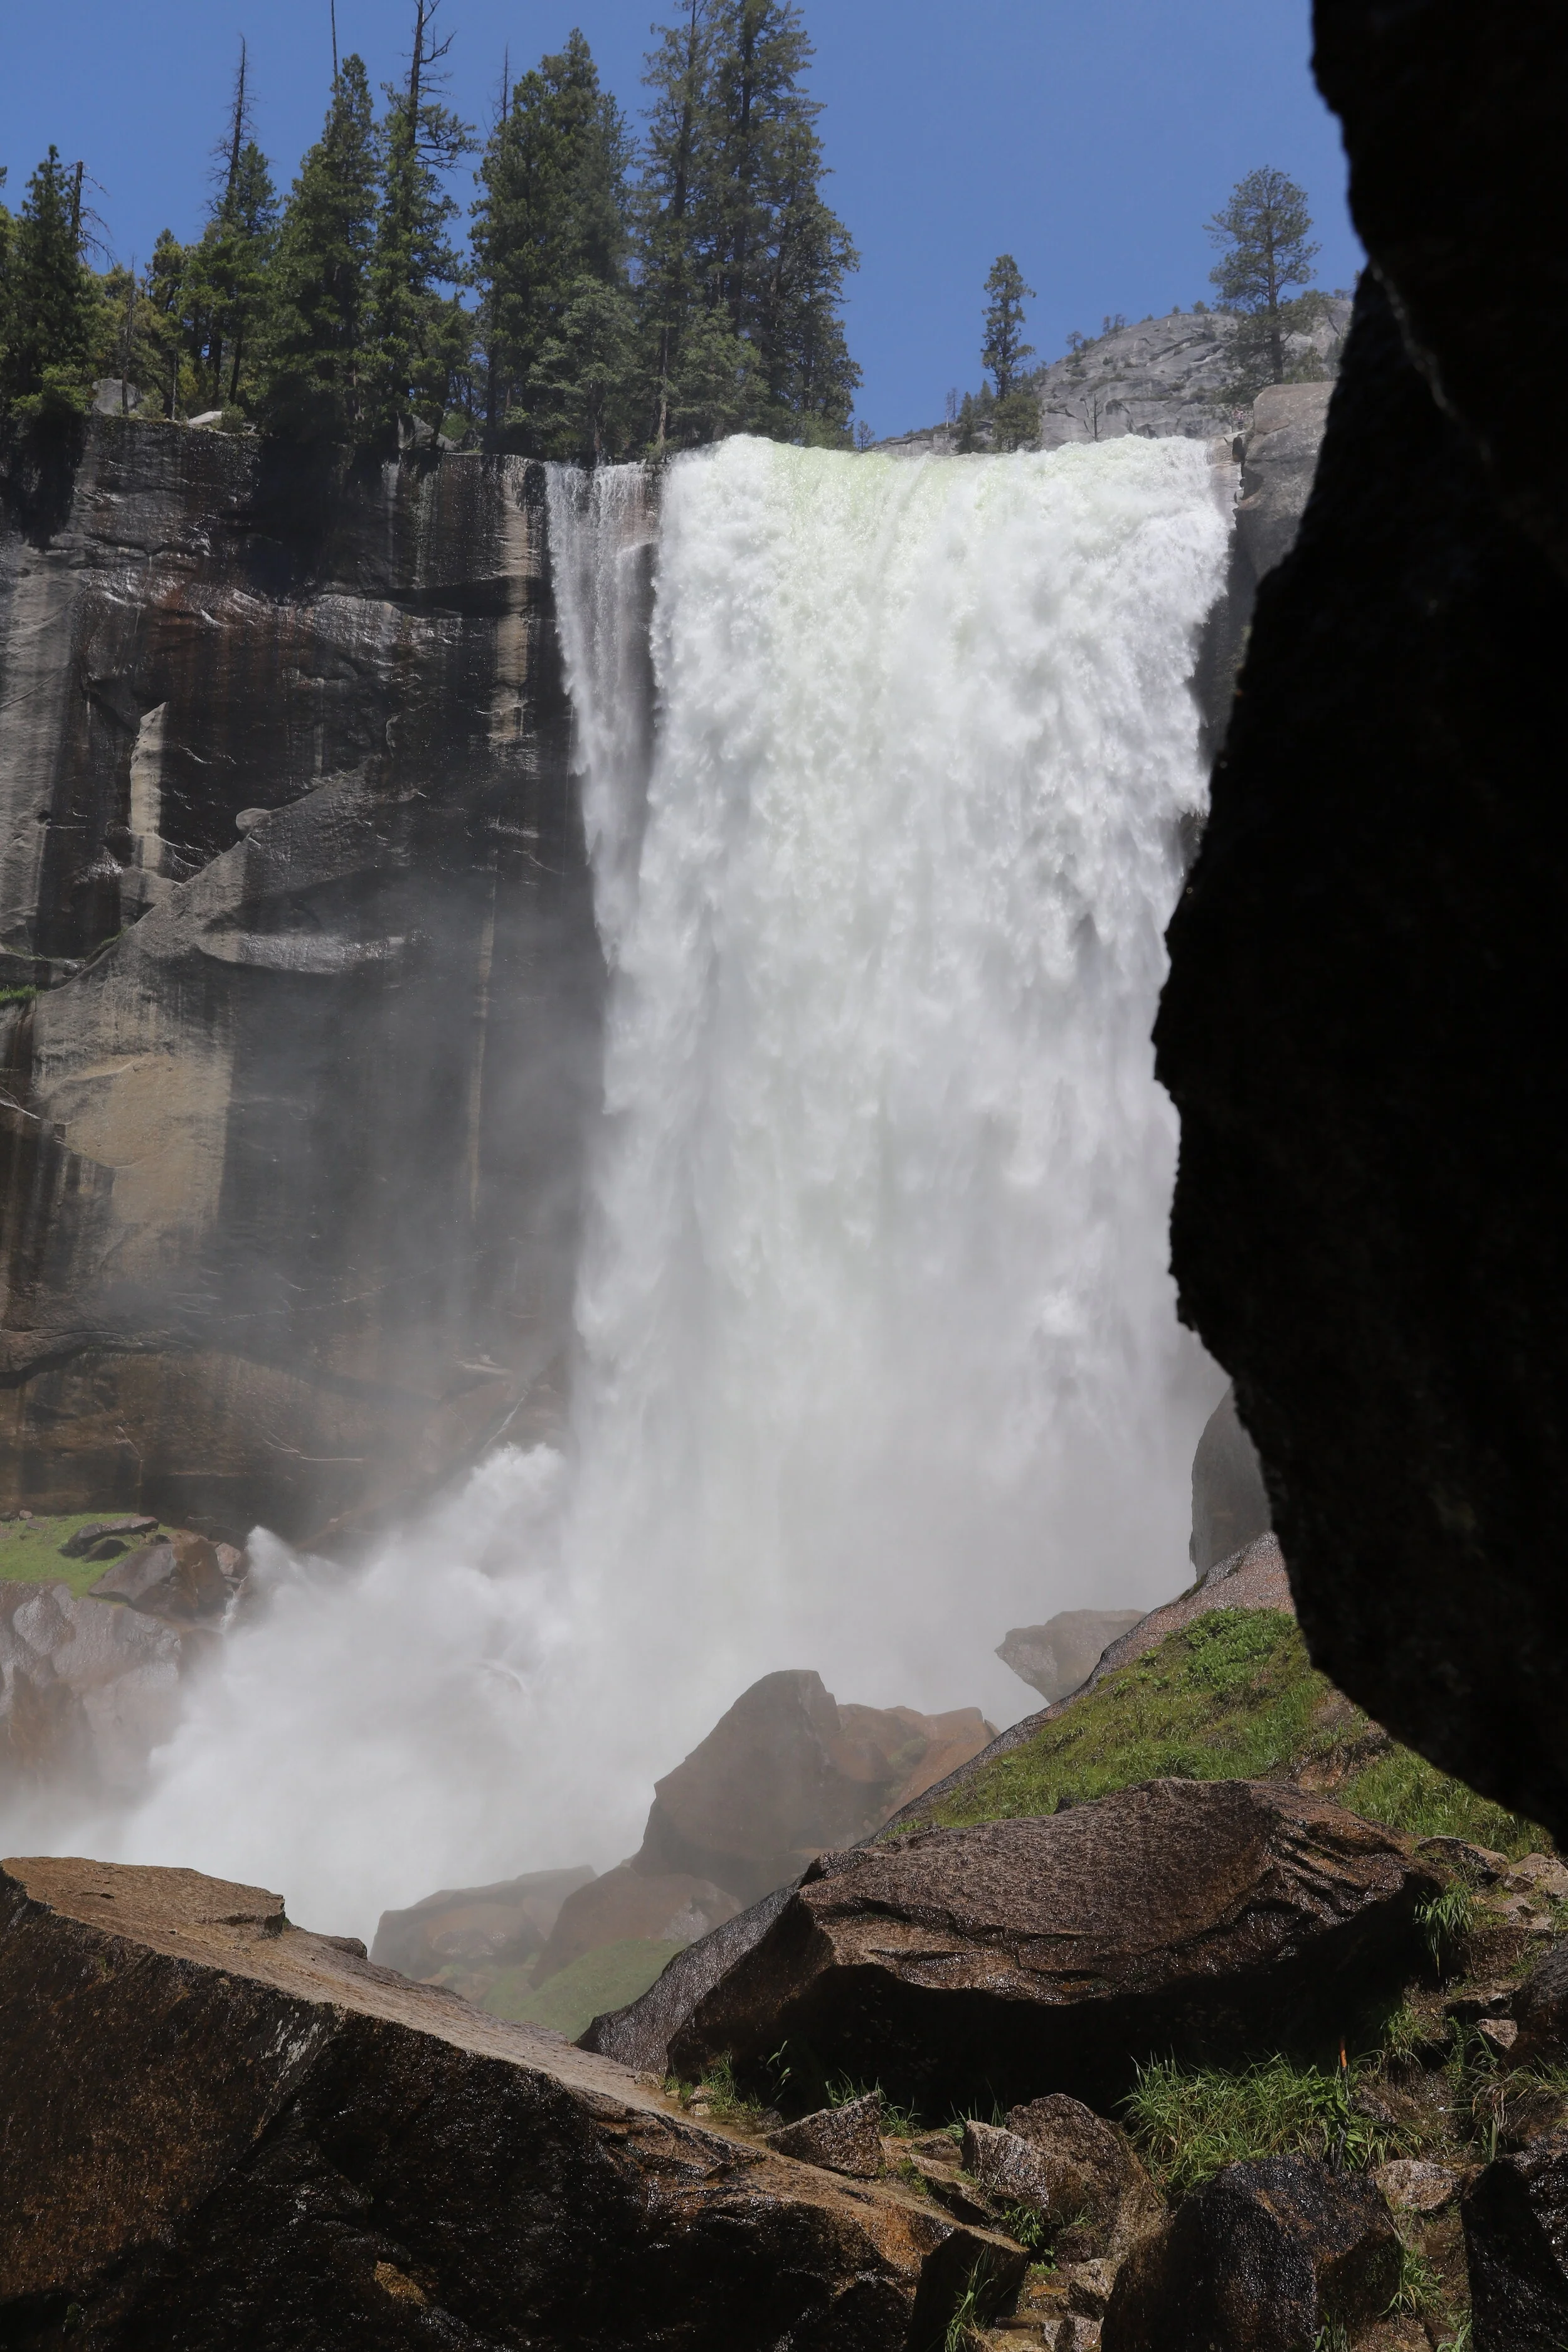
Vernal Falls along the Mist Trail - this was a tricky picture to take and keep the camera lens dry
As we hiked down this portion of the trail, we joked about how the words in the trail guides completely underestimate everything about Yosemite. “Moderate” means “kick-you-in-the-butt hard.” “Challenging” means this is going to be one of the hardest things you’ve ever done. And “Mist” means you’re going to need to change into new clothes.
Merced River Bridge to Happy Isle

Merced River Bridge with Vernal Falls visible in the background
Continue towards the right to Happy Isle when you come to the last trail split. You’ll cross the river one more time. There is a seasonal water supply on the south side of the bridge. From here you have 1.0 miles to go to the Happy Isle bus stop. The trail is still relatively steep, but the trail is along a smooth surface and there are no more boulders to navigate over.
Where to Eat Before You Leave the Park
The following bus stops include food before you head back to your car: 2/10 – Yosemite Village Store / Grill, 3 – Majestic Yosemite Hotel, 4 – Degnan’s Kitchen, 8 – Yosemite Valley Lodge, and 13 – Half Dome Village.
Other Posts from NatureImpactsUs.com
There are posts linked to each pin below.