
Last updated - May 2026. Our most recent trip to Arches National Park was March 2023.

Delicate Arch in Arches National Park
If you enjoy my blog, please consider signing up below to get email notifications of my latest posts. I will not share your email.

Double O Arch - Arches National Park
Desert Magic
If you are planning a trip to Arches National Park, I can honestly tell you that I’m jealous. Out of all of the National Parks I’ve visited so far, Arches is my favorite. This Park leaves me in awe each time, and I’ve had six amazing trips.
I’ve read the signs that explain how the arches formed from the ocean’s salt mixing with denser rock and that the salt later dissolves by water slowing dripping through cracks in the rocks - but honestly all I comprehend is “blah, blah, blah, MAGIC.” I still don’t really understand these rock formations, but I do feel the spirituality that surrounds this Park and its magnificent structures, and I appreciate the timescale that has played out to create this incredible landscape.
Arches is a fantastic park for all types of hikers - young and old hikers, little hikers, and adventure seekers. Double Arch is one of my favorite spots in this park - it’s super easy to get to. Sand Dune Arch is another fun, short, and easy hike. Delicate Arch is a harder hike along slick rock, but probably not the best trail for anyone afraid of heights. Devil’s Garden is a great spot to stretch your legs out and wander on a longer hike through desert backcountry. Fiery Furnace is a special section of the park worth the effort (of repeated attempts) to get permits. Tower Arch is the park’s hidden secret. Whatever you are looking for in a hike, you can find it here (…except shade…). Arches would not be on my list of places to visit in the summer due to the extreme heat.

Partition Arch - A spur off of Devil’s Garden Loop (and my favorite arch in the park)
Planning Your Trip to Arches National Park
For those wanting to do the harder hikes, I would recommend spending at least 1.5 days in Arches National Park, and split Delicate Arch and Devil’s Garden into two different days. If you can snag permits to Fiery Furnace, plan 2 full days. For anyone with smaller children or those that just don’t hike that much, one day should be perfect.
Lodging is incredibly easy at Arches. The city of Moab is just 10 minutes from the visitor center. Moab has several hotels and restaurants and much of the town is geared towards tourists. If you want to camp, there are options at Arches, as well as at nearby Canyonlands National Park (Island in the Sky section), Dead Horse Point State Park, and various sites near the Colorado River.
The one downside to visiting Arches is that it takes some effort to get here. The closest cities with large airports are Salt Lake City (3.5-hour drive), Denver (5.5 hours), Las Vegas (6.5 hours), and Phoenix (8 hours). Once you get to Moab though, you can easily plan an entire week-long vacation right here, with Moab hosting two National Parks, two State Parks, and several other places to hike and explore outdoors.
Personally, I wouldn’t recommend combining all 5 Utah National Parks into one trip. Bryce, Zion, and Capitol Reef are much closer to each other than they are to Arches and Canyonlands. I would split Utah’s National Parks into at least two separate trips and skip the unnecessary extra driving between.
If you are looking for other things to do in Moab on a trip to Arches, here are some of my thoughts on a potential Moab vacation itinerary.
Most of our trips to Arches have been in March, over Spring Break, although in college we visited once in October. It’s been plenty warm each time we’ve visited in March, and I just can’t imagine enjoying this park as much in the summer. There’s no shade - hiking must get so hot.... It can snow in the winter, but the park doesn’t typically receive large snowfall amounts, and it often melts shortly after.
Lastly, the majority of the roads to trailheads in Arches are paved. There’s one road out to Tower Arch that is pretty sandy. We rented a truck, but I don’t think that was necessary. Check the current road conditions with the park rangers at the visitor center if you head out to Tower Arch. If the road is wet, it won’t be passable in any vehicle. There is also one 4x4-only road in the park - I haven’t yet had a chance to explore this part of Arches.

Is Arches a place to take your kids? Absolutely! There are so many rocks to scramble up and explore - a natural jungle gym for kids of all ages!
Hiking at Arches National Park
Below is a general map that highlights the main sections of Arches National Park. I’ve marked the parking areas with black stars.
In the captions are hyperlinks to sections within this blogpost. Feel free to use them to navigate quickly to places of interest and then click back to the map or just read the post as normal.
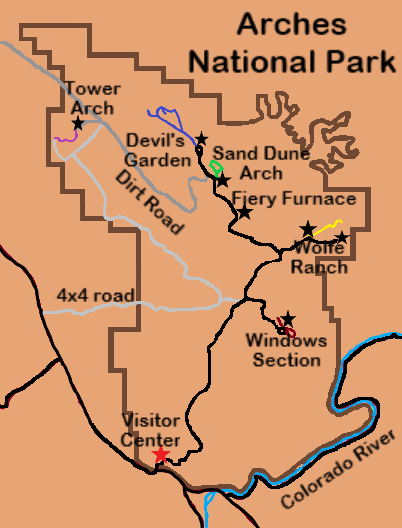
Windows Section - Includes Double Arch (easy), North and South Windows (easy), and Turret Arch (easy)
Wolfe Ranch - Delicate Arch (Moderate - Difficult), Upper and Lower Delicate Arch Viewpoints (I have not hiked these trails)
Fiery Furnace - Permit Required (Moderate)
Sand Dune Arch - Sand Dune Arch (easy), Broken Arch (easy)
Devil’s Garden - Tunnel Arch (easy), Pine Tree Arch (easy), Landscape Arch (easy), Partition Arch (moderate), Navajo Arch (Moderate), Double O Arch (Difficult) - (I have not made it out to Dark Angel or Private Arch)
Tower Arch (moderate) - Main dirt road should work for most vehicles, but it needs to be dry. Double check with the visitor center before driving
Visitor Center

Outside of the Arches National Park Visitor Center
Immediately after you go through the park entrance, there is a pullout for the visitor center. Arches doesn’t have a lot for interpretive signs throughout the park, so I would recommend stopping to see the main exhibit to understand the basics of how the arches are formed. This is a small visitor center - expect to spend less than 30 minutes.
There is a small gift shop next to the visitor center, but downtown Moab is a better place to shop if you are looking for something that says “Arches”. There are several souvenir stores.
Lastly, there are vault toilets at all of the trailheads in Arches, but if you are looking for a flushing option, this is your last chance.
The Windows
The first fork in the road will be to the Windows Section. The road ends in a loop with two areas to park. If you can’t find a spot don’t worry, just keep looping around. These are short trails and people are always coming back to their cars.
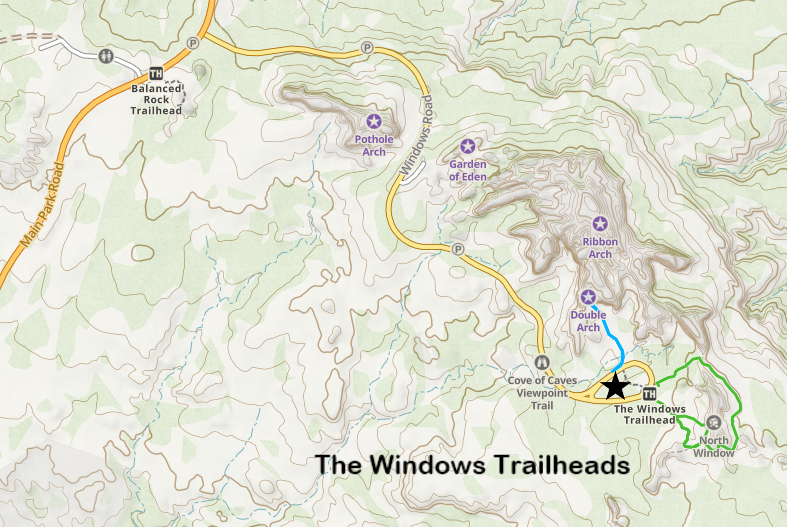
The Windows Trailheads - Main attractions are Double Arch, North Window, South Window, and Turret Arch
There are two separate hikes at the Windows Trailhead. Both are short and easy. Your car stays in the same spot for both trails. If you only have time for one, pick Double Arch. Below is a more detailed map that includes the arch locations.
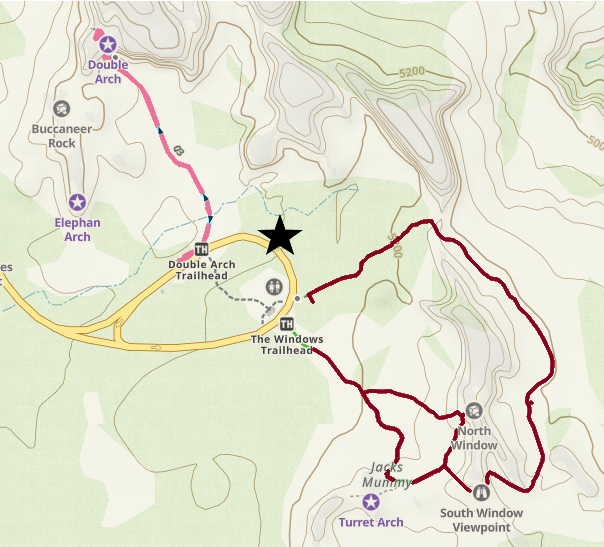
Trails to Double Arch, North and South Wind, and Turret Arch.
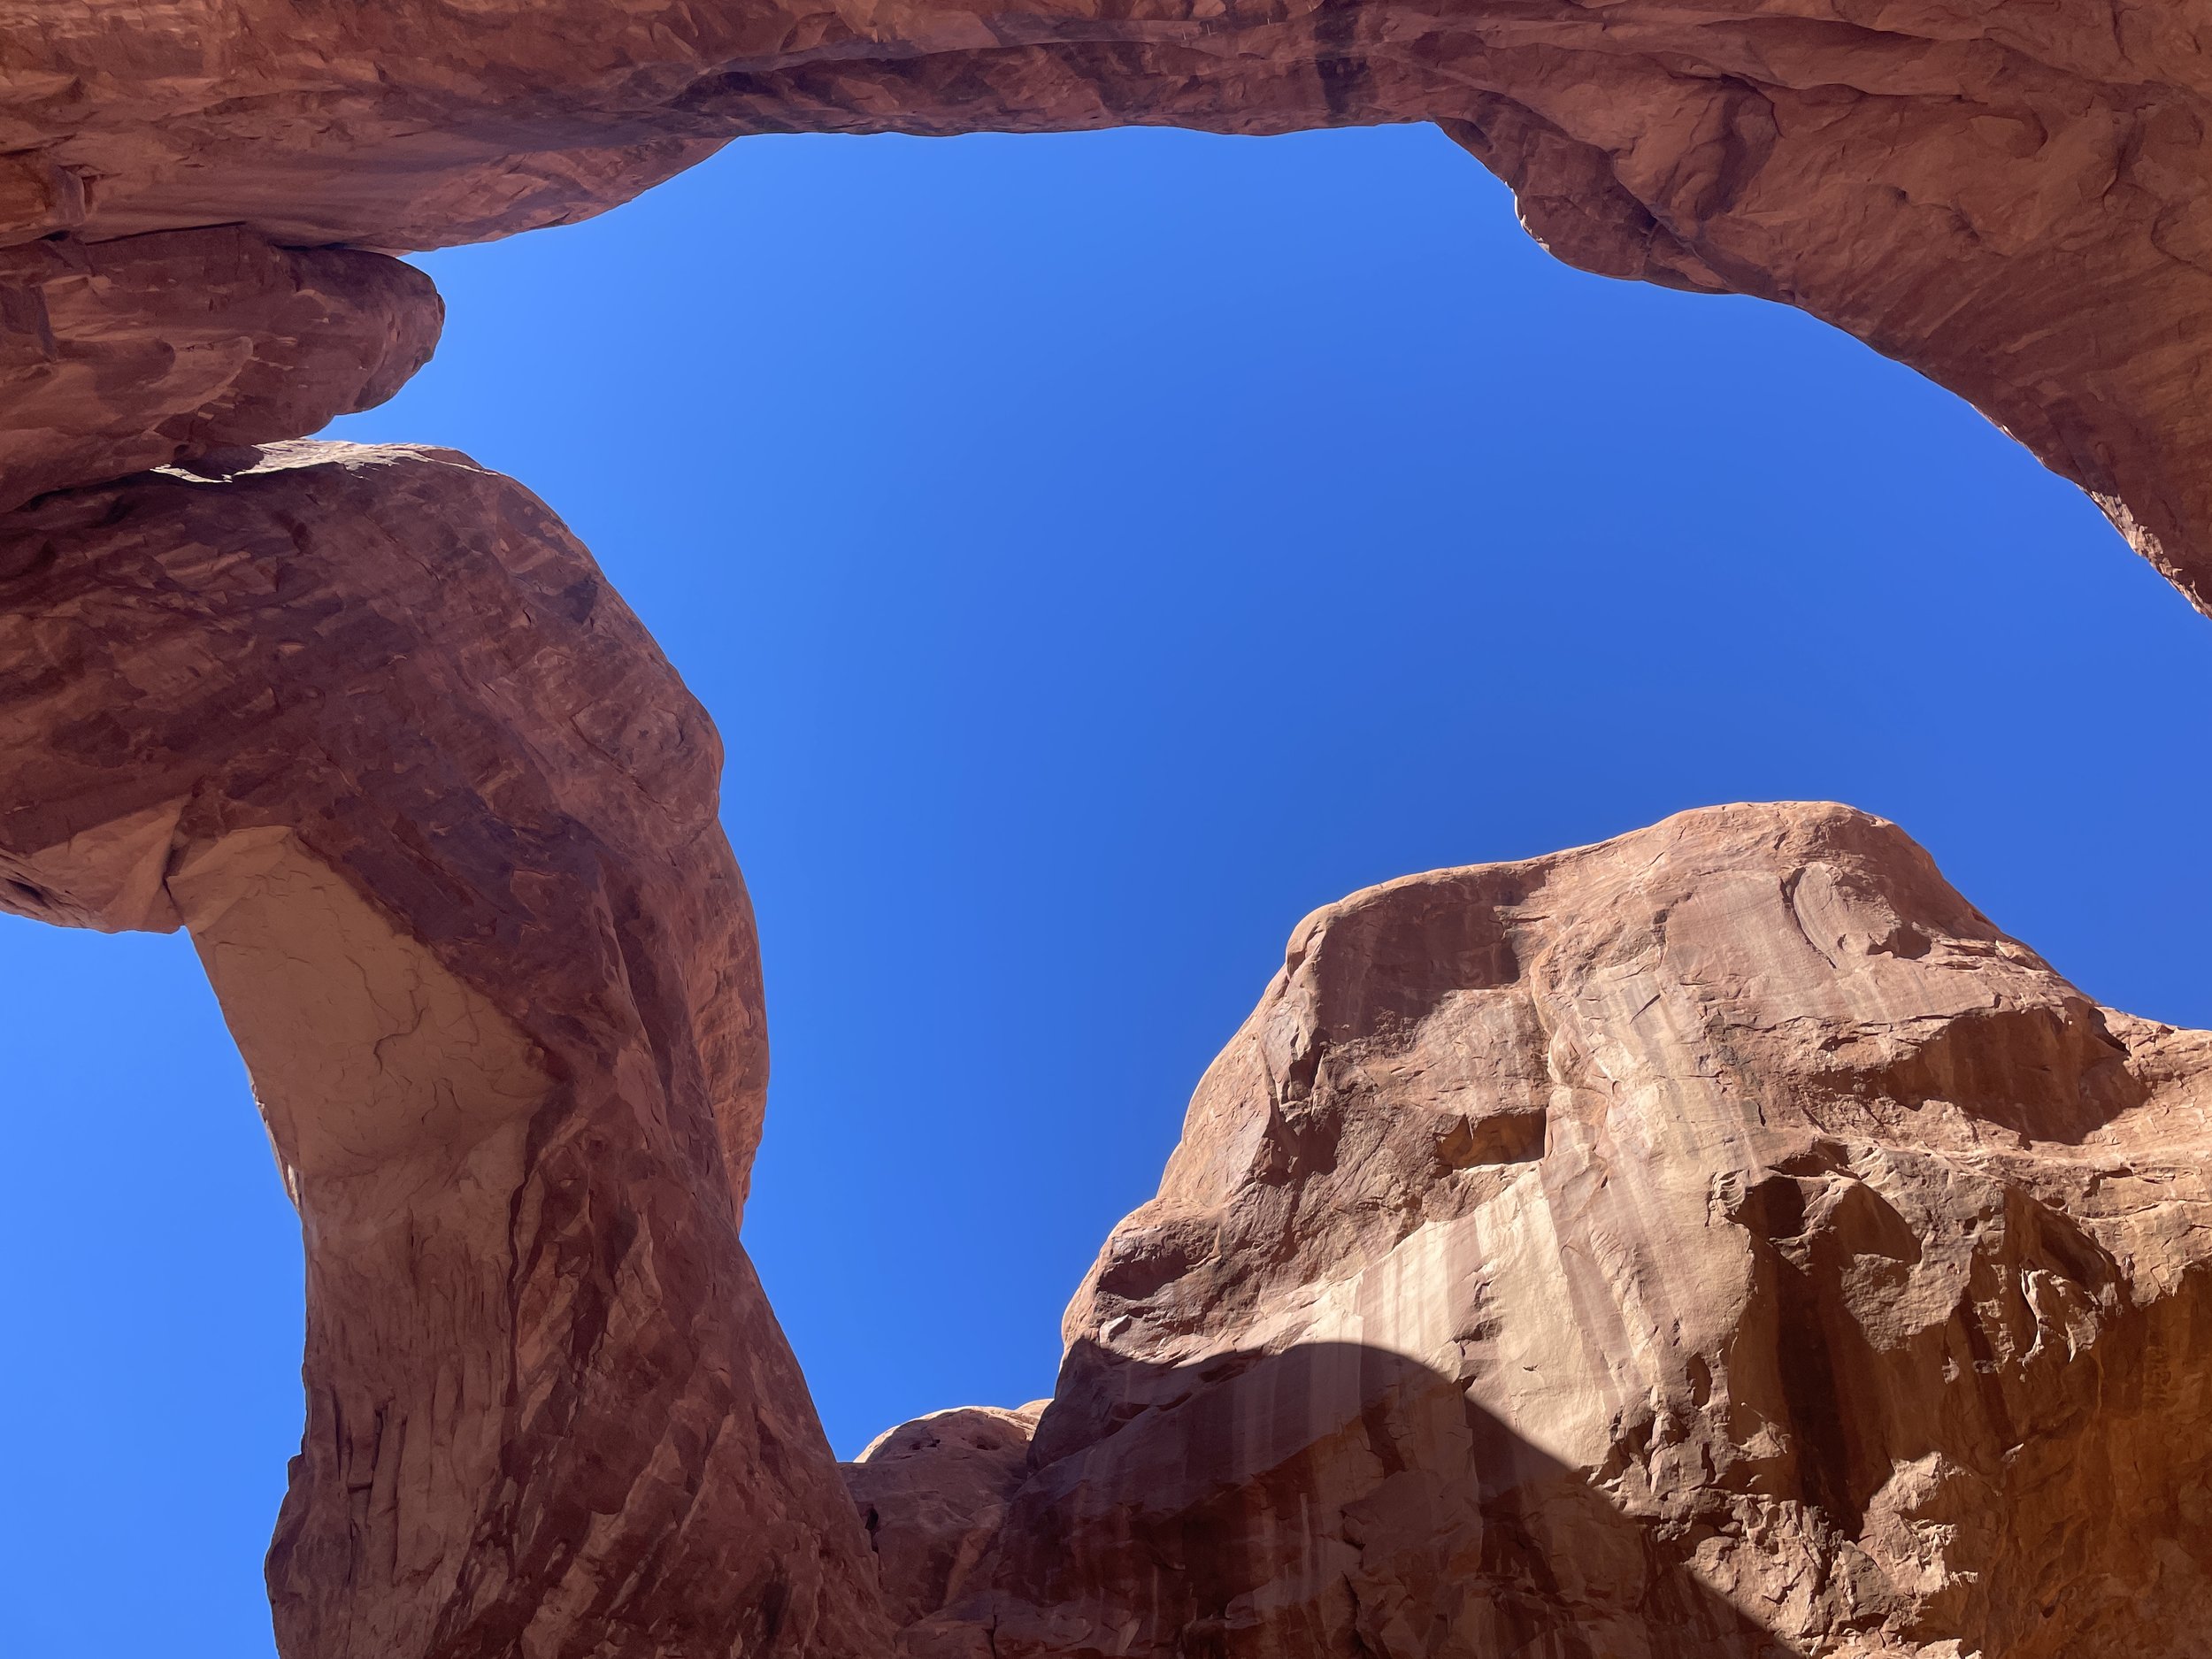
Double Arch
0.50 miles / elevation gain - 0ft unless you climb to the top of the arch base (~150ft)

Double Arch - Arches National Park
The best spots in National Park often involve the hardest hikes, but this isn’t true in Arches. Double Arch (not to be confused with similarly named Double O Arch found in Devil’s Garden) is one of my favorite arches, and it’s super quick and easy to get to it.
The hike itself is a little bit of a let down because it is so easy, and there are a lot of people. Even though this is the first hike in my post, what I actually recommend is saving this hike for the end of the day - when you are tired and can appreciate both this incredible arch and the short walk.
If you are just doing a quick in and out of the park and only hitting the shorter trails, then this is a great place to start.

Double Arch - Arches National Park
I cannot not visit this arch - As I’ve mentioned, I’ve been to Arches 6 times, and each time, I’ve stopped at Double Arch. I truly love being under the arch and just looking up at it.
Double Arch - Arches National Park
It’s a scramble, but if you are able, plan to climb up into Double Arch to fully appreciate it.
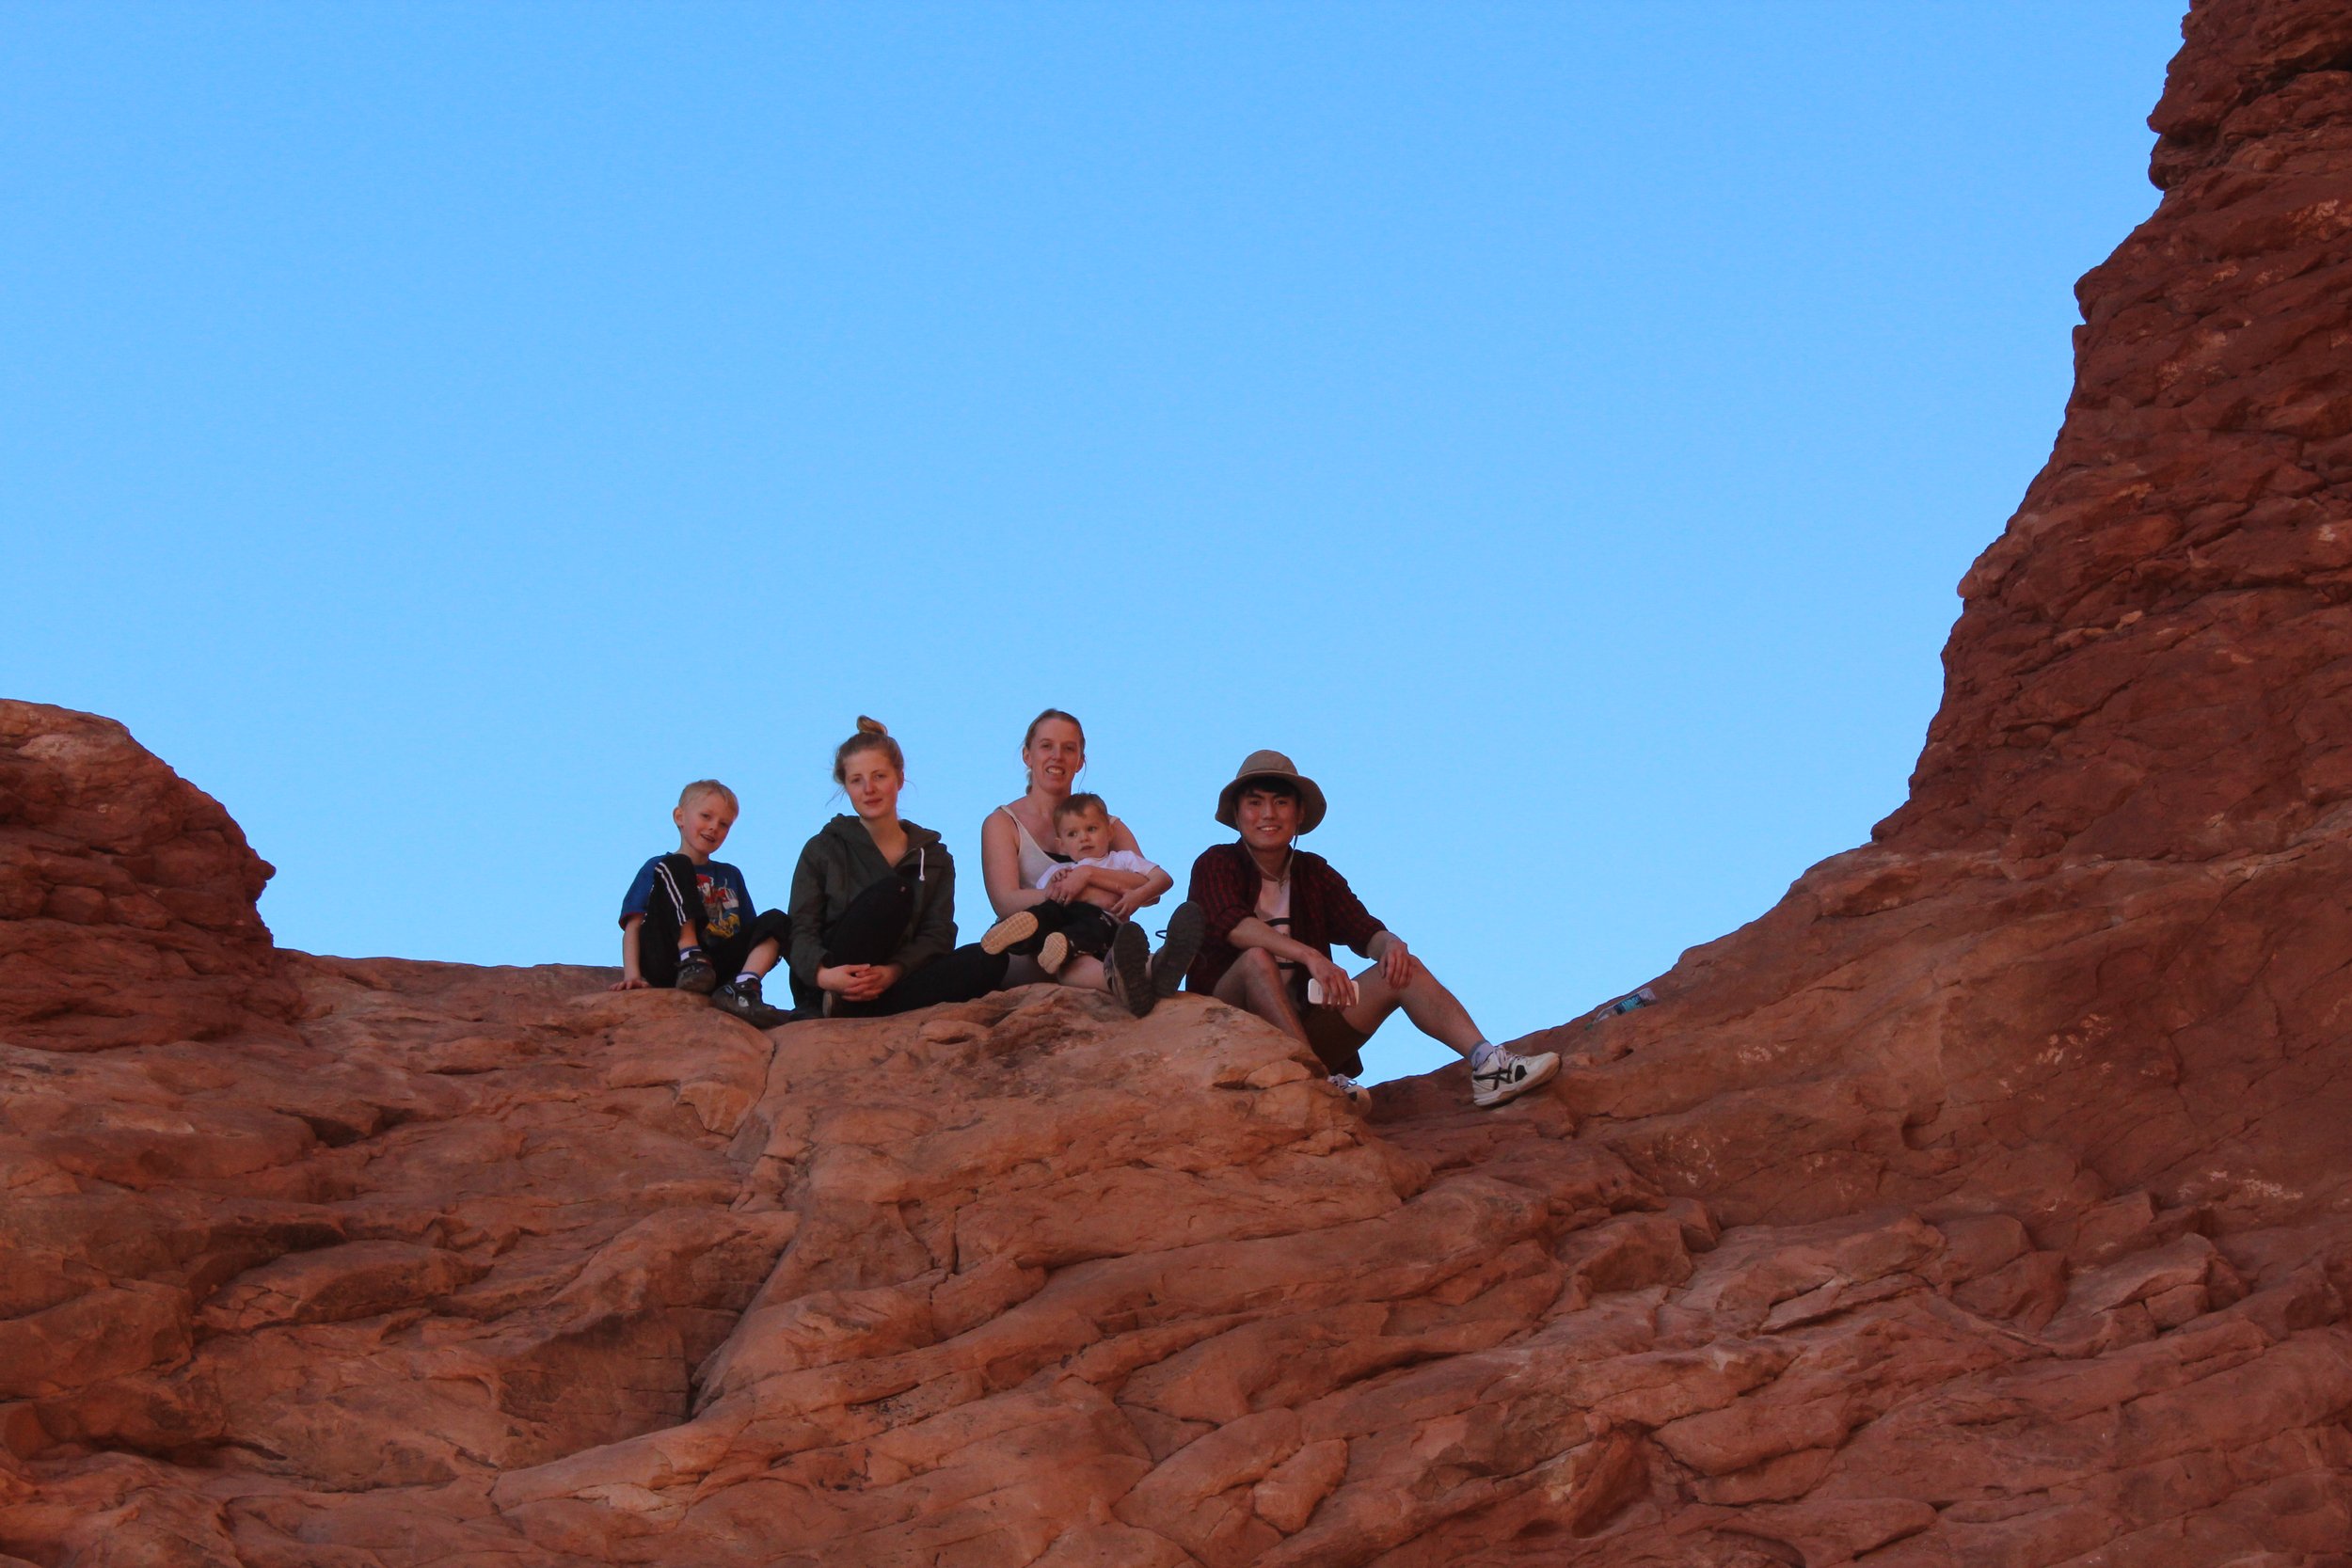
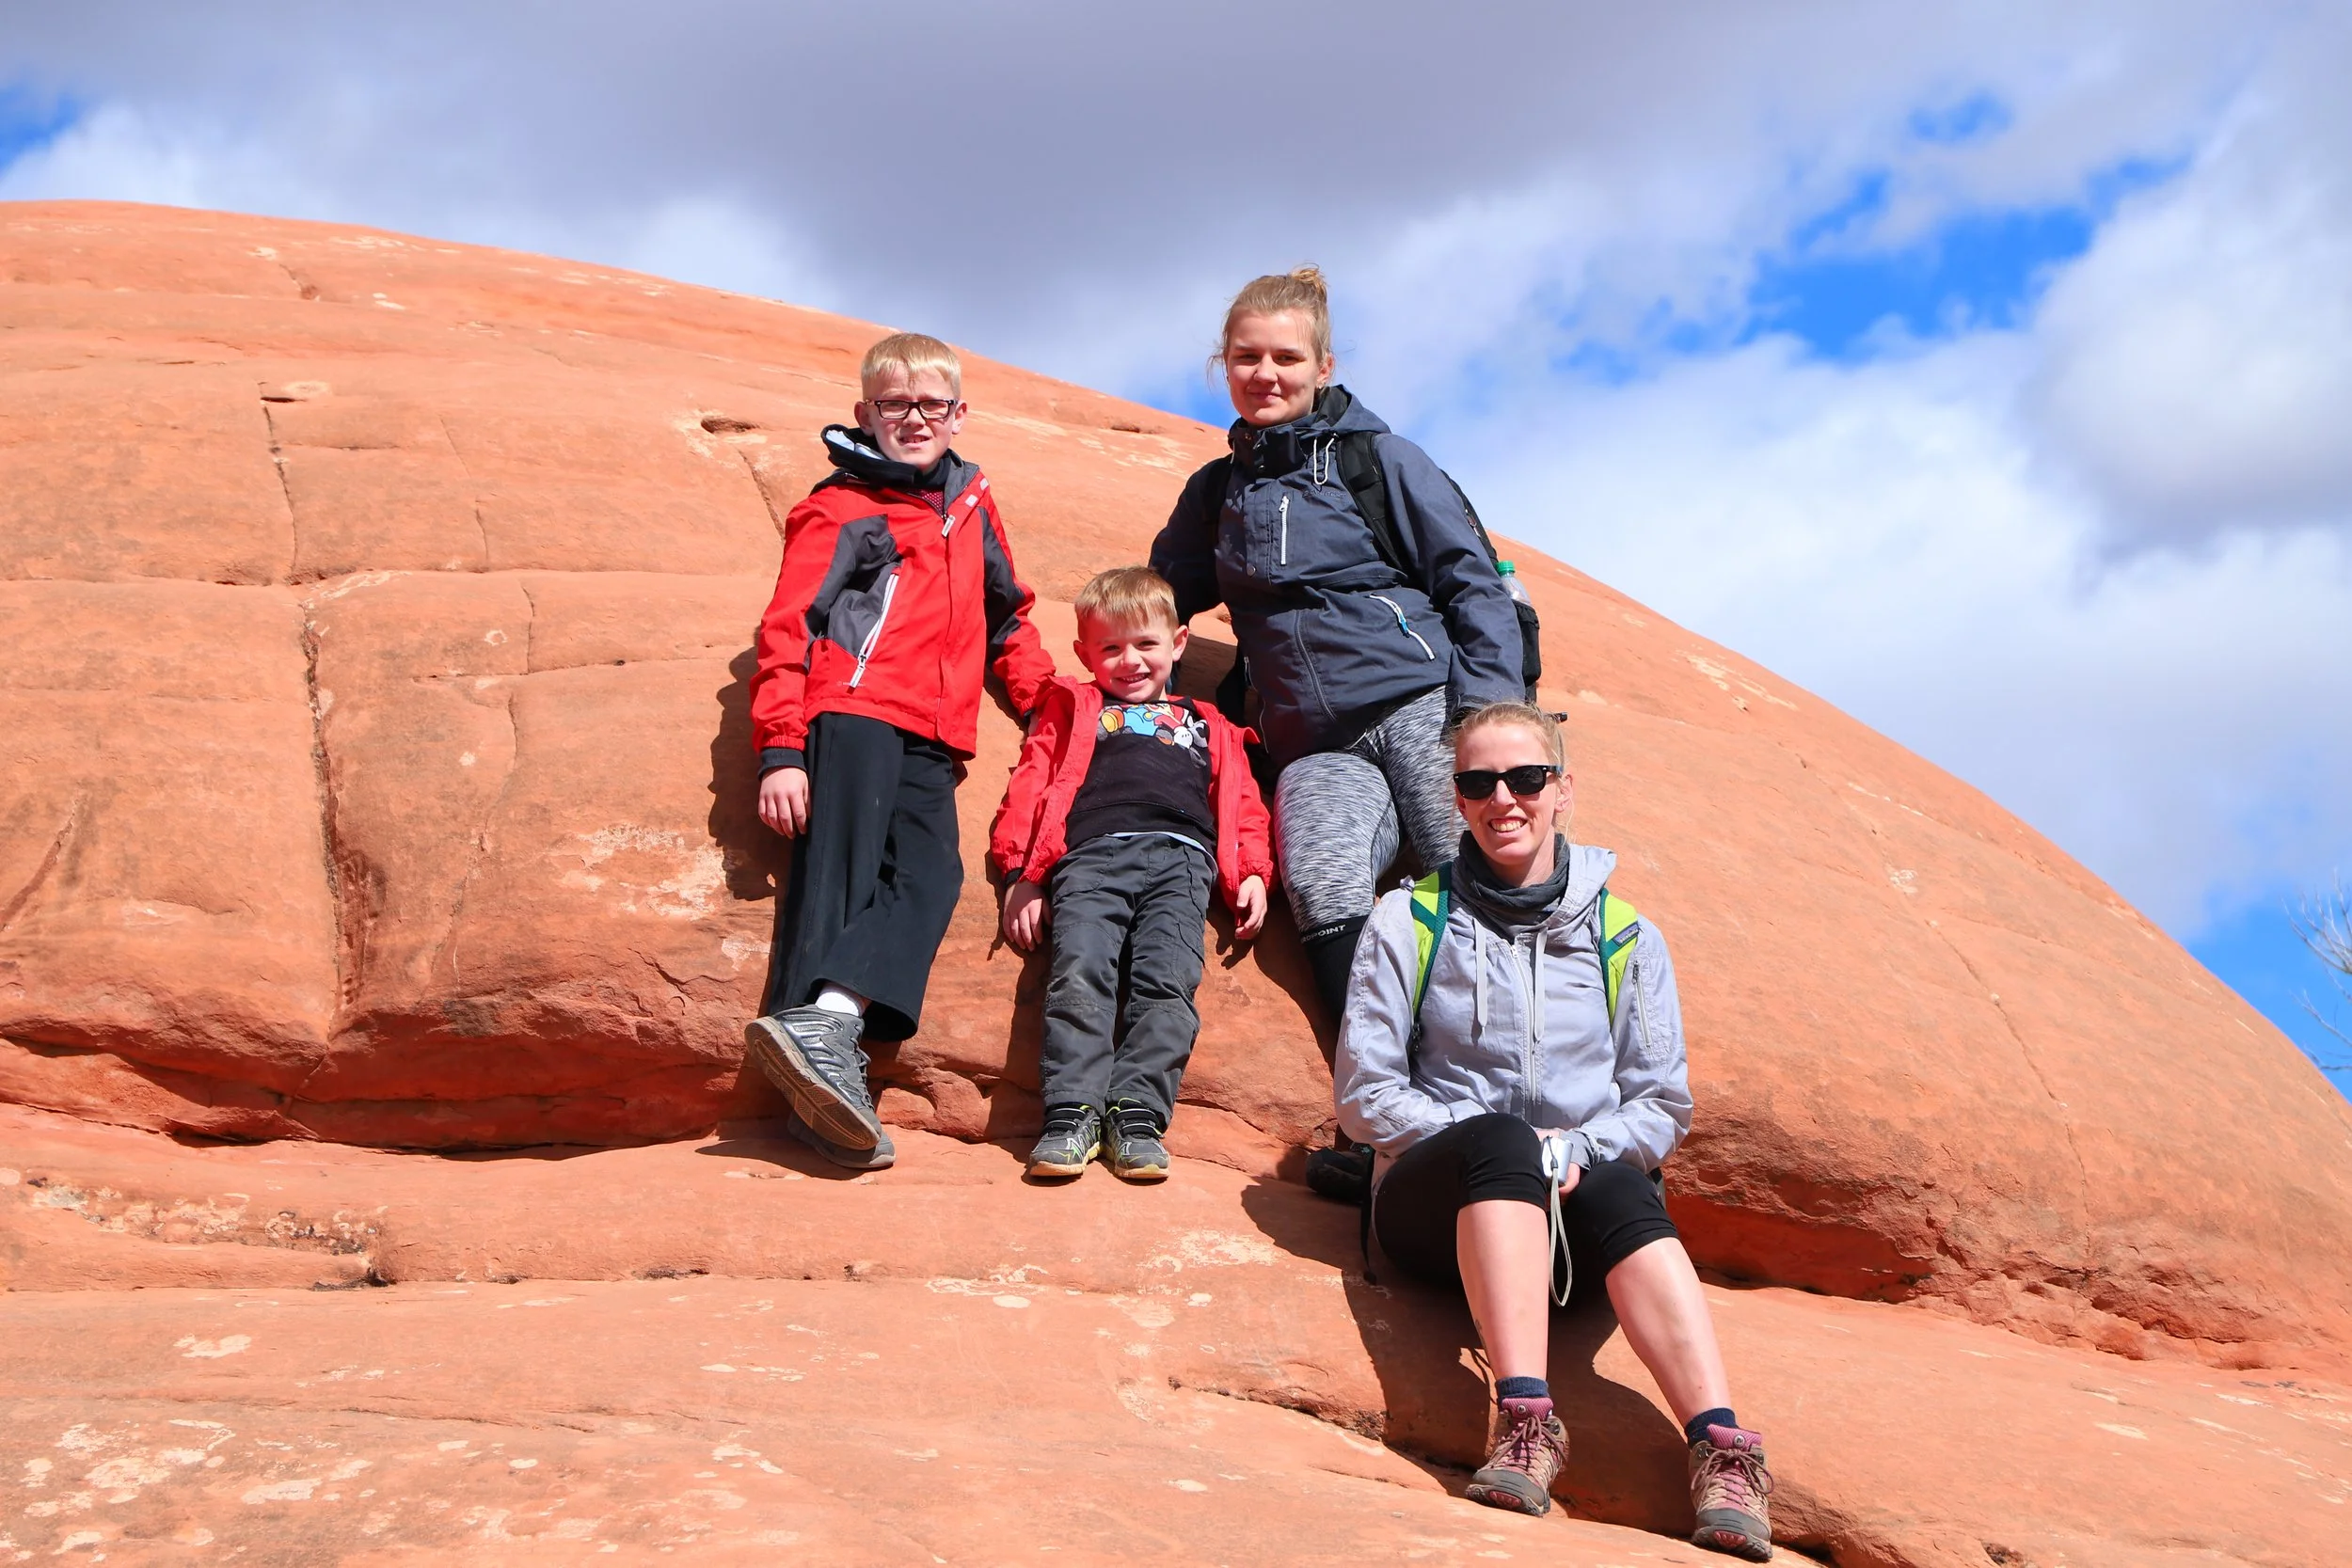
Family picture with two of our exchange students under Double Arch
The below picture is taken from Double Arch, looking back towards the parking area. The whole trail is visible, as well as the rock formations which make up North and South Window and Turret Arch.

As you look back towards your car from Double Arch, you will see the Windows and Turret Arch
North and South Windows and Turret Arch Loop
1.0 mile / elevation gain - 100ft

Turret Arch - Arches National Park
The Windows / Turret Arch Loop is a really easy trail that leads to beautiful and interesting arches, and this is a hike that everyone can do. Although I like Double Arch better, the trail itself around Turret Arch and the Windows is more fun.
If you are a hiker that likes longer treks, this may be a trail that you think you should skip. My advice would be to sneak it in at the end of your day (when you also do Double Arch). There are so many pictures of these arches (in hotel rooms, restaurants, and other places in Moab), that you’ll regret not doing this hike.

North and South Windows pictured from Turret Arch
These arches are fun because you can climb up into them. An arch that you can get up close to is so much more impressive than one seen off in a distance.

South Window
The one downside to this hike is the number of people - easier hikes are obviously going to attract a wider base of people. As most people will stop here first, my best advice to avoid the bigger crowds would be to stop here towards the end of the day (and again, I think you’ll appreciate Double Arch more when you are tired).

North and South Window - Arches National Park

View of Double Arch from North and South Windows
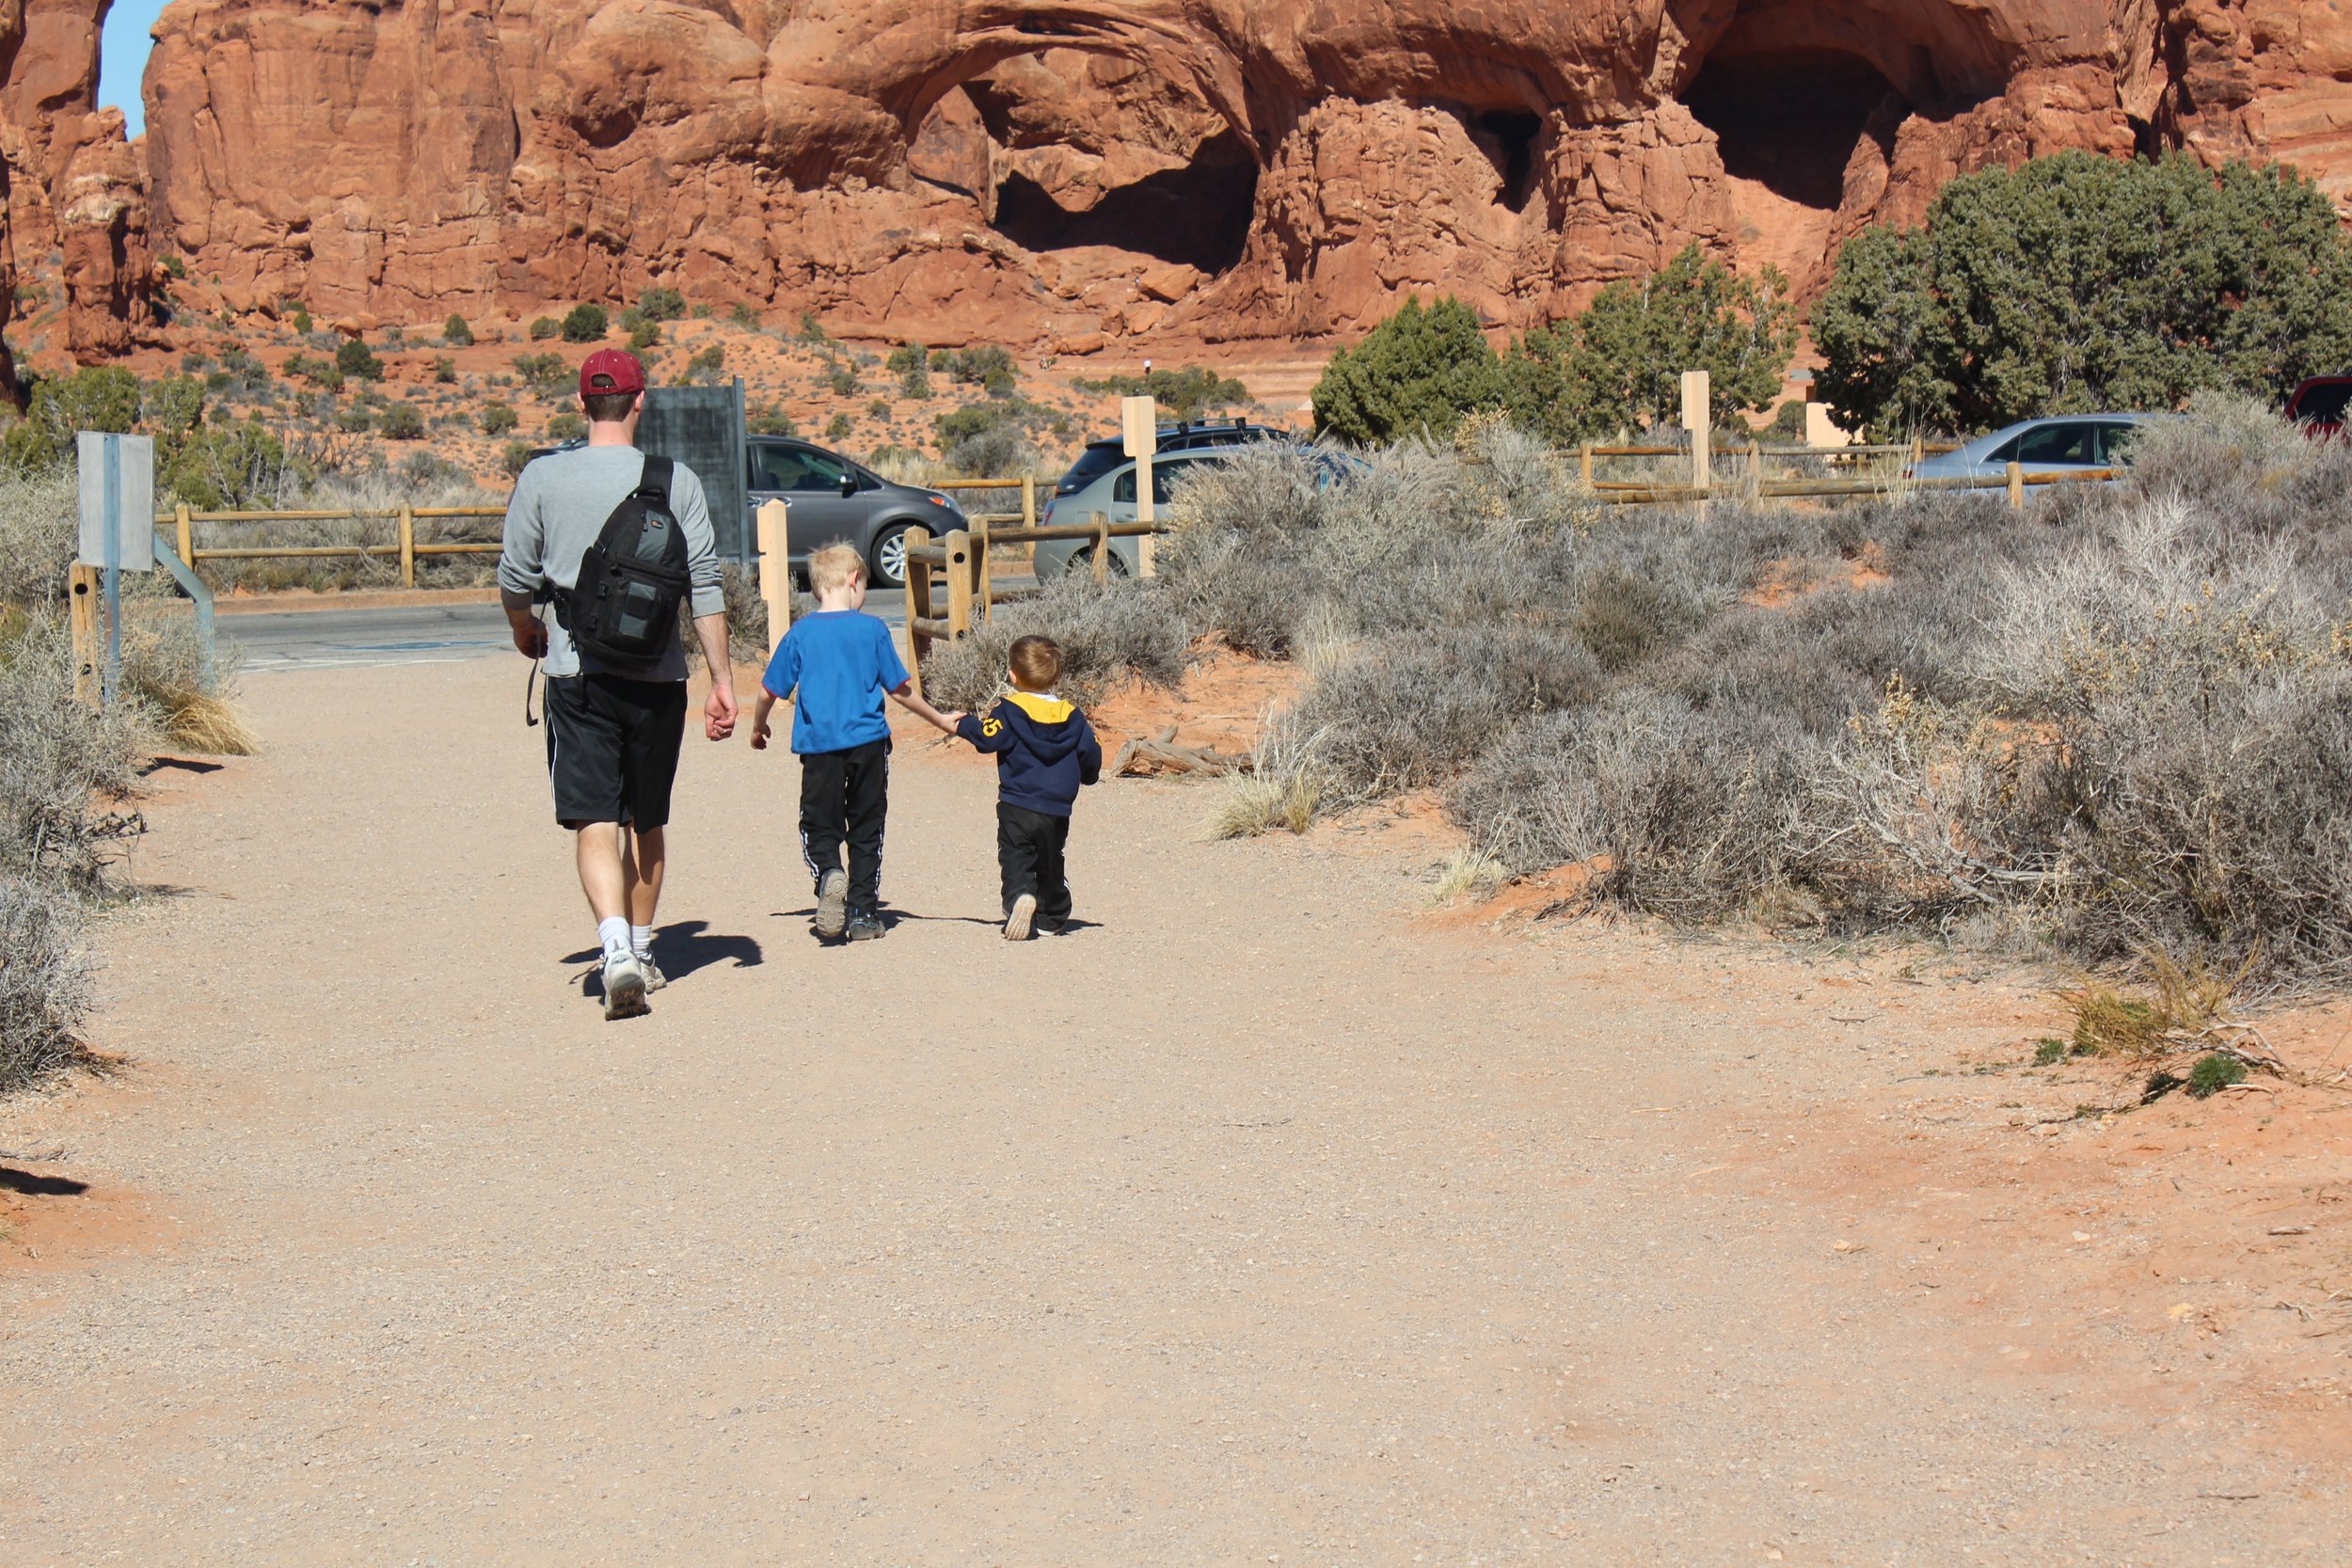
My hikers when they were still “littles” walking back to the car, with Double Arch visible in the background
Wolfe Ranch
The second fork in the road will be to the Wolfe Ranch. This section of Arches National Park features Delicate Arch, the iconic arch displayed on Utah’s license plates. There are three trail options to see Delicate Arch. The first trailhead is the main trail which goes to Delicate Arch. This is the trail where you can stand underneath Delicate Arch. If you take the road all the way to the end, there are two easier hike options to viewpoints of Delicate Arch. I’ve hiked to Delicate Arch twice. I haven’t yet been on either viewpoint trail.
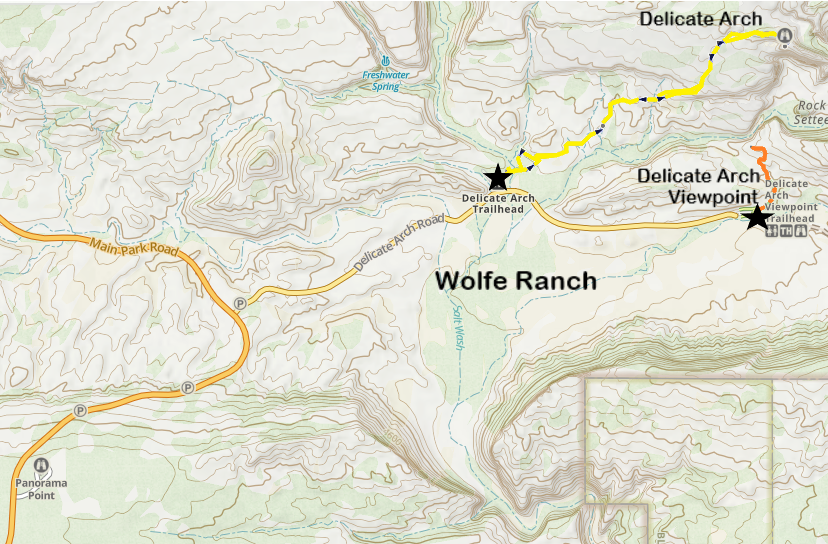
Wolfe Ranch Trailhead Map - Delicate Arch is the main attraction
Although I haven’t been to viewpoints of Delicate Arch, per the map, there are two choices. The first is Lower Delicate Arch Viewpoint, which requires a short 200ft trek with no change in elevation along a paved path. The trail to Upper Delicate Arch Viewpoint is 0.5 miles with an elevation gain of 170ft. Neither viewpoint trail connects to Delicate Arch.
Delicate Arch
3.0 miles / elevation gain - 480 ft
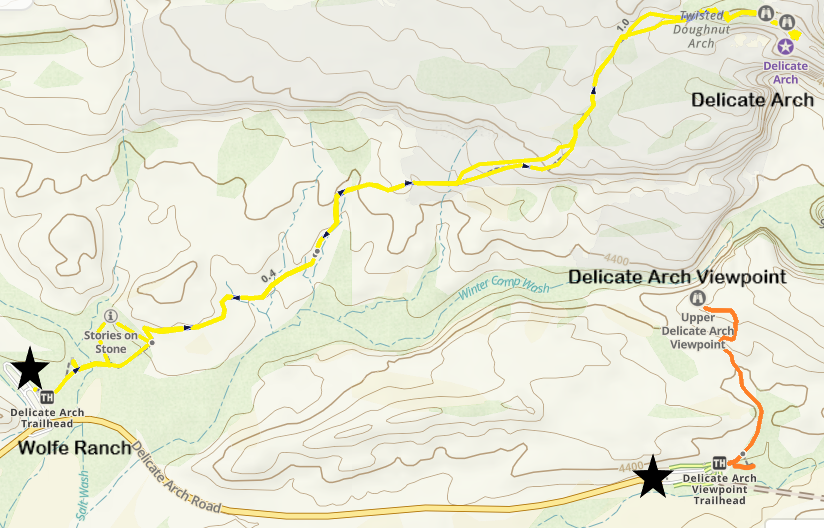
Trails to Delicate Arch (Moderate - Difficult) and Viewpoints of Delicate Arch (I haven’t hiked these yet)
The hike up to Delicate Arch is strenuous although it’s not long. There’s one section on slick rock that just goes straight up - no switch backs. Once you are the top, there are some pretty significant drop-offs from the trail that make me hesitant to say this trail is for everyone that can handle the climb. If you are afraid of heights - there are so many other arches in the park to see. Skip this one and hike at Devil’s Garden instead. If the slick rock is too difficult to hike up, pick one of the viewpoint trails.

Delicate Arch with the snow-covered La Sal Mountains in the background
Before you head out along the trail to Delicate Arch, there’s a few things to be prepared for. 480 ft in elevation gain over a 1.5-mile hike might not sound like a lot, but it’s all in one section, so it’s steep. The trail surface as you hike up is on what is known as “slickrock.” When this rock is dry, you’ll feel a bit like a mountain goat. As long as you are wearing good shoes or boots with traction you can walk up even steep slickrock with relative ease. When slickrock is wet, it’s sandy and slippery. This wouldn’t be a trail to be caught on when it rains, so, pay attention to the weather.
And I’ll state this on several of the trail reviews… It’s a desert, so you are likely to encounter the sun on this hike, and there won’t be much shade. Bring at least 2 liters of water per person. Hike early in the morning if you are hiking in the summer and consider throwing a couple of umbrellas in your backpack to bring a portable shade option.

Wolfe Ranch - Arches National Park
The trail to Delicate Arch starts next to Wolfe Ranch, and then goes past some well-preserved petroglyphs known as Rock Panel Art.

Rock Panel Art - Arches National Park petroglyphs
The scenery along the trail out to Delicate Arch is quite pretty. The first part of the trail is flat, but the surrounding landscape is not.

Beginning of Delicate Arch Trail
After the flat section comes the steep slickrock portion of the trail that I mentioned earlier. It feels as straight up as it looks, but once you get to the top, that’s it. The trail flattens back out again.

Slickrock portion of the trail to Delicate Arch
One other thing you notice from the picture above is the number of people. This is a really popular trail. Expect a crowd the whole way along this trail. This picture is from my first hike up in March 2016. Most of our pictures from 2016 include people I do not know, including those of Delicate Arch. Everyone wants their picture under it, thus it’s difficult to capture moments free of tourists.
My boys and I were back on this trail in March 2021 during the pandemic, and somehow, we stumbled on an almost empty parking lot. When we got to the arch, there was only one other group of four people. They took our picture for us and then left, leaving the three of us alone at Delicate Arch for the remainder of our visit - an unexpected and magical moment during a difficult year. As a result, I have several tourist-free pictures. I think it’s important to provide honest trail reviews. Don’t expect to be able to snag similar photos. You will most likely have strangers in your pictures due to the popularity of this hike.

Views from the slickrock portion of the Delicate Arch Trail
Even before you get to the arch - wow, wow, wow! I’d rank this as one of the best hikes in the country (minus the crowds).

Views along the trail to Delicate Arch
An epic trail comes with some pretty epic drop-offs. This surprised me on my first hike, so I’m sharing this picture. If you have made it this far, and are scared of heights, I’m sure you would be very frustrated. The trail continues for a bit like this. You can see I had my son intentionally walking on the inside of the trail, and that it is wide enough for two people side by side, but still, it’s a long ways down.

Backside of the trail to Delicate Arch (just before getting to see the arch) - Steep drop-off
There is a large window along the trail. If you look through it, you will see the La Sal Mountains (first picture). Keep peering around the corner of the window (second picture) and this is your first glimpse of Delicate Arch.

Window along the trail to Delicate Arch

Same window as above with a different angle - this is the first view of Delicate Arch along the trail
Once you get to Delicate Arch, there is plenty of space to sit down on the flat rock surface and enjoy the view.

Delicate Arch - March 2021
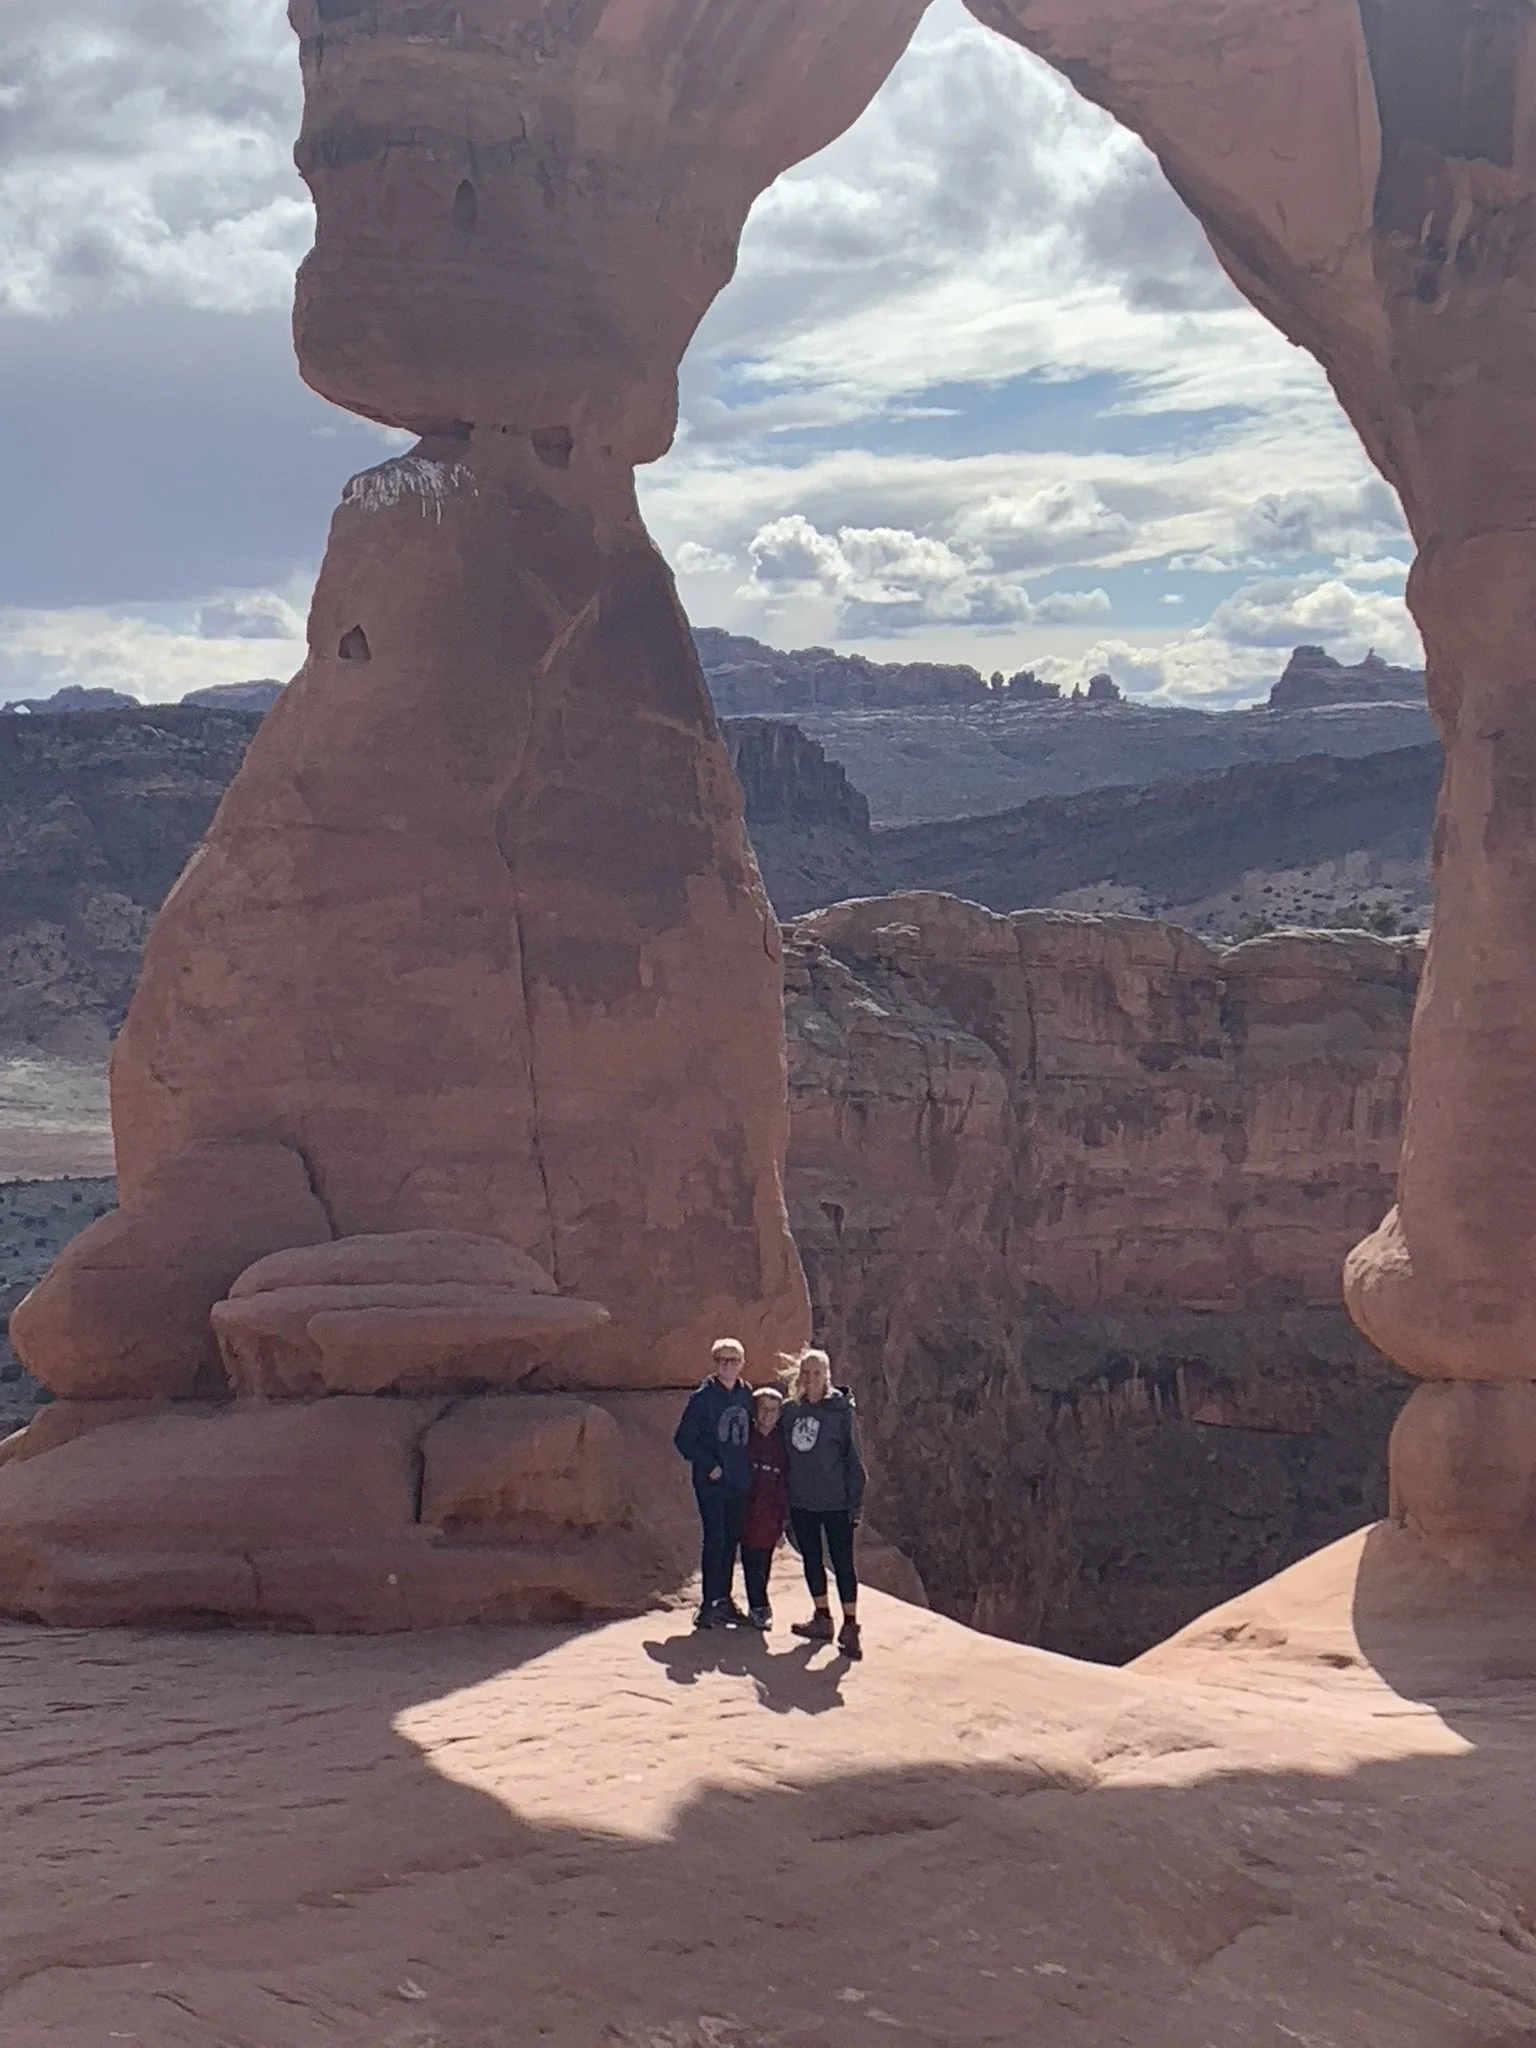
Delicate Arch - March 2021

Delicate Arch - March 2021
Fiery Furnace
The third fork in the road will be to Fiery Furnace. This is a special section of Arches National Park that is protected from the number of visitors that enter each day by a permit system. The permits are cheap, and the only requirement to hike is to watch a video on how to minimize our footprint on this special land. But some pre-planning and luck are needed to “win” the permit lottery. On our sixth trip to this park, we finally were able to visit the Fiery Furnace. It was worth the wait!
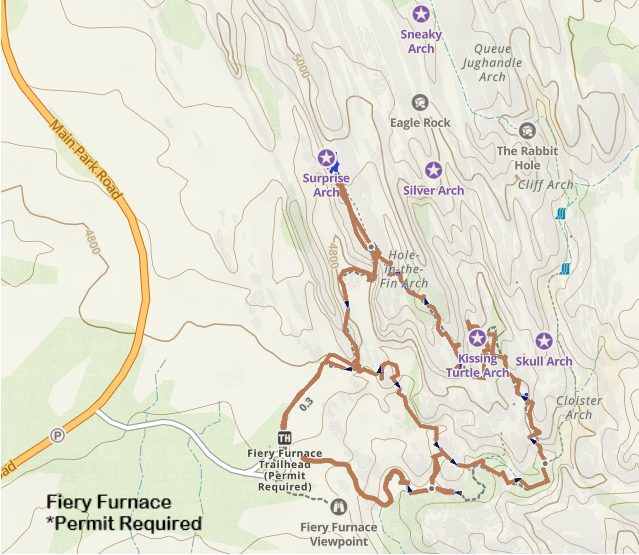
“Map” of Fiery Furnace - there is no defined trail. This is a trace of our steps.
Permits are purchased from the Arches National Park website. Go to the website, take a look at how far in advance permits can be booked, then set a calendar reminder on your phone to go off at 8am (Mountain Time) on the first day you can reserve permits for your planned trip. Have an account already established with the National Park System. Log in right away when your alarm goes off. These permits sell out fast!

View of the Fiery Furnace from the parking lot
Once you have your permit, you will display it on the outside of your hiking bag, and then you are free to explore the Fiery Furnace area.

Entering the Fiery Furnace
I have a map of our steps, but there are no trails defined in this region of the park, so each hiking group will have a different milage and elevation gain. Hiking through the Fiery Furnace is an adventure in selecting where to wander (as long as you stay on rock and sandy surfaces). That’s part of how the Fiery Furnace is protected.

Exploring Fiery Furnace
In general, I would rank this section of the park as a moderately difficult hike. There isn’t likely going to be much elevation gain, but there will be a lot of rock scrambling, and navigating over, under, or through obstacles. Because there is no trail, this is going to take a bit of courage as well. You will feel very exposed to the wilderness.

Getting a little lost in the beginning while in awe of the rock formations
There are lots of websites you can Google to “learn” how to navigate through the Fiery Furnace. There are downloadable maps available as well. There’s also a Ranger-guided option through the Fiery Furnace that you can select when you purchase your permits. I chose none of this. I wanted to enjoy this special place with my boys on our Spring Break trip in 2023. I wanted to get lost, figure out how to get unlost together, explore every interesting nook and cranny, and simply just be. This was a little intimidating of a decision to have made. At points in our morning, it was not obvious where to go, including frankly just how and where to get started. But we had a fantastic time wandering. We did make it out, and this was one of the highlights of our trip.

First of several tight squeezes
Although I did not have a marked trail, downloaded map, or guidance on where to go, I did have my GAIA GPS app running, which was tracking our steps, so I knew exactly where the car was, and at worst, I’d be able to retrace my steps to get back. We didn’t end up needing to use it, but I did have it running in the background on my phone while we hiked.

Disappearing into the rocks
Eventually we noticed small white arrows throughout the Fiery Furnace. The arrows are not obvious in several locations. We missed the intended beginning, and didn’t quite understand that the arrows were there to help us as the first arrow we encountered was point us back in the direction we had just come from. I’m not sure what we missed at the beginning, but once we realized there were arrows, finding them was half the fun, and it did help with some of the more stressful worries of feeling like we really could get lost.
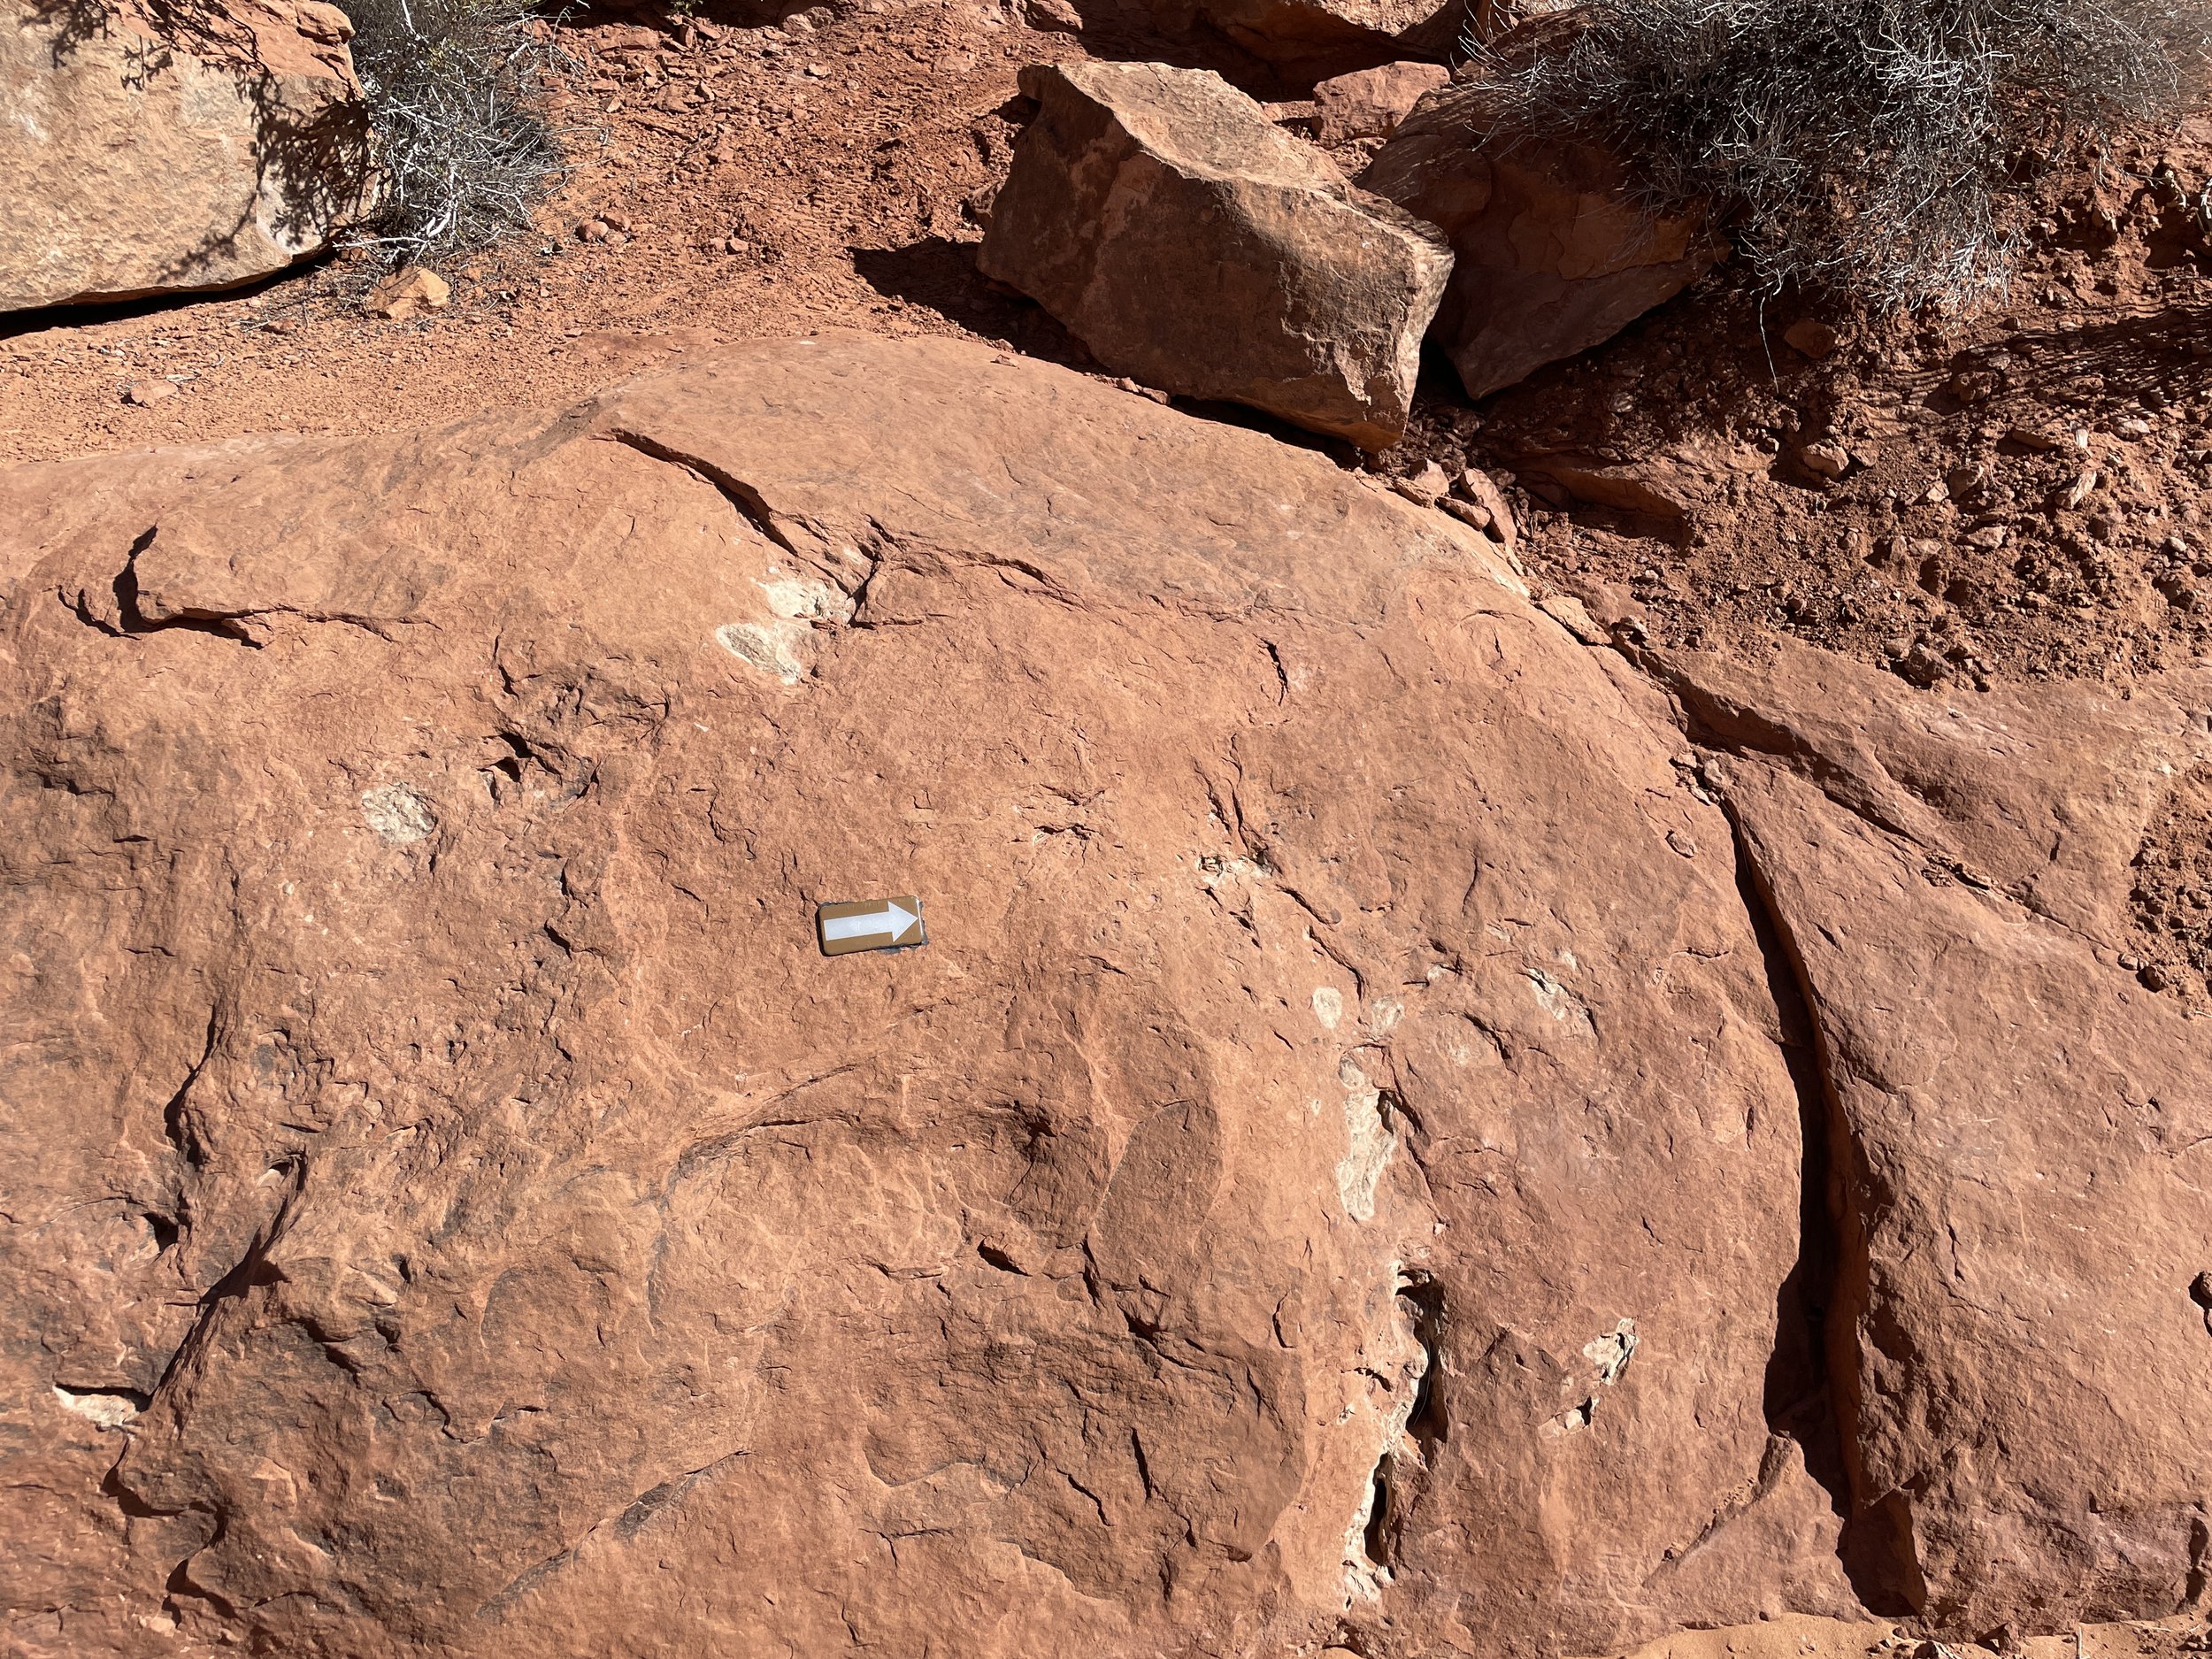
Subtle arrows mark out a loop that can be followed to explore the Fiery Furnace
Because you can only walk on rock surfaces and sandy washes, there were moments we had to turn around and backtrack. This was one of those places. There isn’t a “wrong direction,” but some choices are going to require some extra steps to continue exploring.

Exploring a sandy wash in Fiery Furnace
Sometimes we would follow an arrow down what seemed to be the obvious intended way, and we’d get to an opening and then have no idea where to go. So, we would start on the right side and explore that as far as we could, then go back and try the other side. Eventually we would find another arrow.
Lots and lots of incredible hoodoos
We had such a blast truly exploring this part of the Park.

Playing here as we explored down a dead end
There are a couple of signs marked “Dead End”. My best advice if you see one is to follow it. You will find arches at the end. Then turn around and head back.

Surprise Arch - we enjoyed lunch here and didn’t see another hiker back here the whole time.
I’d highly recommend the Fiery Furnace, especially if you are hiking with older kids. I can’t put into words how much fun we were having as we navigated through this quiet wilderness full of incredible rock formations.

I had a lot of fun exploring this special place as well!
Sand Dune Arch
Sand Dune Arch is an awesome short trail option. This trailhead is just a pullout from the main road, a little bit before Devil’s Garden and the campground. For a slightly longer option, there is a trail out to Broken Arch.
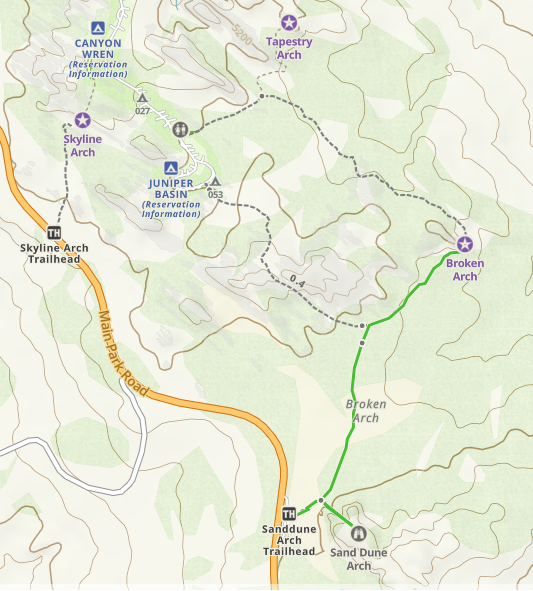
Map of the Sand Dune Arch Trailhead - the main attractions are Sand Dune Arch and Broken Arch
Sand Dune Arch
0.4 miles / elevation gain - 0 ft

Sand Dune Arch
This trail is fantastic for the youngest of hikers. I think Sand Dune Arch is the most accessible arch in park, and the trail takes you right under it. Plus, there is sand everywhere, so tons of opportunity to play. The trail is short and flat with shade, and it’s guaranteed to be a hit with your littles. There are even some tight spaces to squeeze through and explore nearby.

Hiking Sand Dune Arch with my parents
Broken Arch
2.3 miles / elevation gain - 60ft

Broken Arch off in the distance
Technically I’ve only seen Broken Arch from the trail to Sand Dune Arch, but if you want to keep going along the trail, you can walk all the way to the arch. If you are looking for longer easy hikes, I’d recommend Landscape Arch (see below).
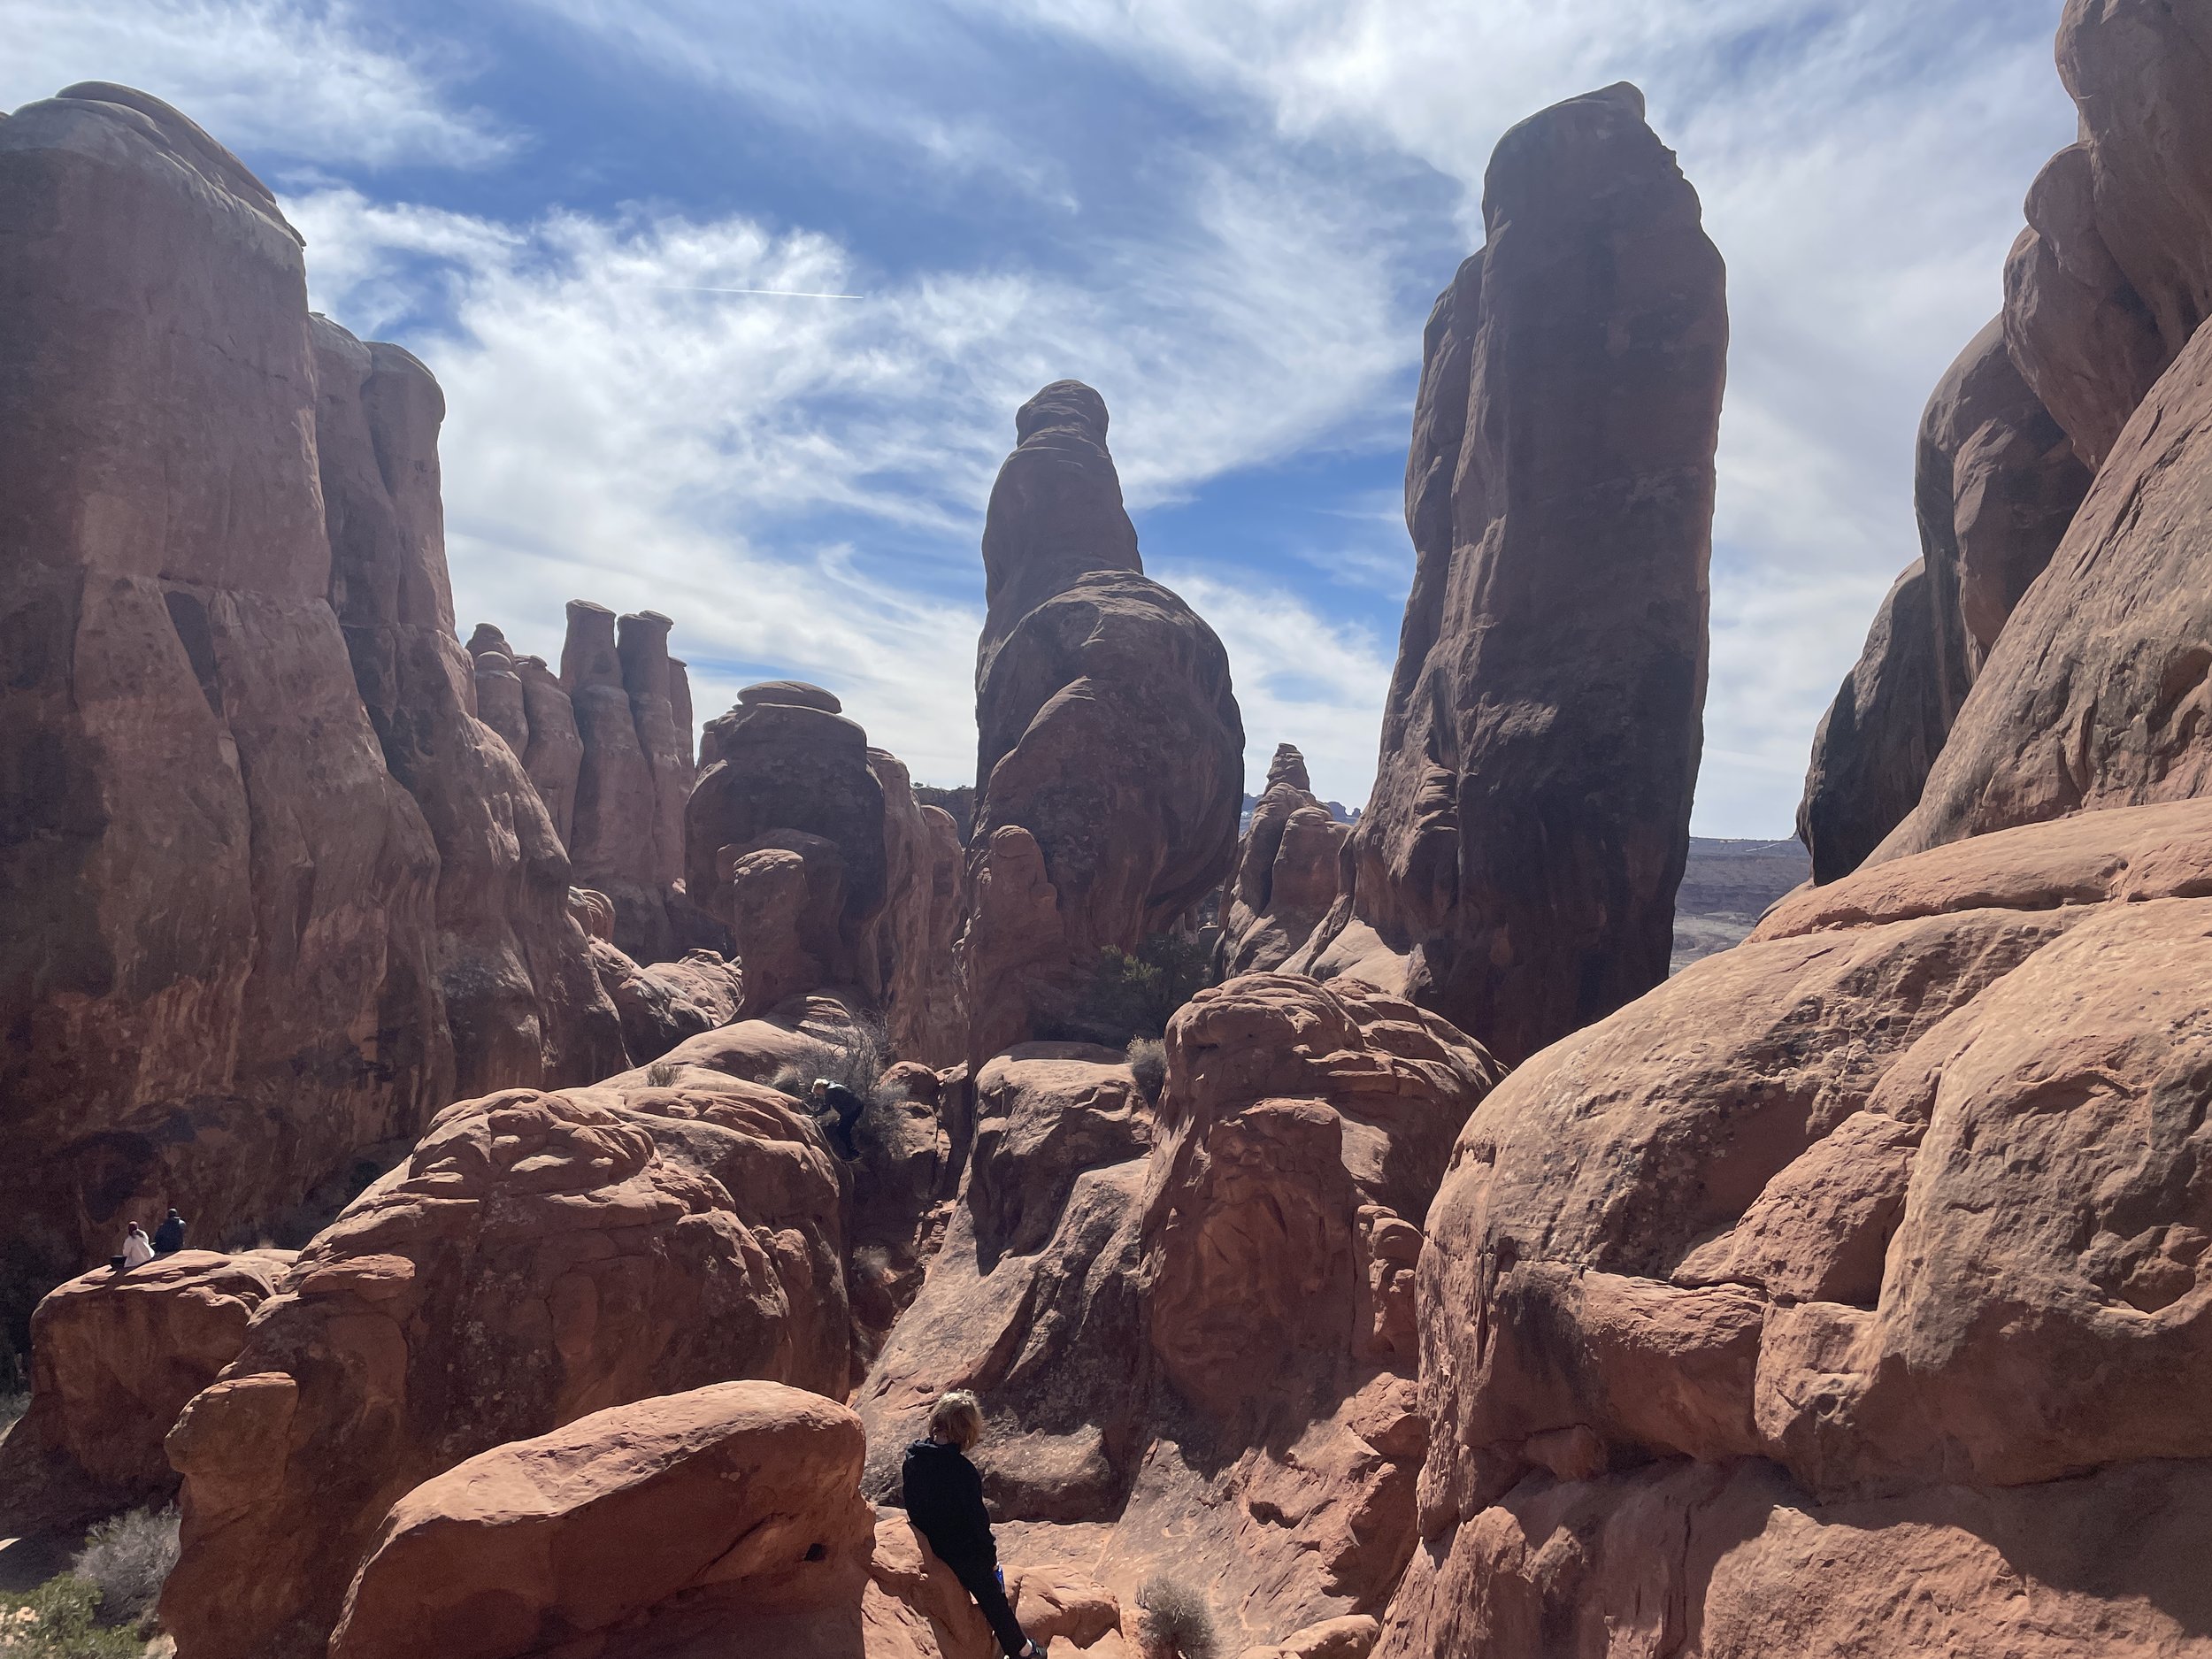
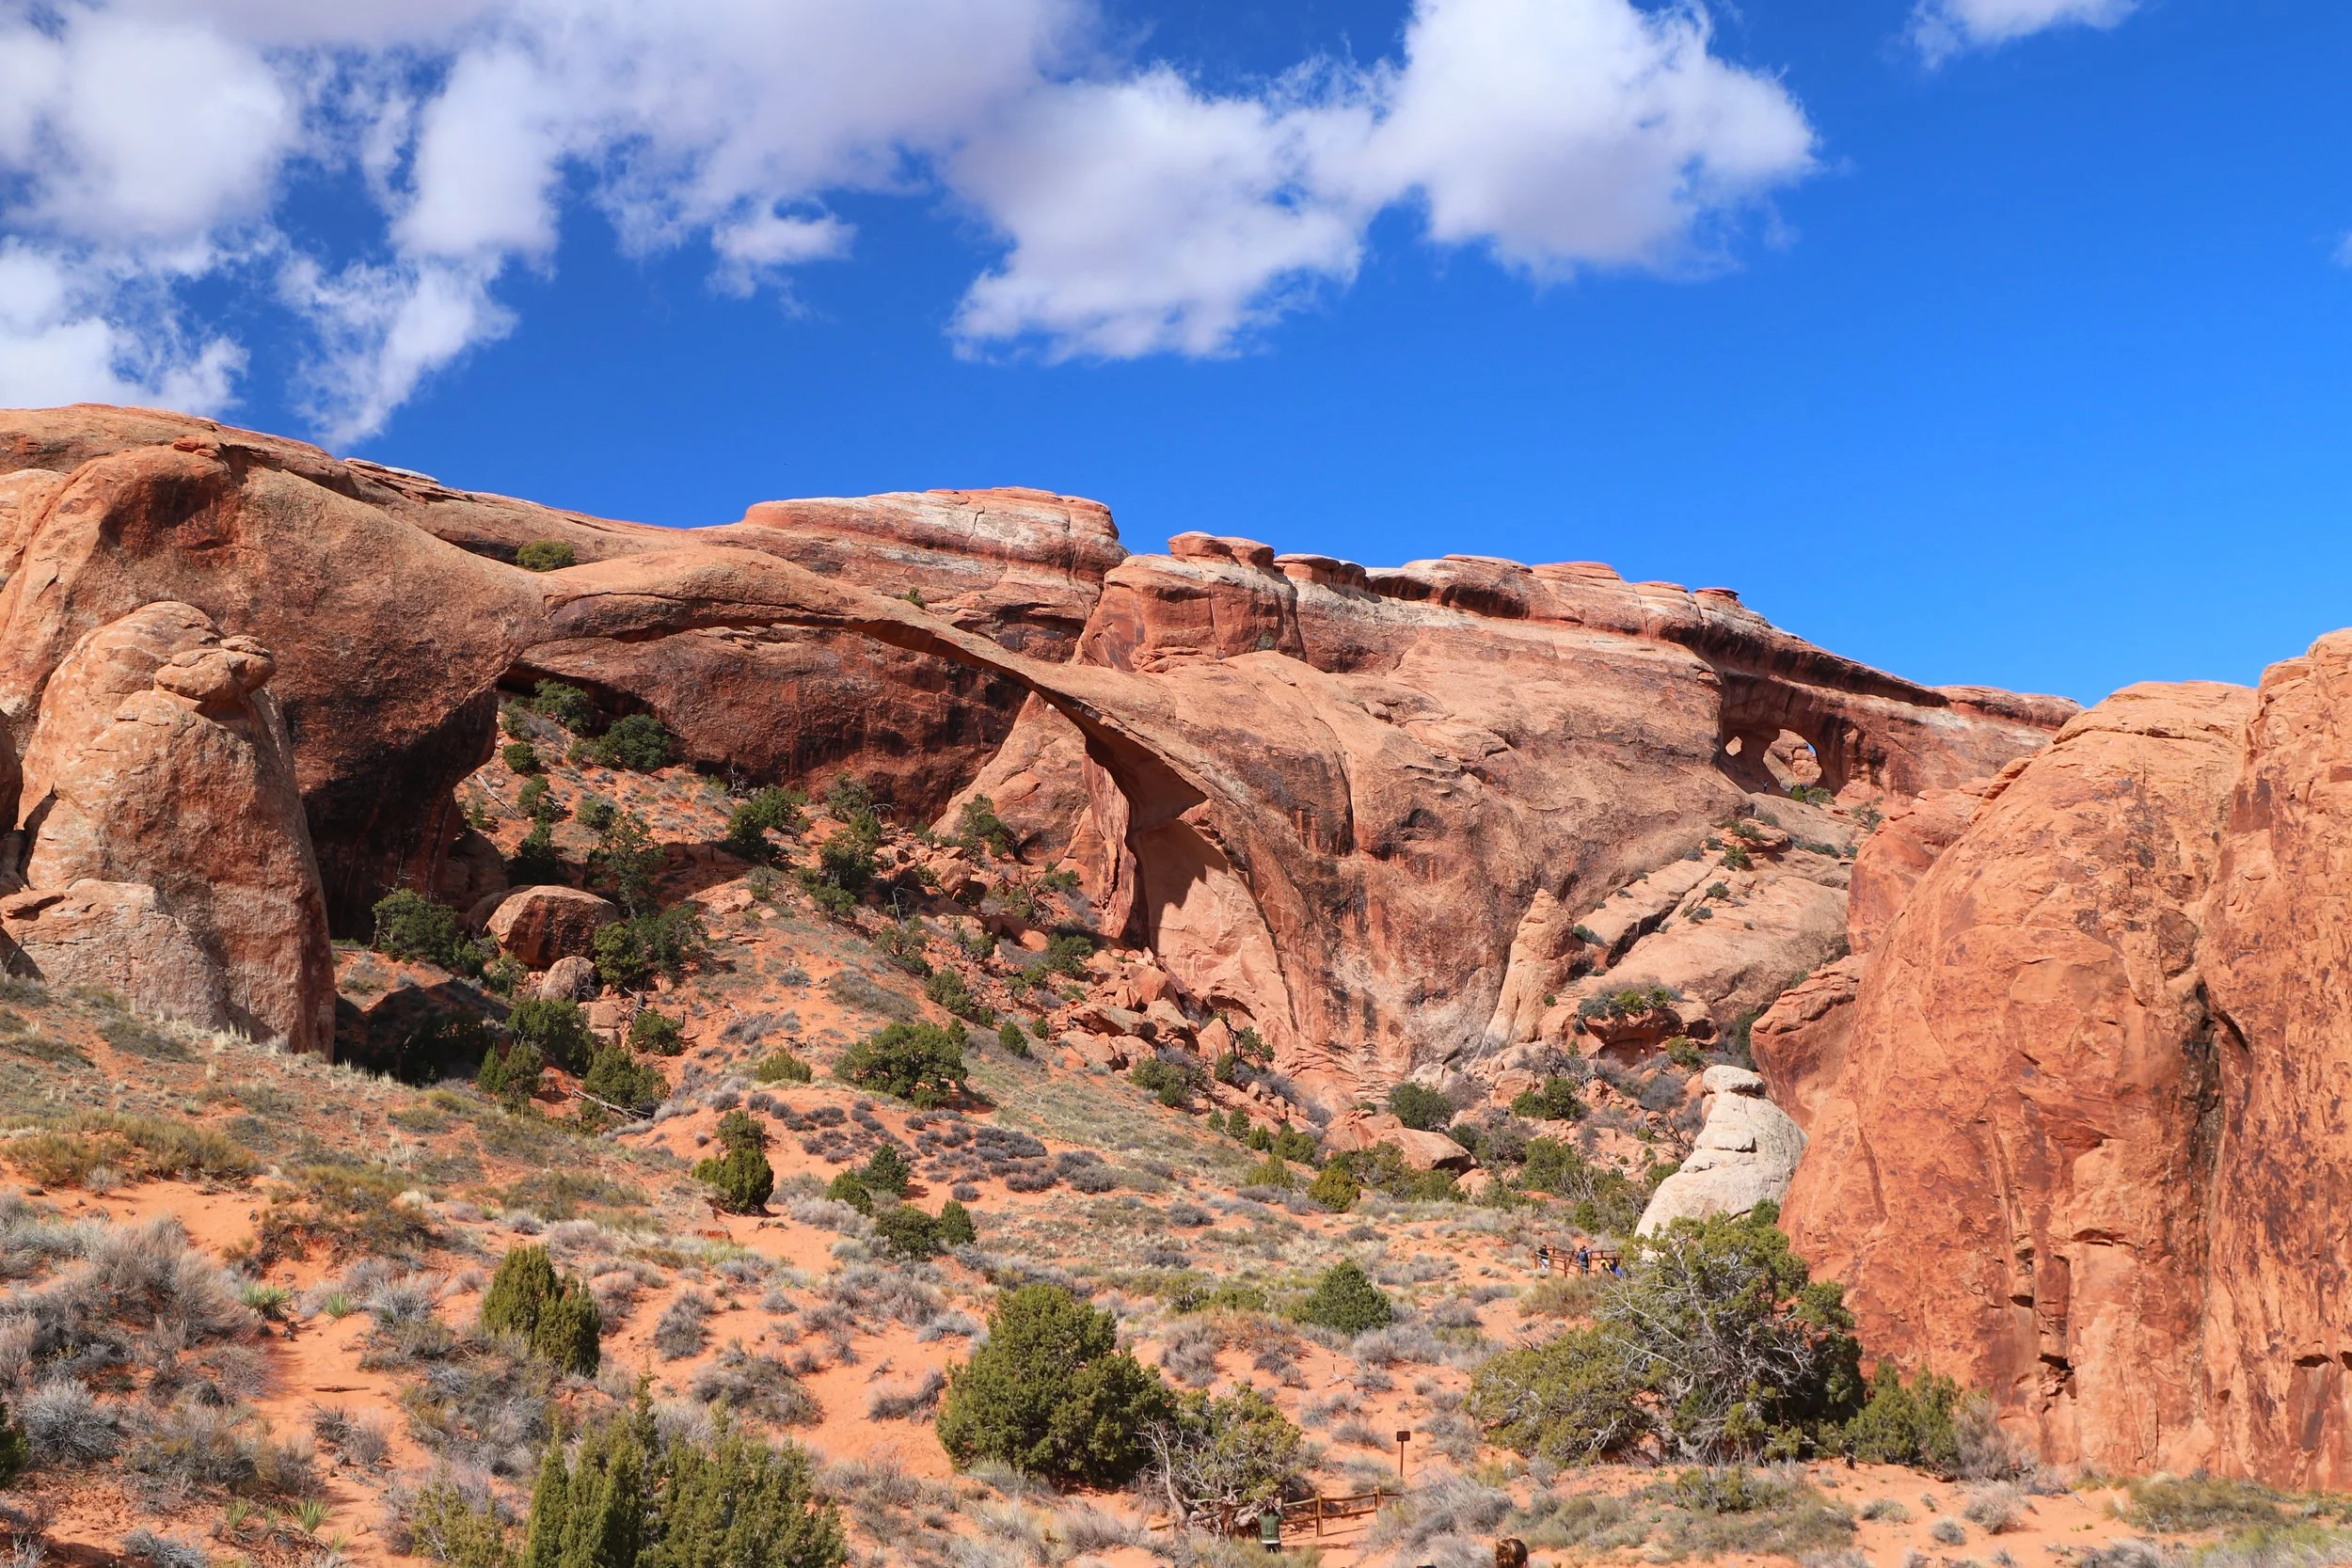
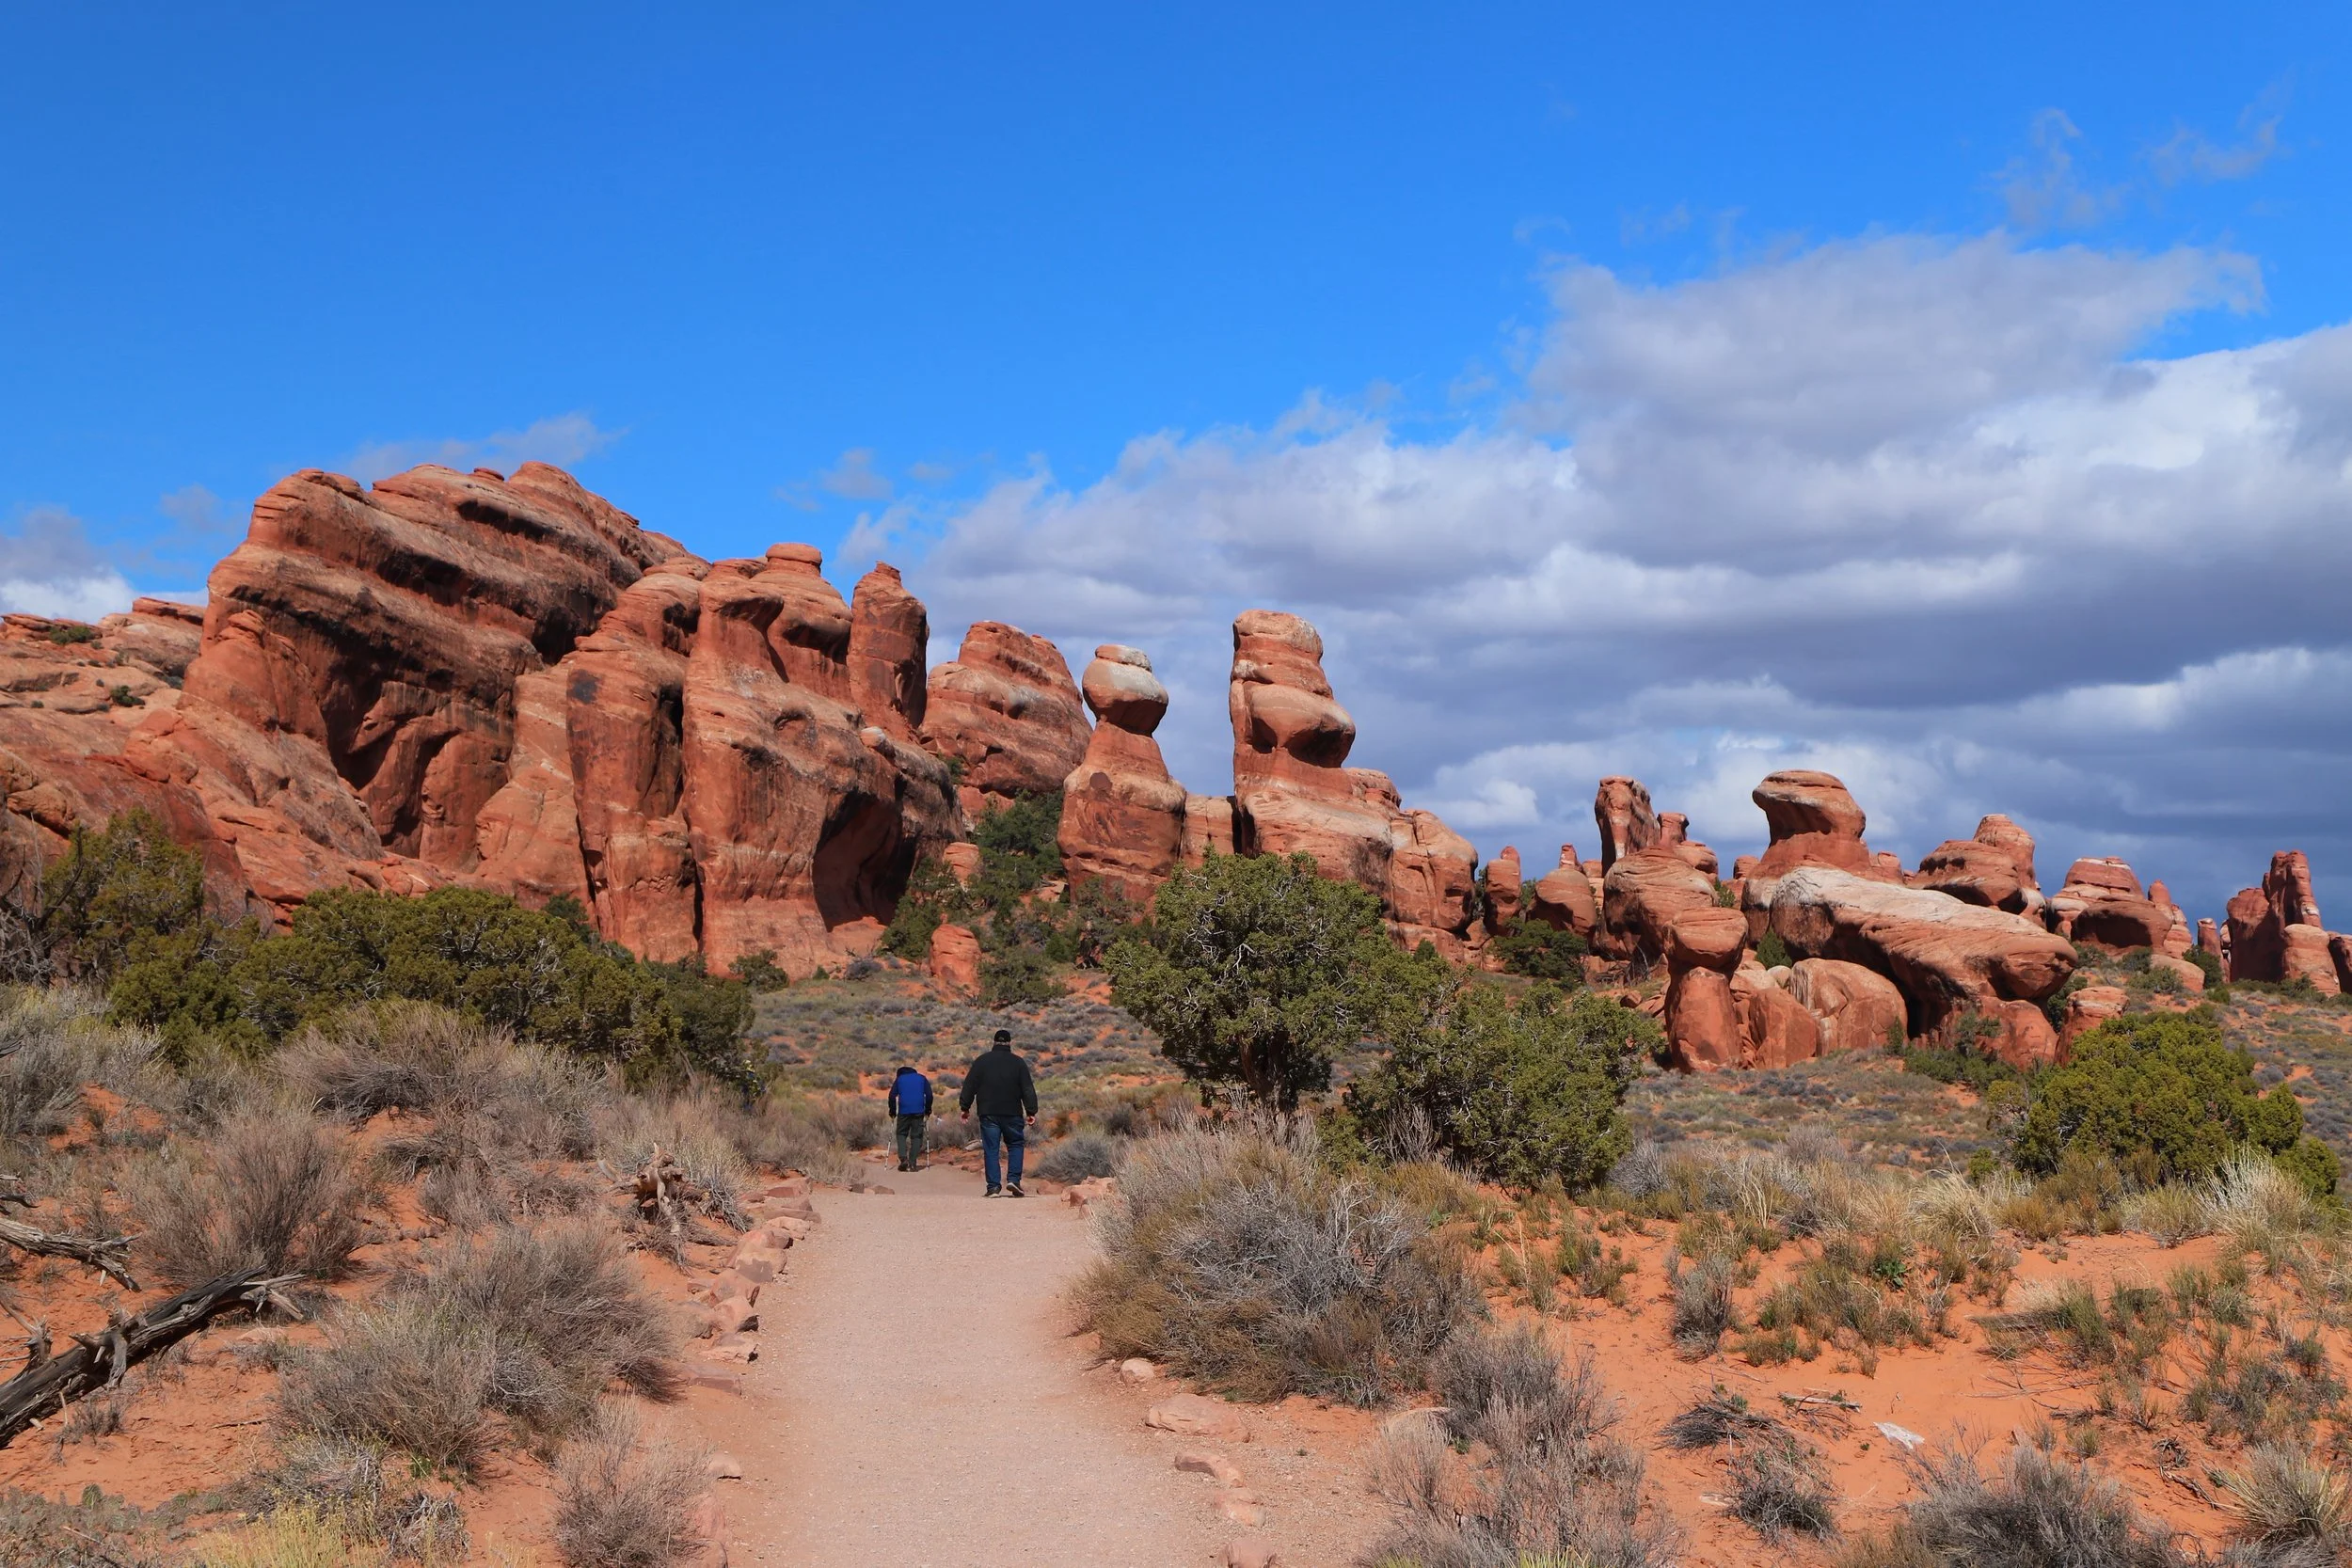
Devil’s Garden
At the end of the main road is Devil’s Garden. The second most famous arch (after Delicate Arch) is Landscape Arch - the longest arch in the United States, and fifth longest in the world. This arch is visible from the Devil’s Garden Loop from a distance. It’s protected. You will be able to see it well but not get anywhere it. My favorite arch in the park is also found on this trail - Partition Arch. This is a moderate hike and it does require a bit of rock scrambling and squeezing.
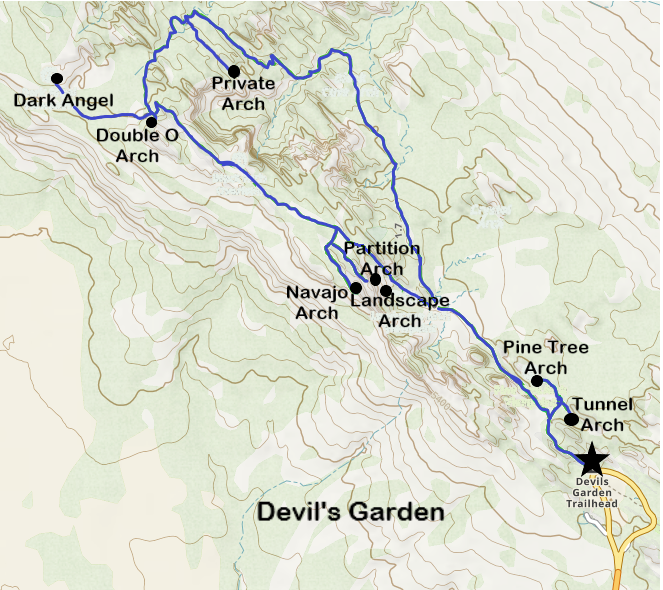
Map of the Devil’s Garden Trailhead - Main attractions in order clockwise are Tunnel Arch, Pine Tree Arch, Landscape Arch, Partition Arch, Navajo Arch, Double O Arch, Dark Angel, and Private Arch - I have made the loop, but not the spur trails to Dark Angel or Private Arch
Tunnel Arch
0.4 miles / elevation gain - 100ft (one way - distance from the parking lot)

Tunnel Arch
The first arch you can see in Devils Garden is Tunnel Arch. The trail is very easy with no change in elevation. The only thing to get used to is walking along sand.
A short spur hike from the main trail is required to see Tunnel Arch.
Pine Tree Arch
0.6 miles / elevation gain - 100ft (one way - distance from the parking lot)
0.2 miles from Tunnel Arch
Pine Tree Arch can be viewed from the same spur trail as Tunnel Arch, just keep walking an additional 0.2 miles. For those that want to stick with easy trails but might want to hike a bit further, the spur to Tunnel Arch and Pine Tree Arch is a nice option to combine with Landscape Arch.

Pine Tree Arch
Landscape Arch
0.9 miles / elevation gain - 150ft (one way - distance from the parking lot)
(Round trip combining with Tunnel and Pine Tree Arches is 2.3 miles)
Landscape Arch - the largest arch in the United States
At 290ft, Landscape Arch is the longest arch in the United States. This is a relatively easy trail, although the hike out and back is almost two miles. There is a slight elevation gain, but it’s gradual.
It is also protected, meaning you can’t get under this arch, nor can you view it from the other side. The picture above was taken with a zoom lens. The arch is a ways off of the trail.

Landscape Arch
As you approach Landscape Arch, and when you take the spur to the viewpoint, it’s actually difficult to get a good photo due to the rocks behind it. It’s hard to see that it’s an arch. Don’t turn around yet. Keep going just a short distance further on the Devil’s Garden loop trail, past the spur to the viewpoint. You’ll get a better picture with just a few extra steps.
View of Landscape Arch from the viewpoint - go back to the main trail and walk a bit further to get the best pictures of Landscape Arch before turning around to return to the parking lot.
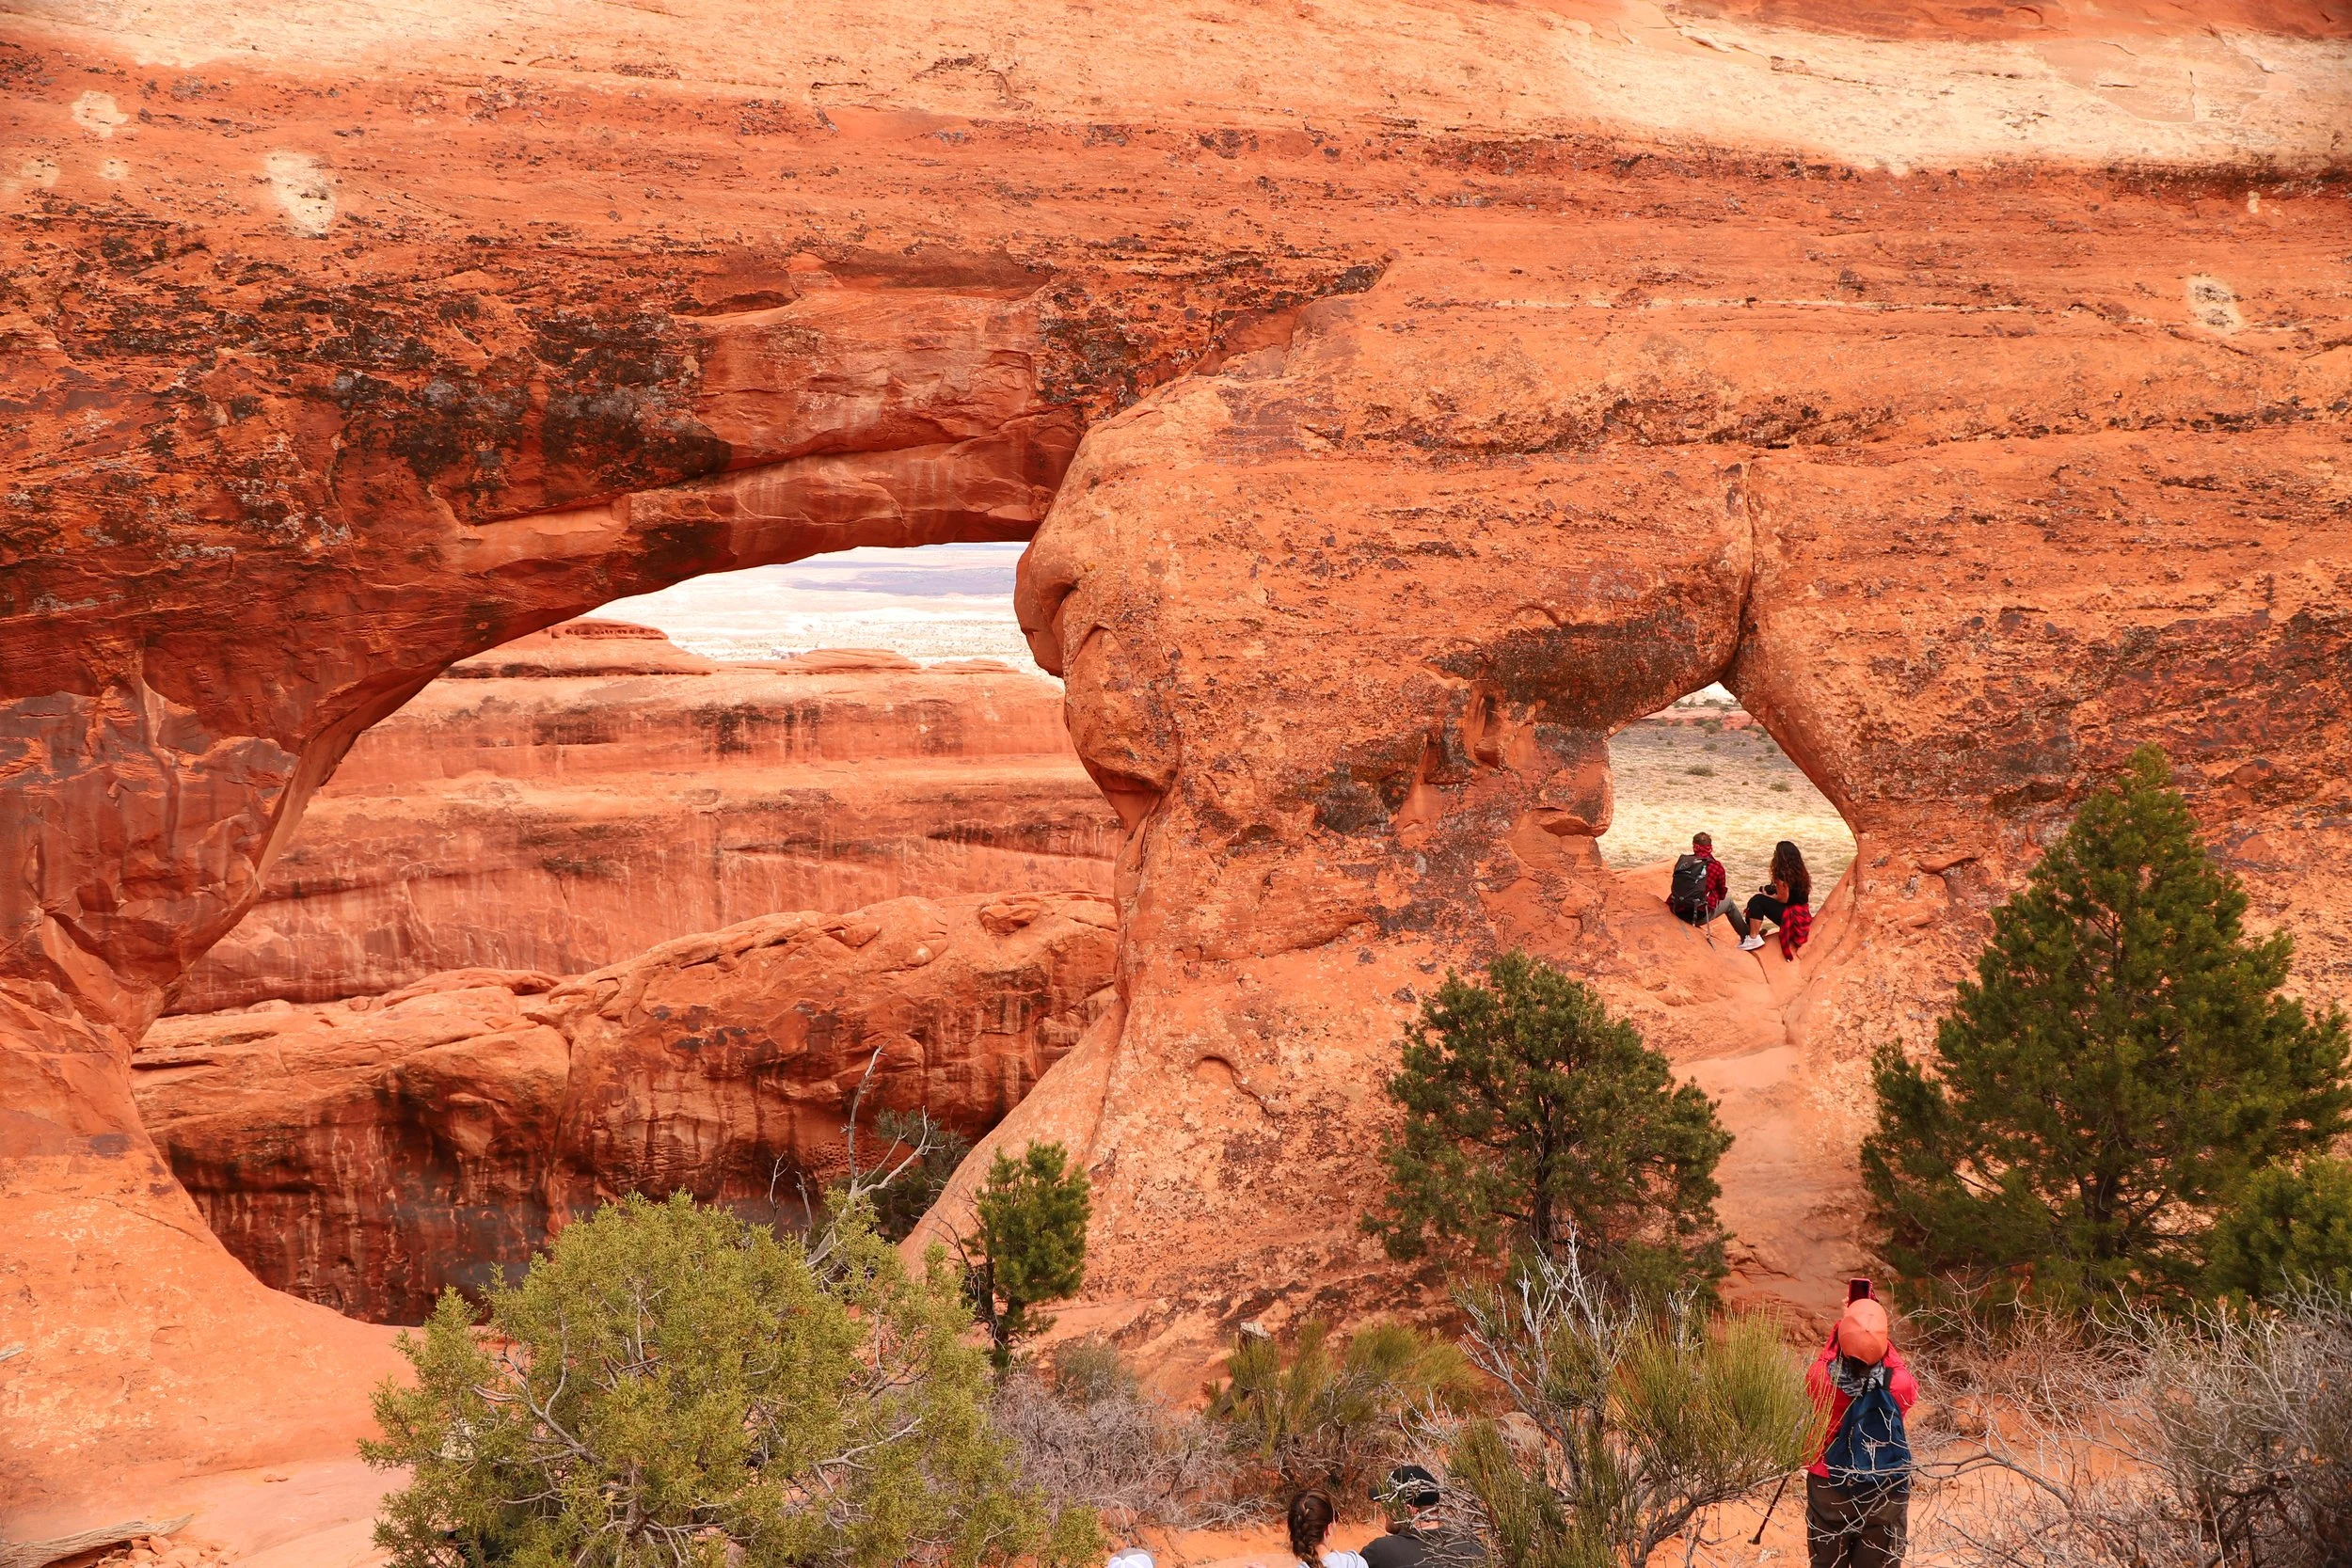
Partition Arch / Navajo Arch
1.4 miles / elevation gain - 350ft (one way - distance from the parking lot)

Partition Arch
Out of all of the arches in the park, Partition Arch is my favorite. I came here for the first time while I was in freshman in college with a group of other students. I fell in love with this park instantaneously. But I was 18, overwhelmed by absolutely everything, and was simply following where others who had been here before were guiding us while in the park. After the trip, I knew that I’d seen Landscape Arch, but I couldn’t tell you what the names were of any of the other arches I had visited. And that began to be a problem, as I thought about this particular arch over and over again.
I didn’t get to visit Arches again until 2014. I thought for sure that we would see this arch if we simply hiked to Landscape Arch again. We did not find it though because we hadn’t gone far enough, but I was stumped as to where it could be. We came back again in 2016, primarily to hike to Delicate Arch, but also, I wanted to keep looking for where this unknown arch might be located. This time, when we hiked to Landscape Arch, I noticed an arch visible on the hill to the right of Landscape Arch. I was hiking with my 10-year-old and my parents, and we’d already used up the allotted number of steps in our day, so this is where we turned around…. but I was already planning my next trip back with intent on exploring that arch on the hillside.
Partition Arch is the hole in the rock on the right upper part of the hillside - Landscape Arch is on the left side
So, in 2018, here we were again, and this time we were hiking the whole Devil’s Garden Loop, which included a spur trail to explore that arch on the cliff, and (cue dramatic moment music), I found out the arch I’d been picturing so clearly for 18 years is known as Partition Arch.

Hiking to Partition Arch
There is one tight squeeze on the way to Partition Arch. It’s not tall enough to be a slot canyon, but if feels a bit like one.
If you are hiking the Devil’s Garden Loop (rather than simply out and back to Partition Arch), you will need to take a short spur trail. There is a second spur trail to Navajo Arch, which I’ve been to as well, but I must not have taken any pictures of it.
Partition Arch - Arches National Park
I think the reason Partition Arch is my favorite is that not only can you walk under it, there is a sandy section where you can sit and rest off on the right side of it, completely hidden. The arch is huge, and the view both behind it and through it is amazing.
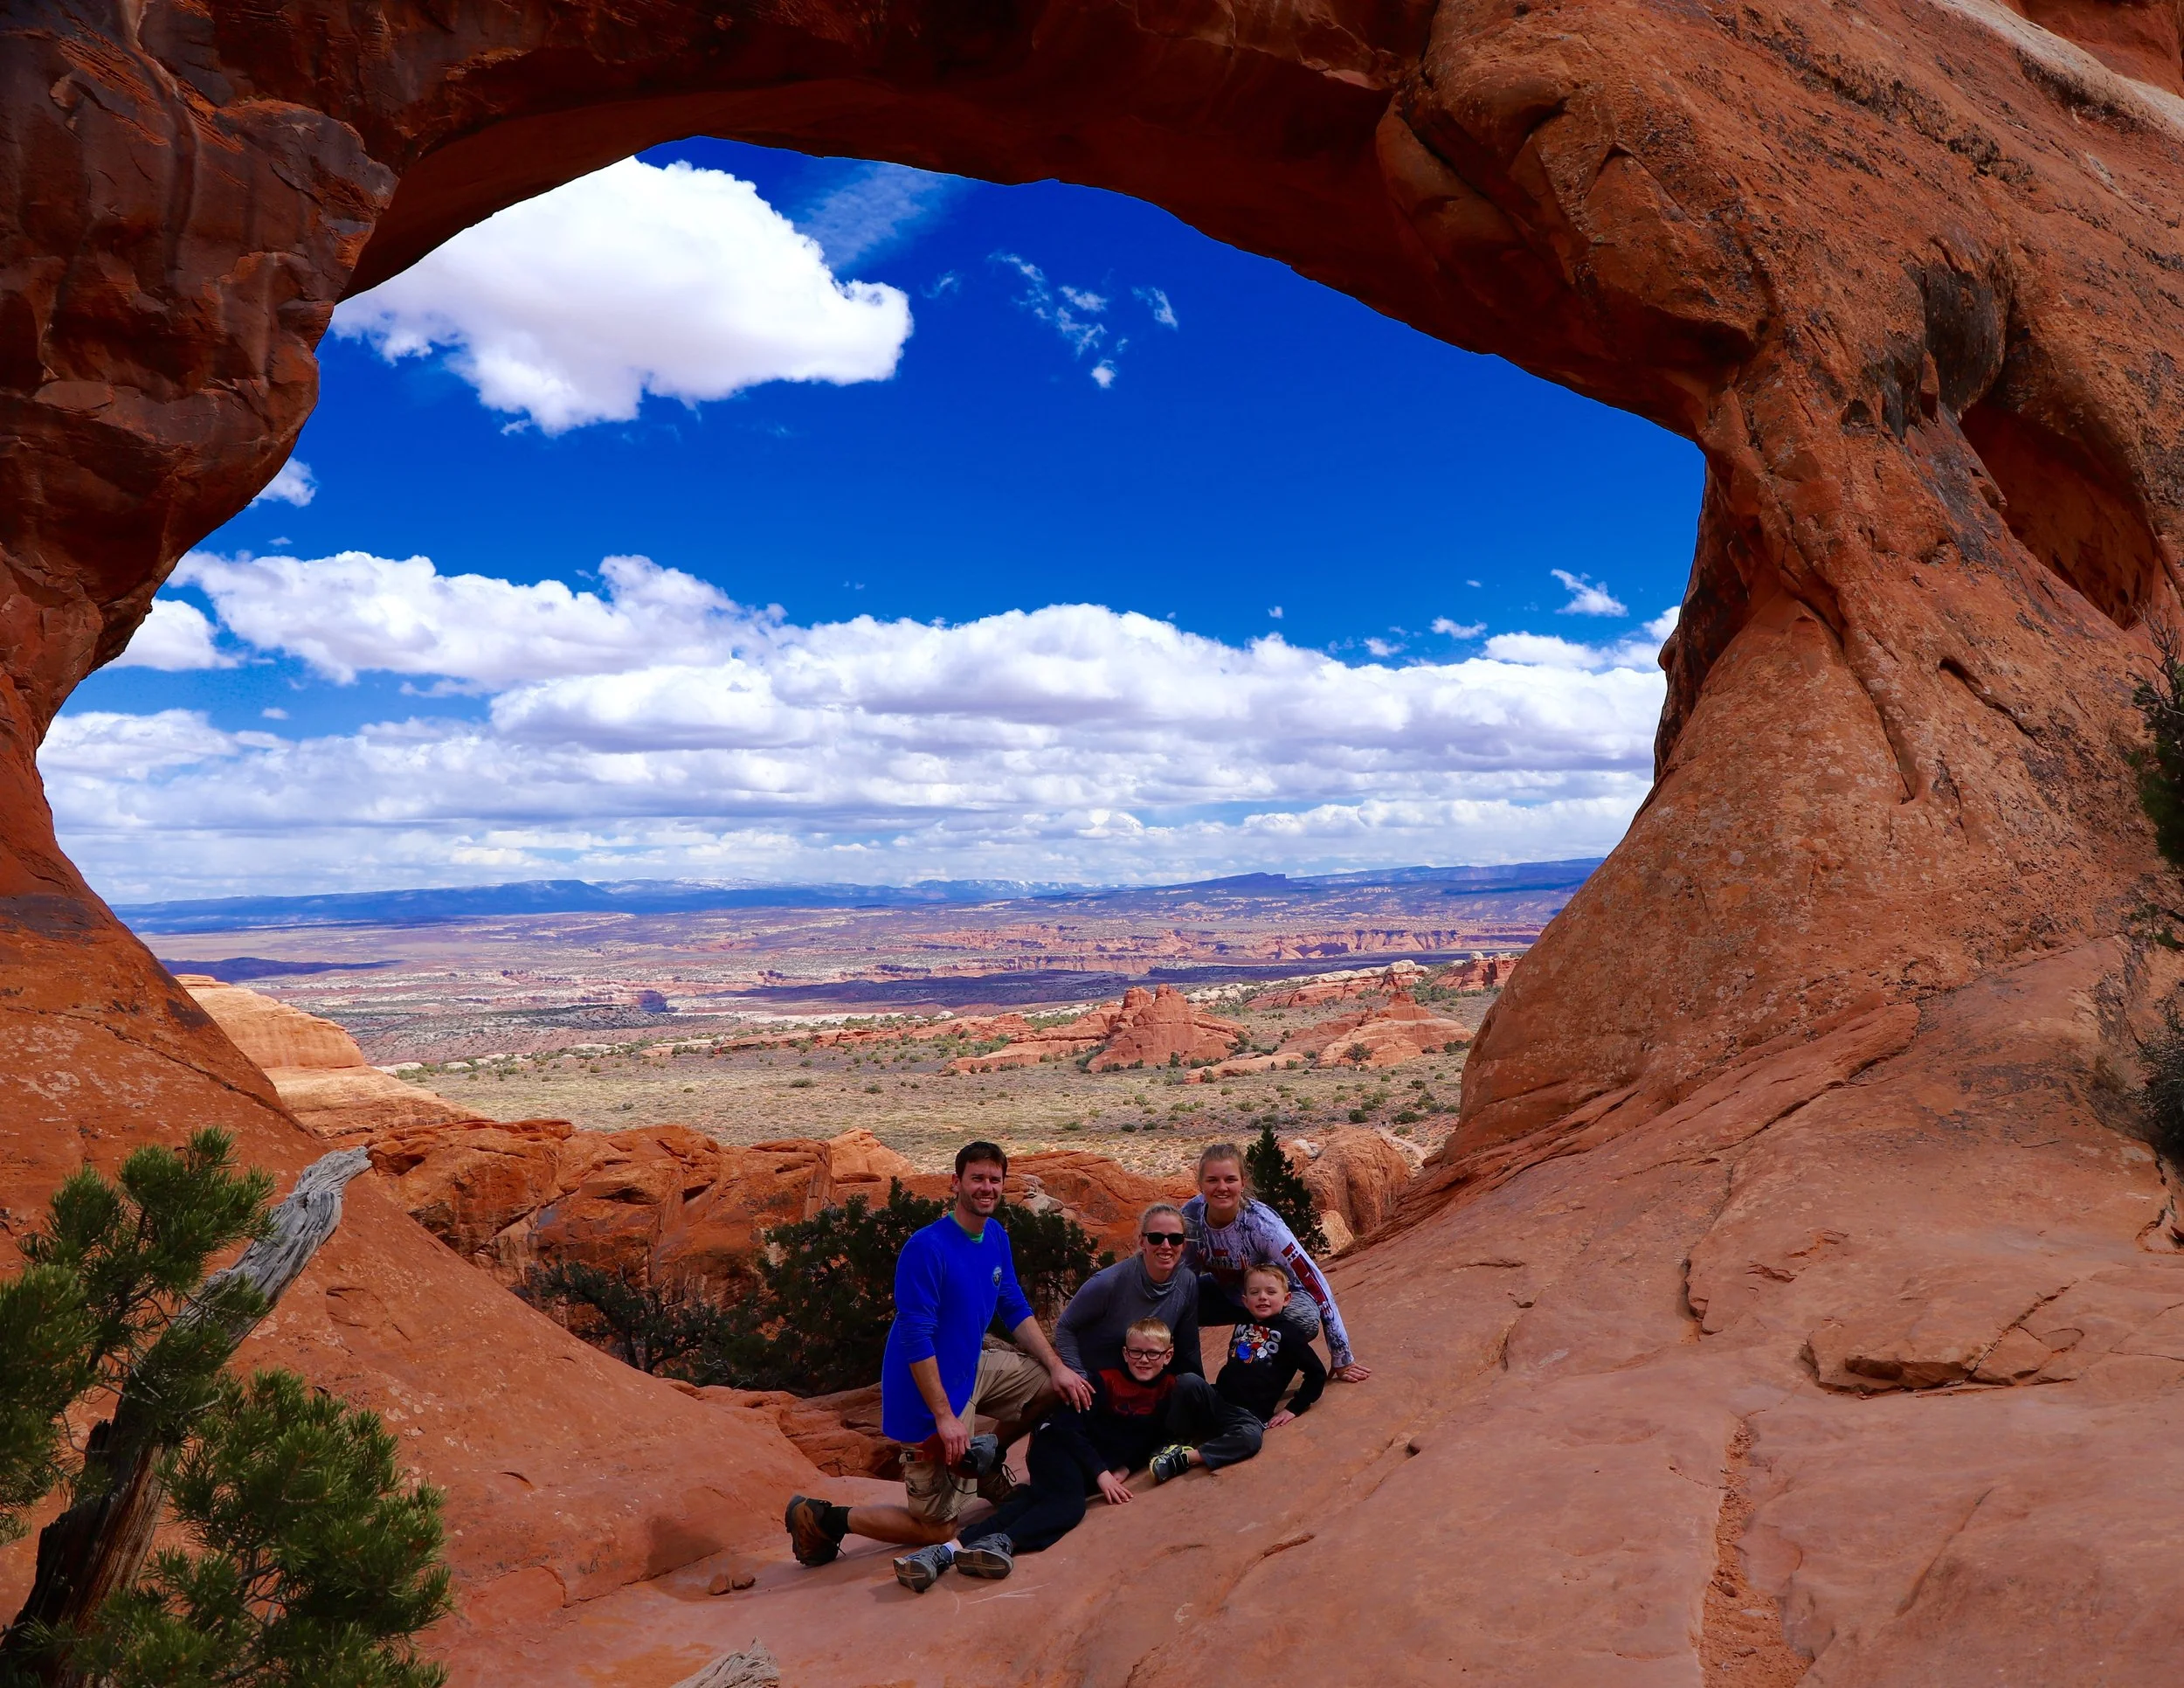
Partition Arch - March 2018
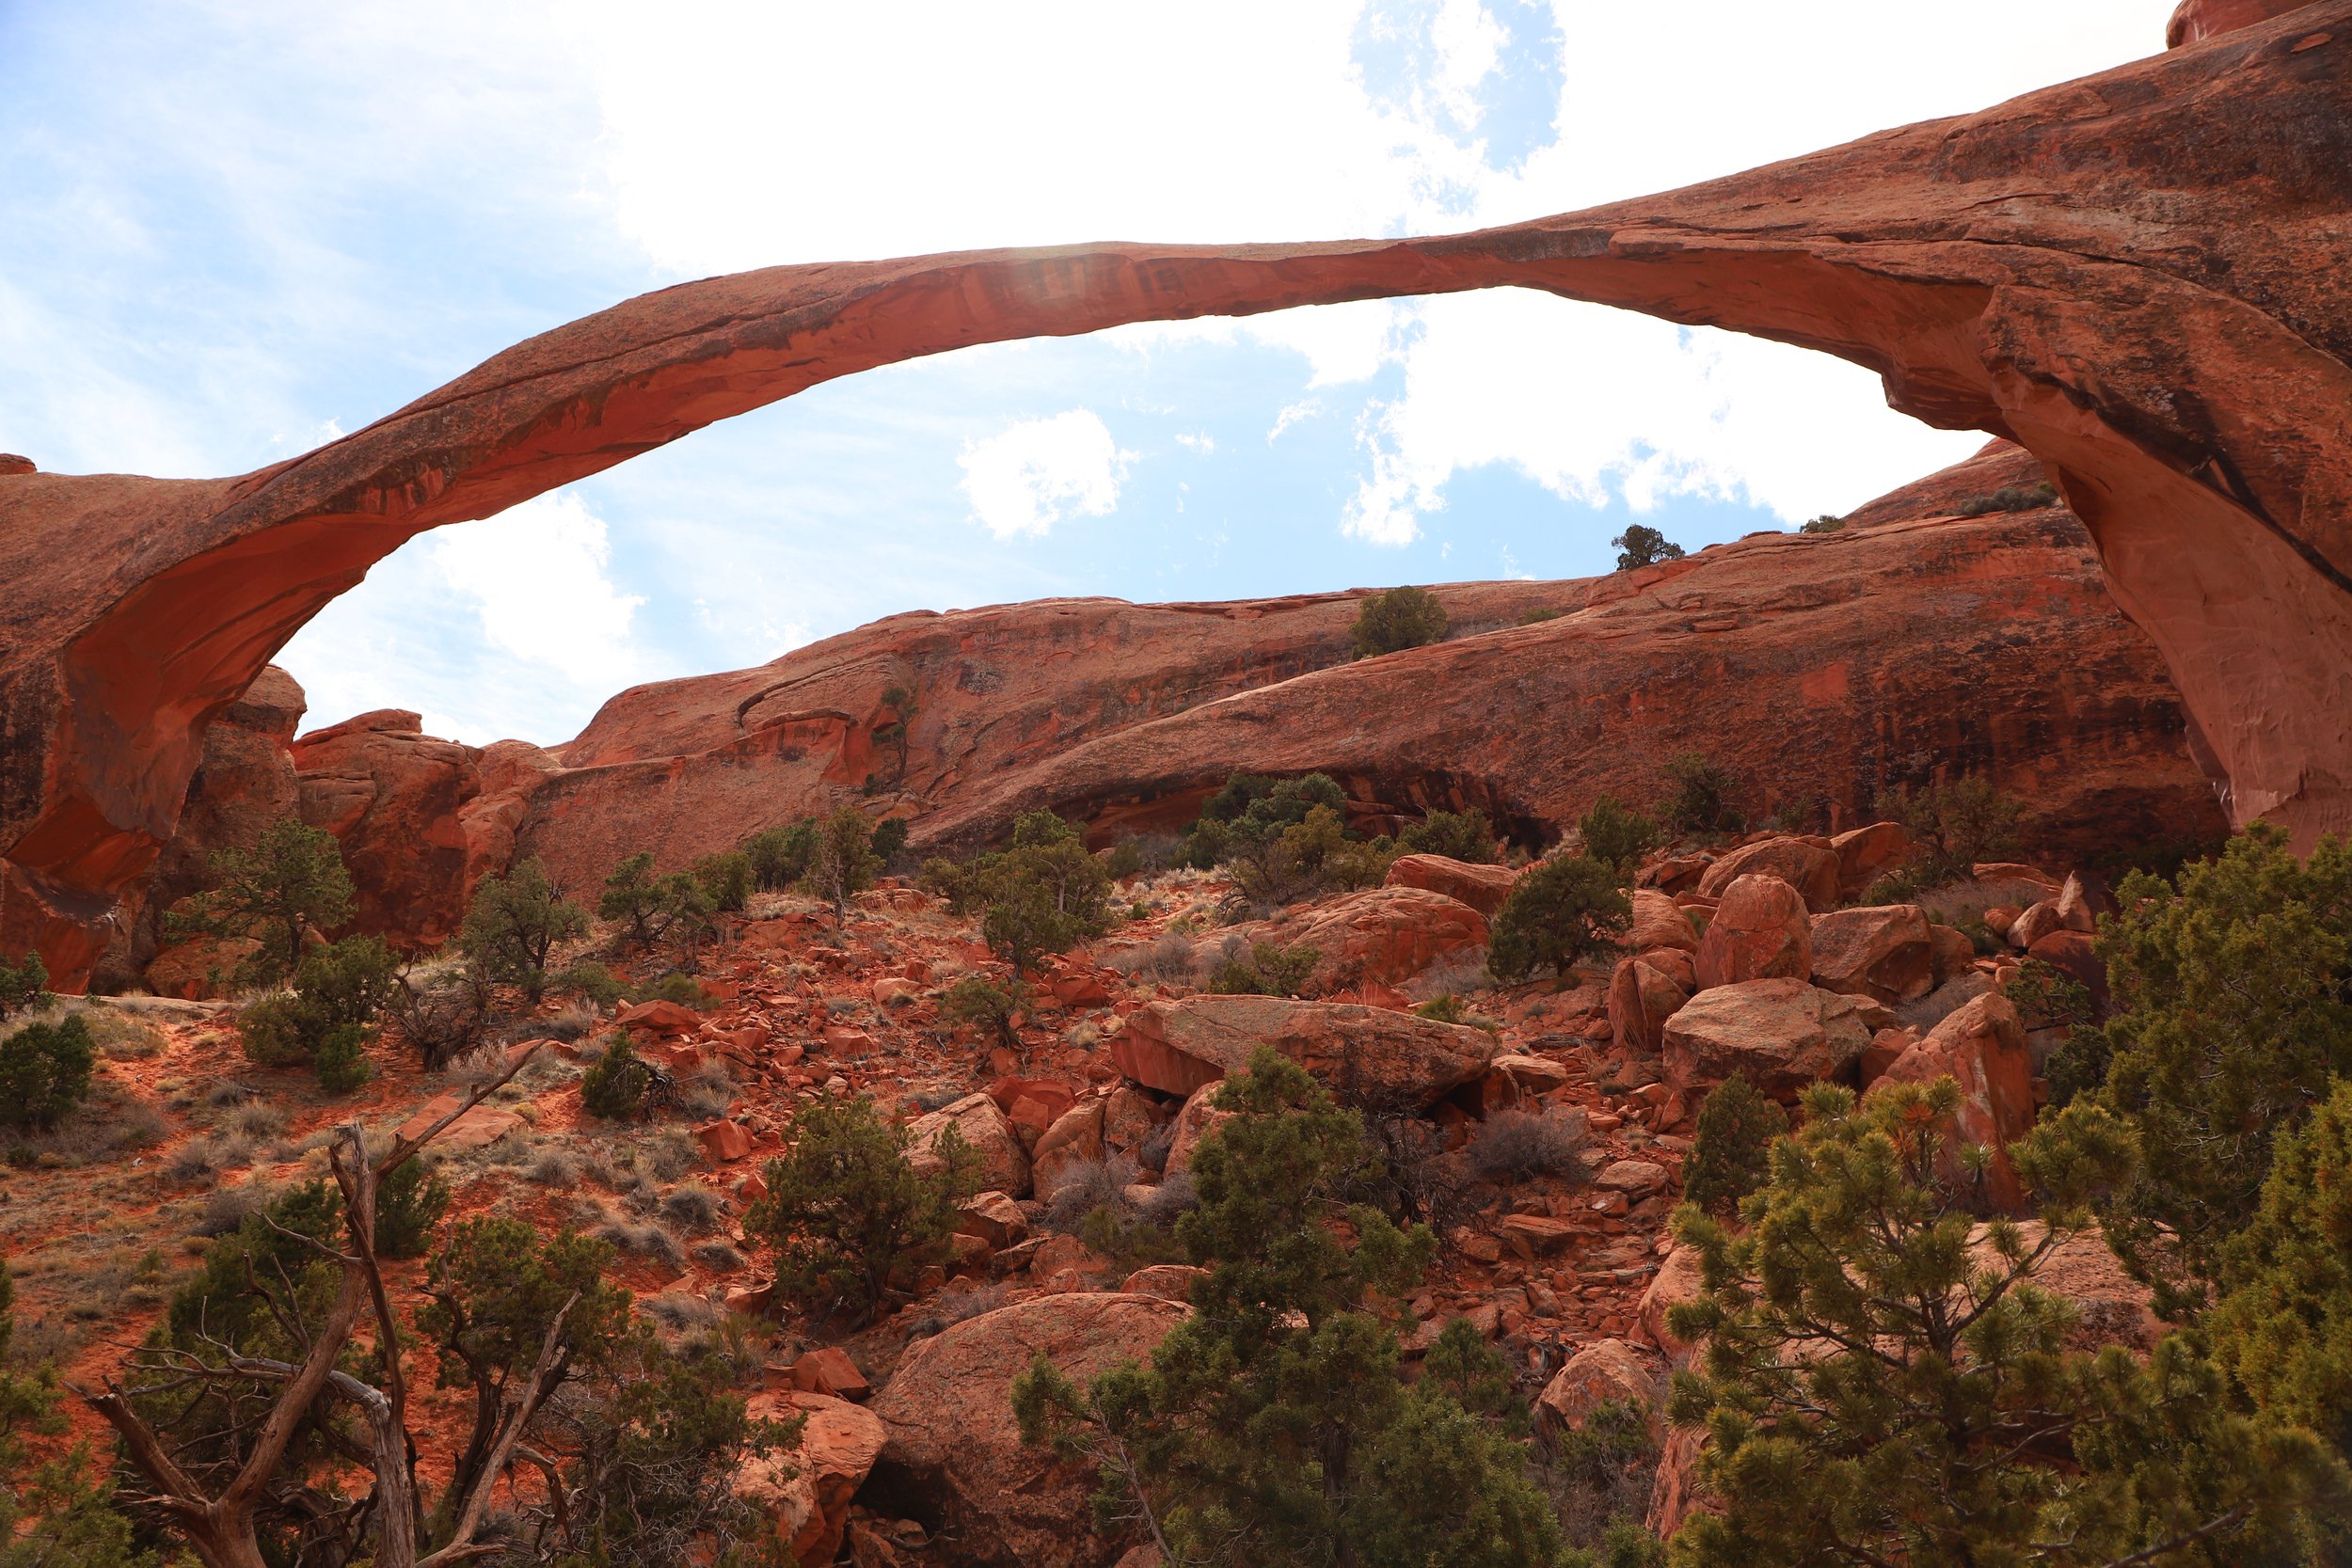
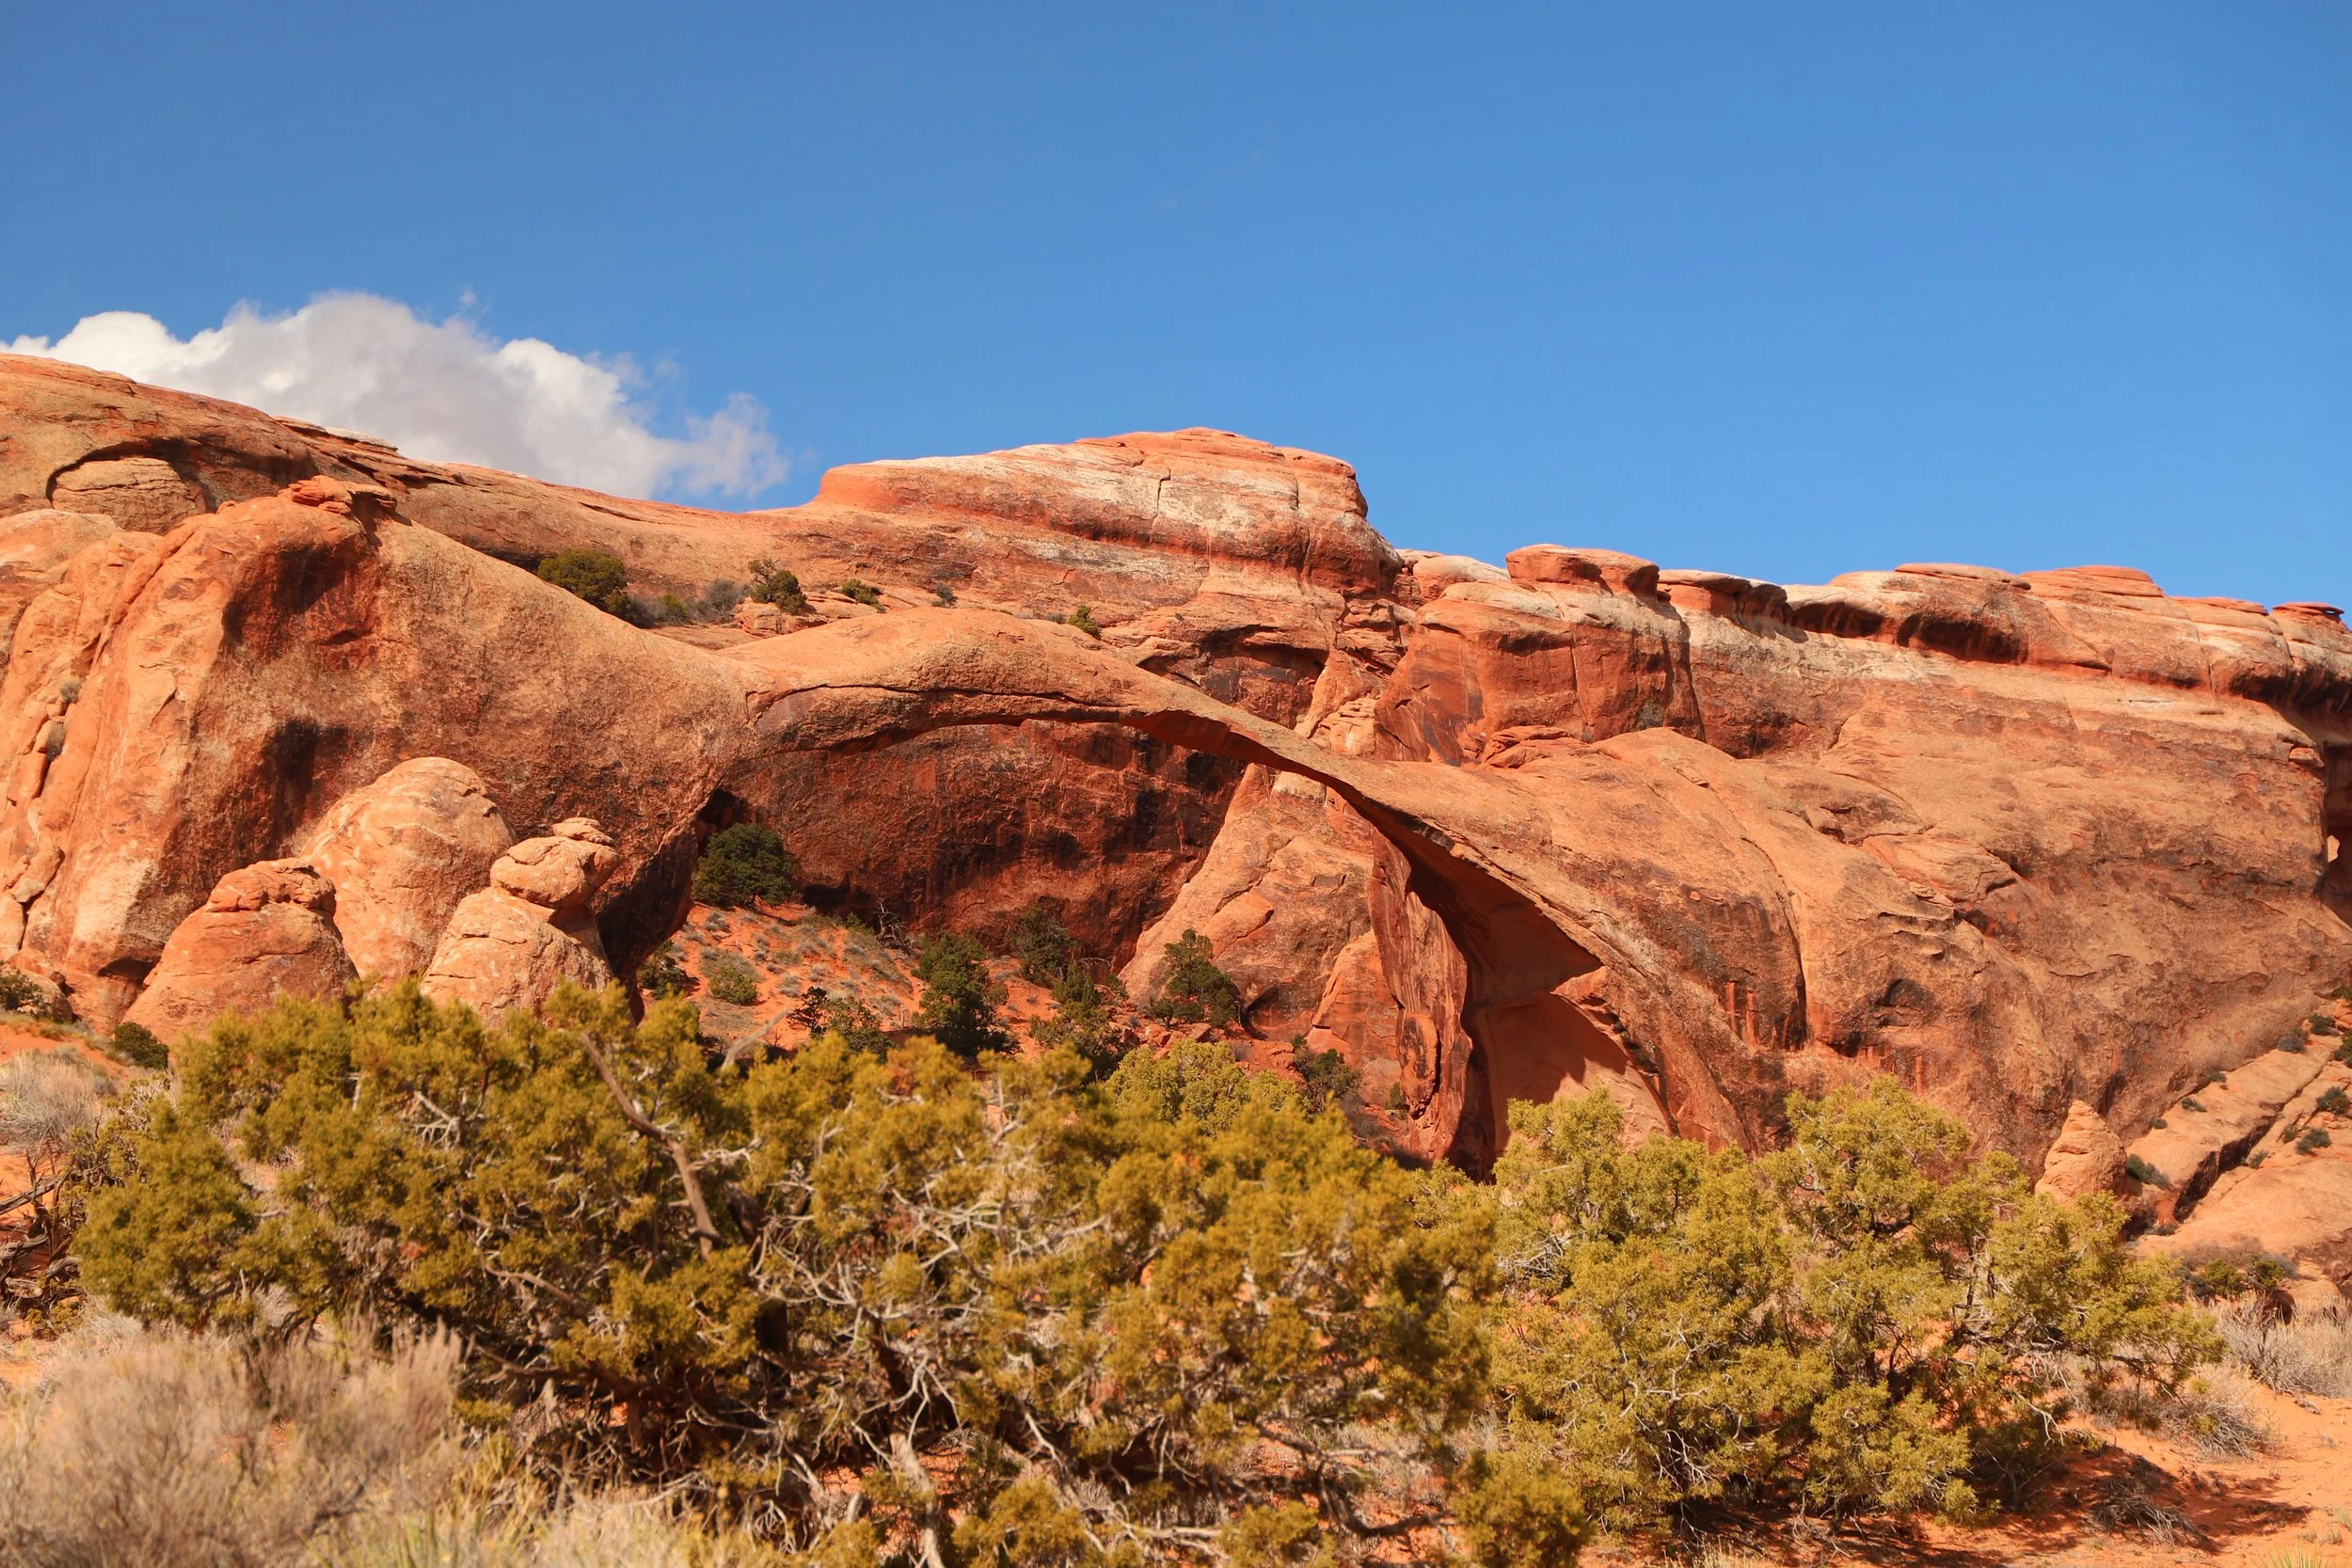
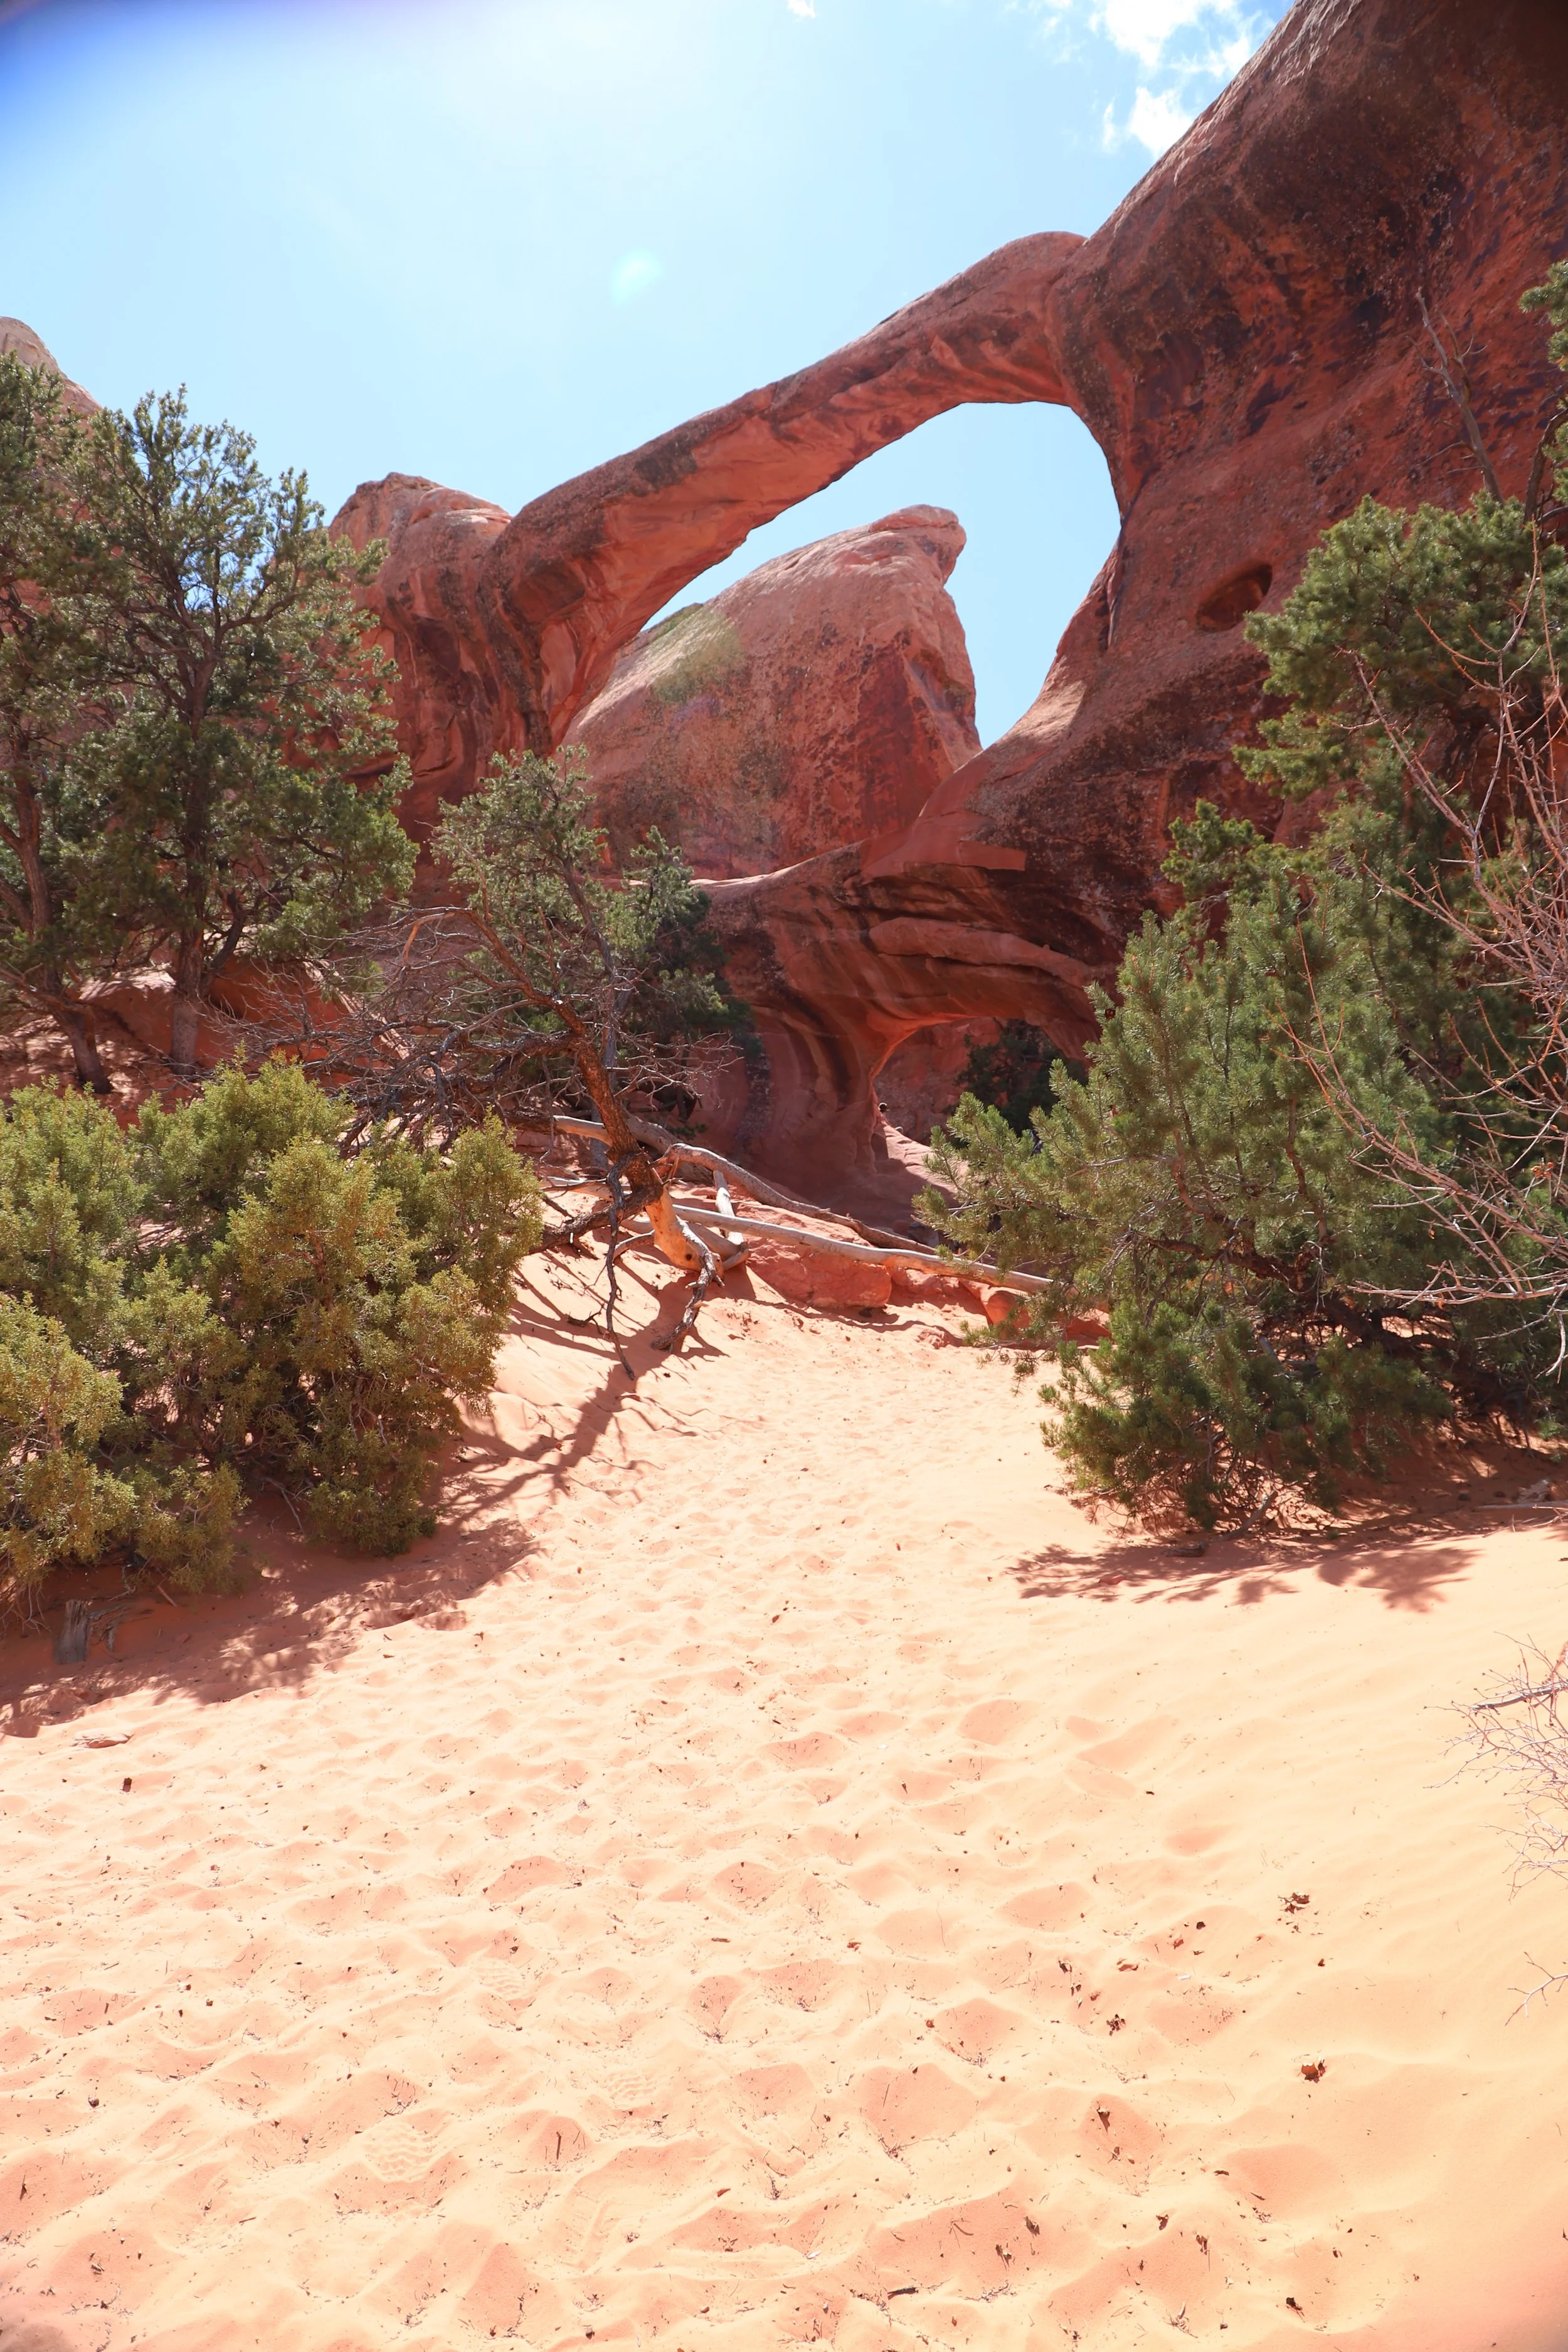
Double O Arch / Devil’s Garden Loop
6.5 miles (loop) / elevation gain - 1000ft
If adding on spurs to Dark Angel and Private Arch - 8.1 miles (loop plus spurs) / elevation gain - 1150ft

Double O Arch
If you want to see Double O Arch, you might as well hike the whole Devil’s Garden as a loop rather than an out-and-back, and there is some strategy in which direction you decide to hike. We went counter-clockwise. That helped on the knees as we did the steepest section while we were hiking up the slickrock.
In addition to the steeper sections, the slickrock causes one other logistical problem. The trail is marked with cairns (stacks of rocks), but it’s not always consistent, and this is an easy place to lose our way and miss the trail. This is a trail I would recommend using a GPS map. Even if you don’t have internet, as long as you have pre-downloaded the map, you will be able to see where you are at all times. We use the GAIA GPS app. It’s expensive, but it has features of not only being able to download the map, but we can also pre-mark the trail, and we can record our hikes. I use it on every hike.
Prior to Landscape Arch, Devil’s Garden Loop is obviously marked, in order to keep people from wandering off trail. Past Landscape Arch, there will not be many people, and on slickrock, it doesn’t matter as much if the steps each person takes are a little different as there aren’t plants or soil to disrupt.
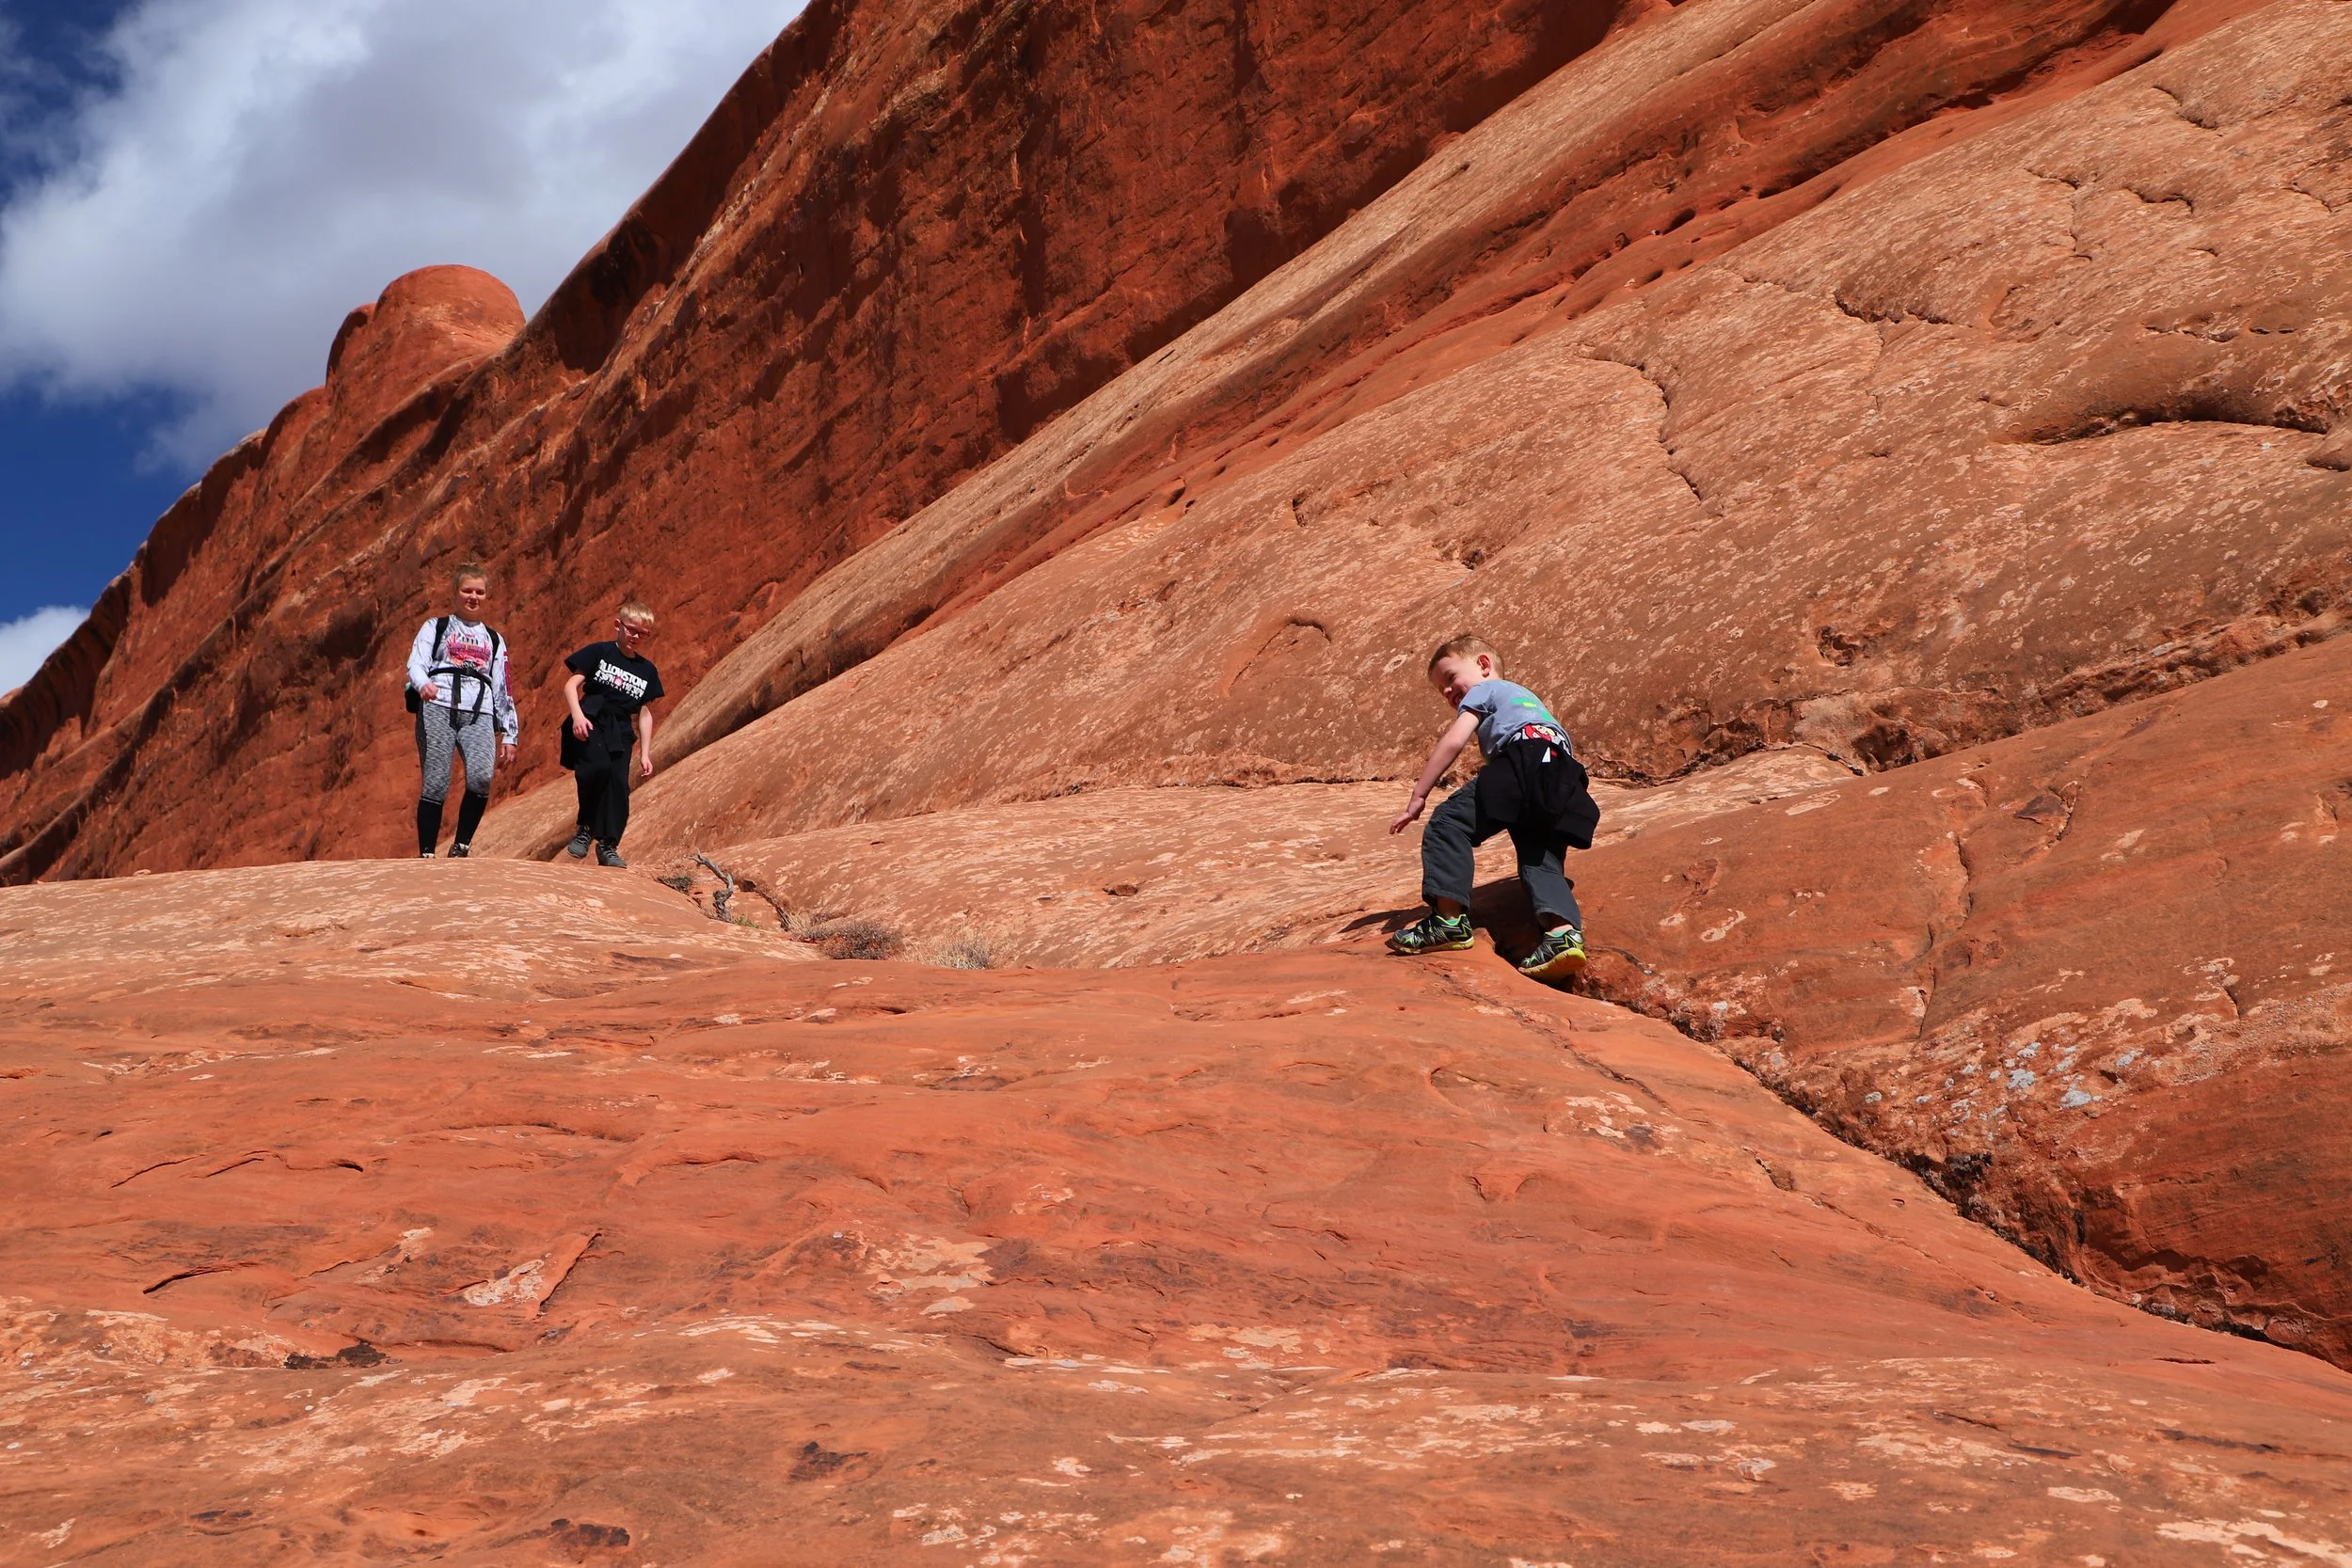
Devil’s Garden Loop is the hardest hike within Arches National Park, but you don’t need to be an expert hiker to do it. My youngest was 5 when he hiked it. It takes time to hike, some pre-planning (like reading this blog), packing enough snacks and water, and this hike is better suited for a non-summer month (or leave really early in the morning to avoid the afternoon heat and pack an umbrella for some portable shade).

My hikers starting off on our loop of Devil’s Garden
This is the hardest hike in Arches National Park, and it involves a lot of uphill - much of it along steep sections of slickrock.
Heading counterclockwise along Devil’s Garden in Arches National Park, just past Landscape Arch
Throughout much of Arches National Park, the La Sal mountains are visible, including along the Devil’s Garden Loop. In March, in contrast to the warm and dry red rock and sand, the La Sal Mountains are frequently covered in beautiful snow caps.

Devil’s Garden Loop with the La Sal Mountains in the background - Arches National Park
I heavily glossed over how an arch is made in the beginning of this blogpost, but prior to a rock becoming an arch, it’s eroded into a fin. And there are simply stunning fins on display through much of the Devil’s Garden Loop, including one spot towards the end where the trail goes on top of one of the fins.
It’s so much fun to imagine this landscape both as how it looked a long time ago (before Delicate Arch, Landscape Arch, Double Arch) as well as how it could look some day in the future.

These rock formations are known as “fins” - they have the potential to become arches one day
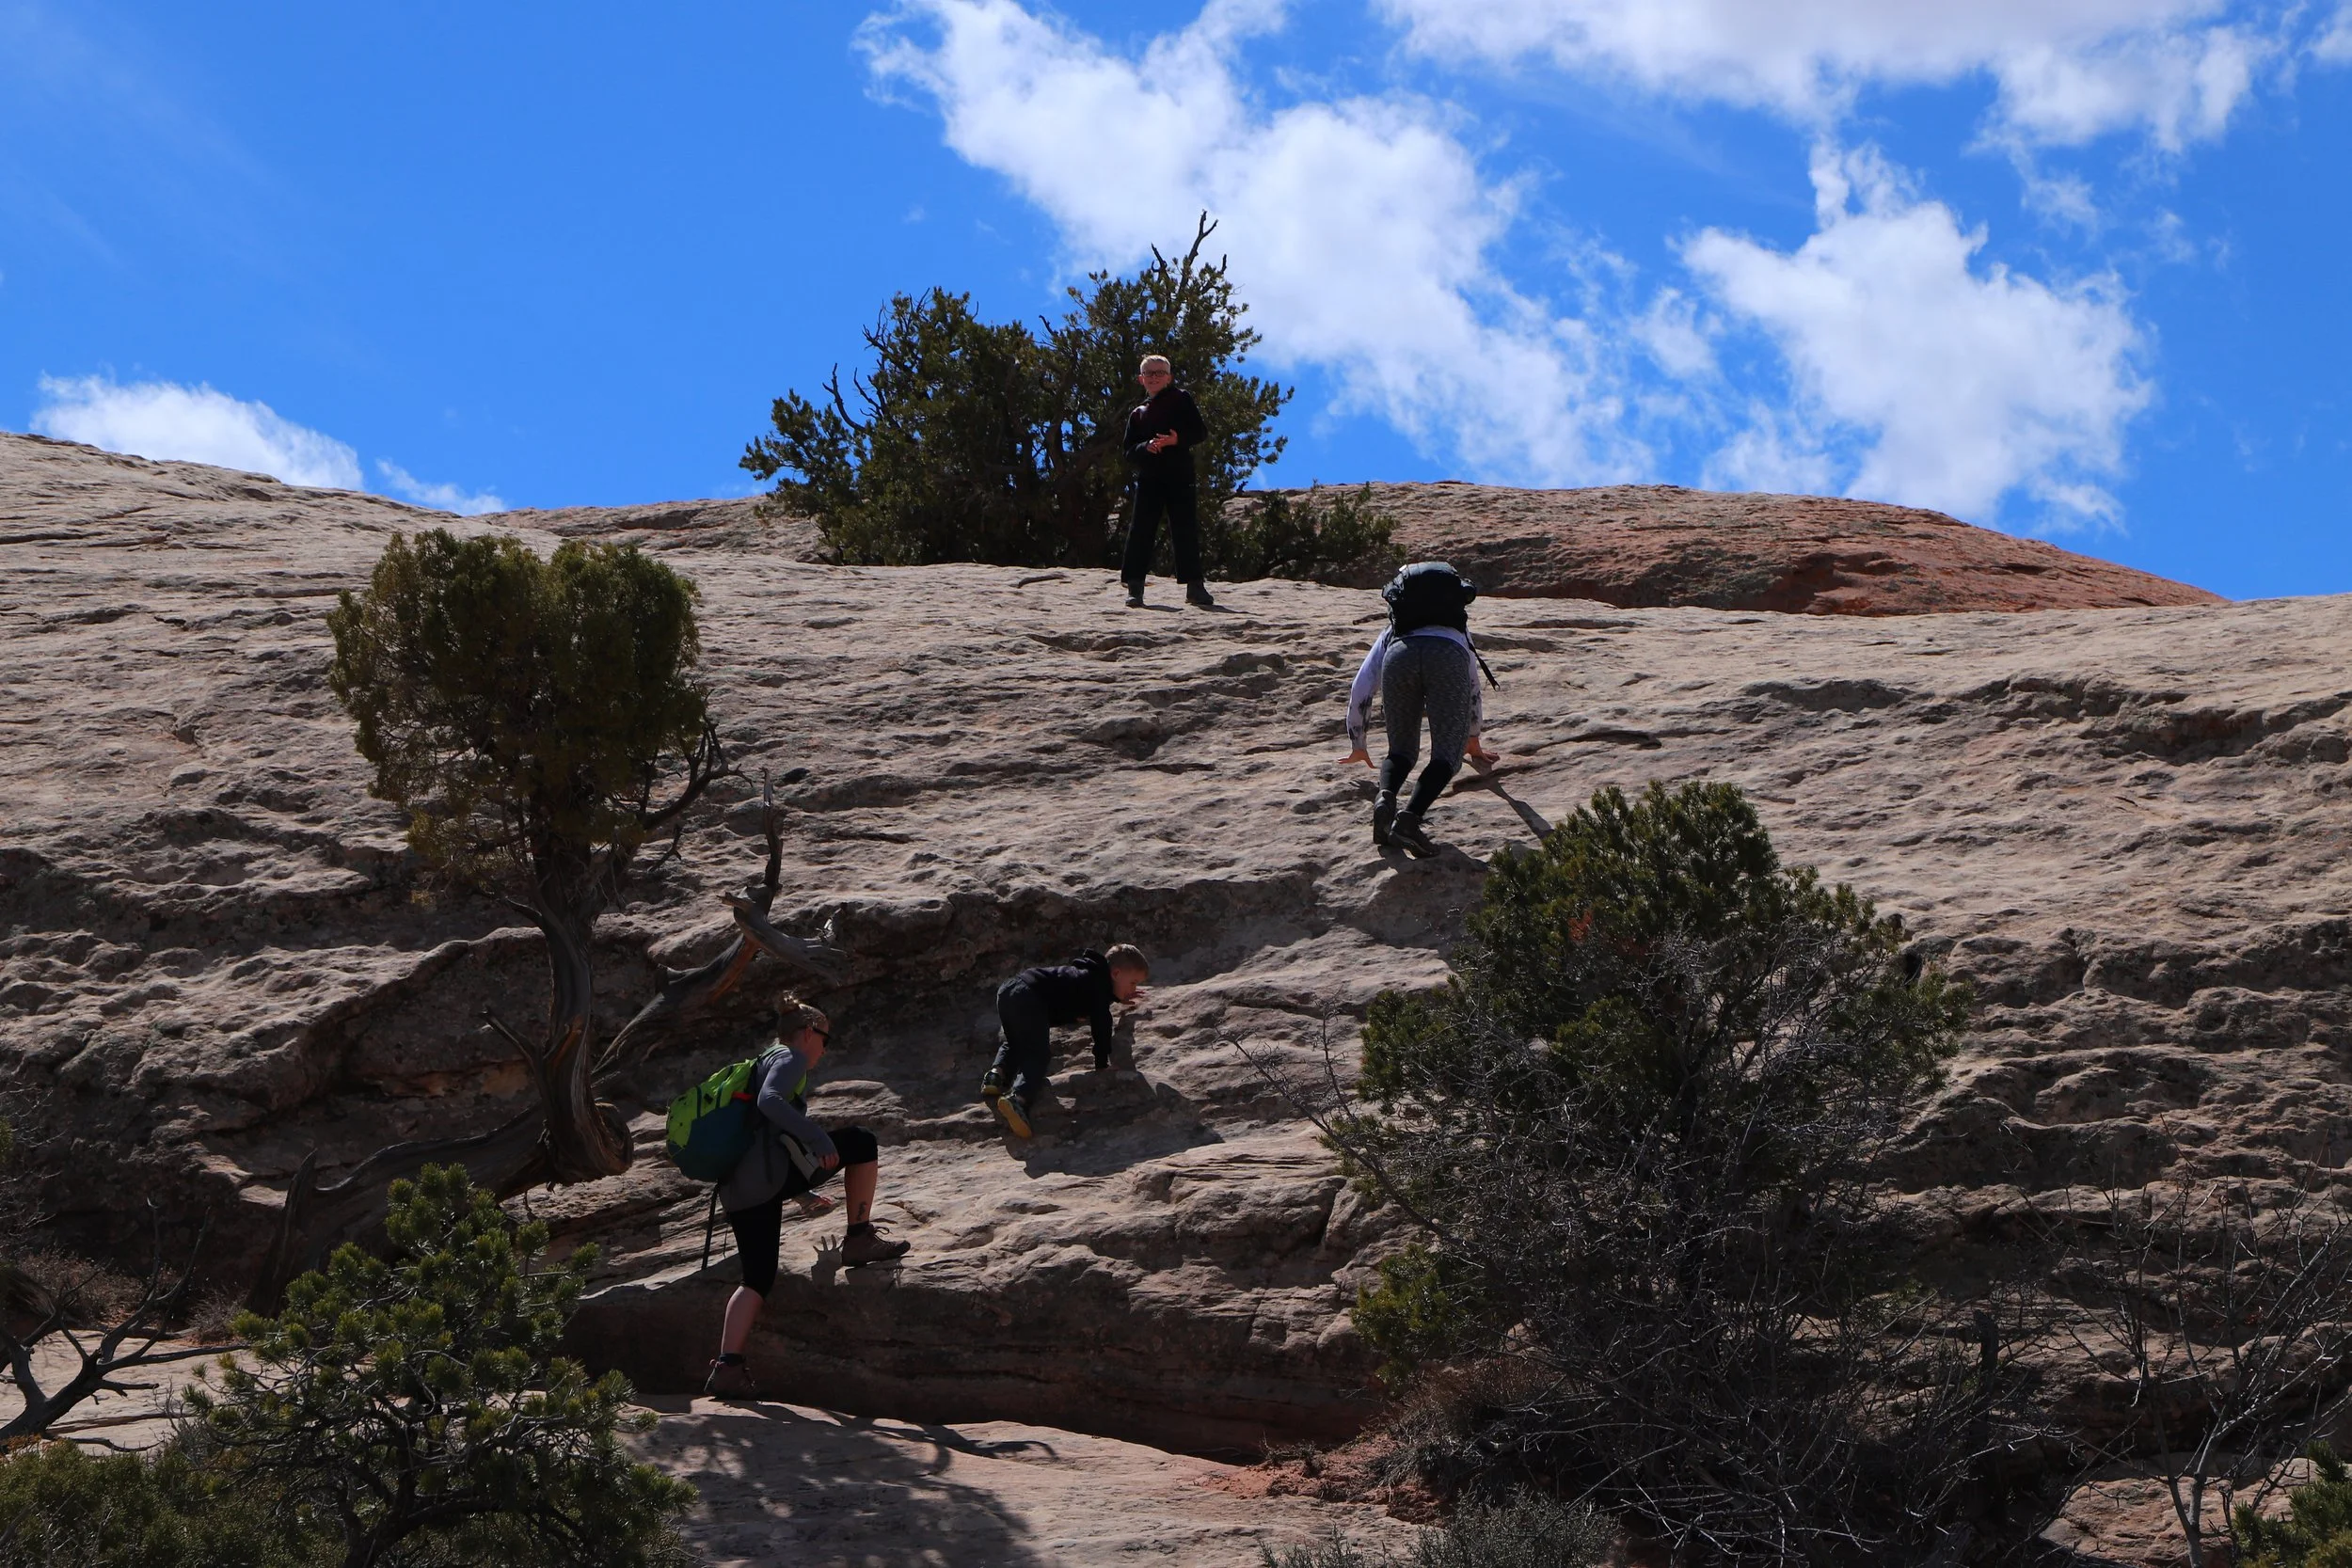
I mentioned we chose to hike Devil’s Garden counterclockwise to deal with the steep slickrock sections going up rather than down. This would be the start of that steep slickrock section.
Devil’s Garden Loop - Posing for a picture so we could actually take a few moments to catch our breath as we scaled up the slickrock
This is a hard hike, but it’s not impossible. Just keep hiking, just keep hiking.
Hiking up the slickrock along Devil’s Garden Loop (going counterclockwise)
I also mentioned earlier that this trail is hard to follow in spots and that a GPS app is helpful. We hiked this trail a year before we learned about GAIA. We did get lost for a bit. It’s not great to be wandering in an unknown direction through any type of backcountry desert landscape... AllTrails is another great option. Whatever you use, pre-download the map when you have Wi-Fi at the hotel, the night before.

Hiking Devil’s Garden Loop - this is what the trail looks like in spots - there are spots it’s not obvious how to follow
We may have been lost for a bit on this, but we were surrounded the whole time by epic views. No complaints from us - we loved this hike! But my advice is just not to get lost though…

I don’t think I need words to explain why Arches is my favorite National Park with pictures like this
For anyone hiking Devil’s Garden Loop, Double O Arch means you’re well over the halfway point. The arch is fun - you can walk under the lower part. It’s impressive, but not the reason we loved this hike. The whole trail is awesome. Double O Arch is just one of the many amazing things you’ll find.

Double O Arch - Arches National Park
Capturing 3D arches in 2D is difficult. Here’s another angle, but the view in my head while we sat on a nearby rock and enjoyed a snack while staring at this arch is much more impressive. This hike is worth it, even if it takes you all day. Just bring enough water, and don’t tackle this trail in the summer.
Double O Arch - Arches National Park
I thought the best part of this trail was actually after Double O Arch (hiking counterclockwise). The trail continues upward, and at this point you are pretty high in elevation within the park, and you can see the much of the Park, and Arches National Park is incredible from up high.
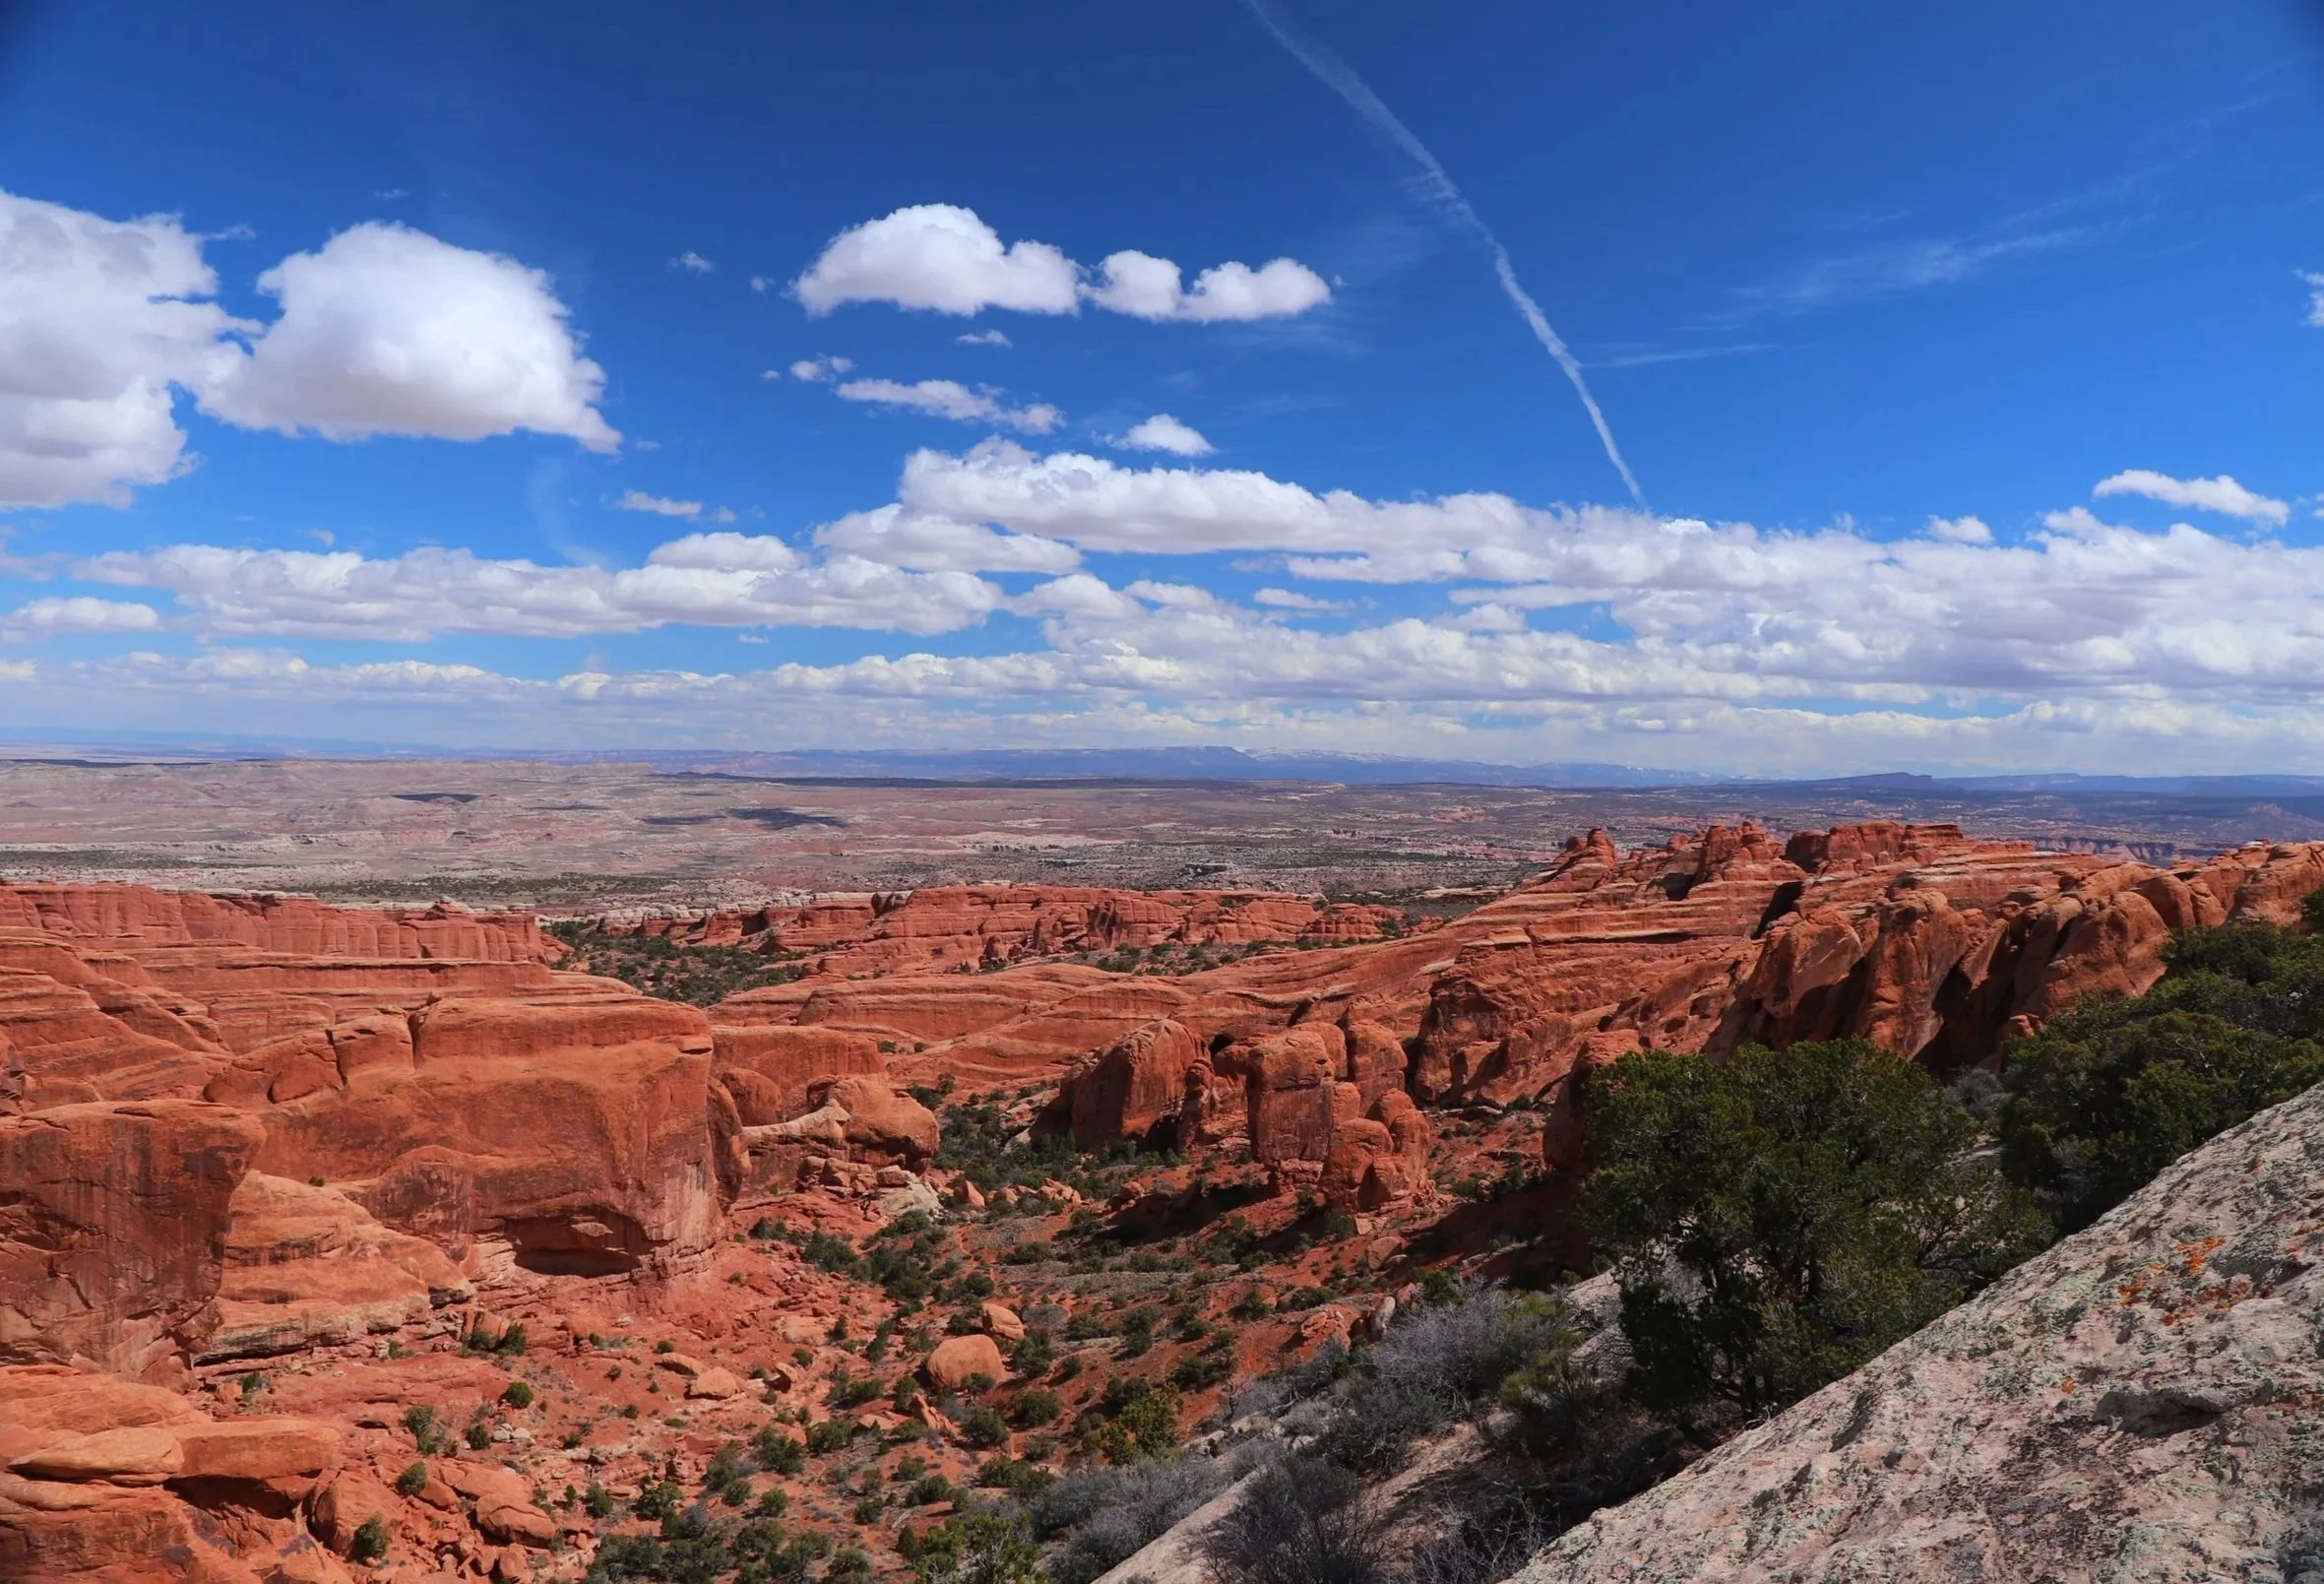
Climbing up in elevation - looking out over Devil’s Garden Loop

Devil’s Garden Loop - a little higher - even prettier views
And the trail isn’t done climbing up yet. One last push, and you will find yourself on top of a fin, and potentially a future arch.
Devil’s Garden Loop - Hiking up onto the fins (going counterclockwise)
Climbing up to this viewpoint is the best part of the trail! It’s not even marked on the National Park map as a viewpoint… And it’s one of the best spots in the entire park!

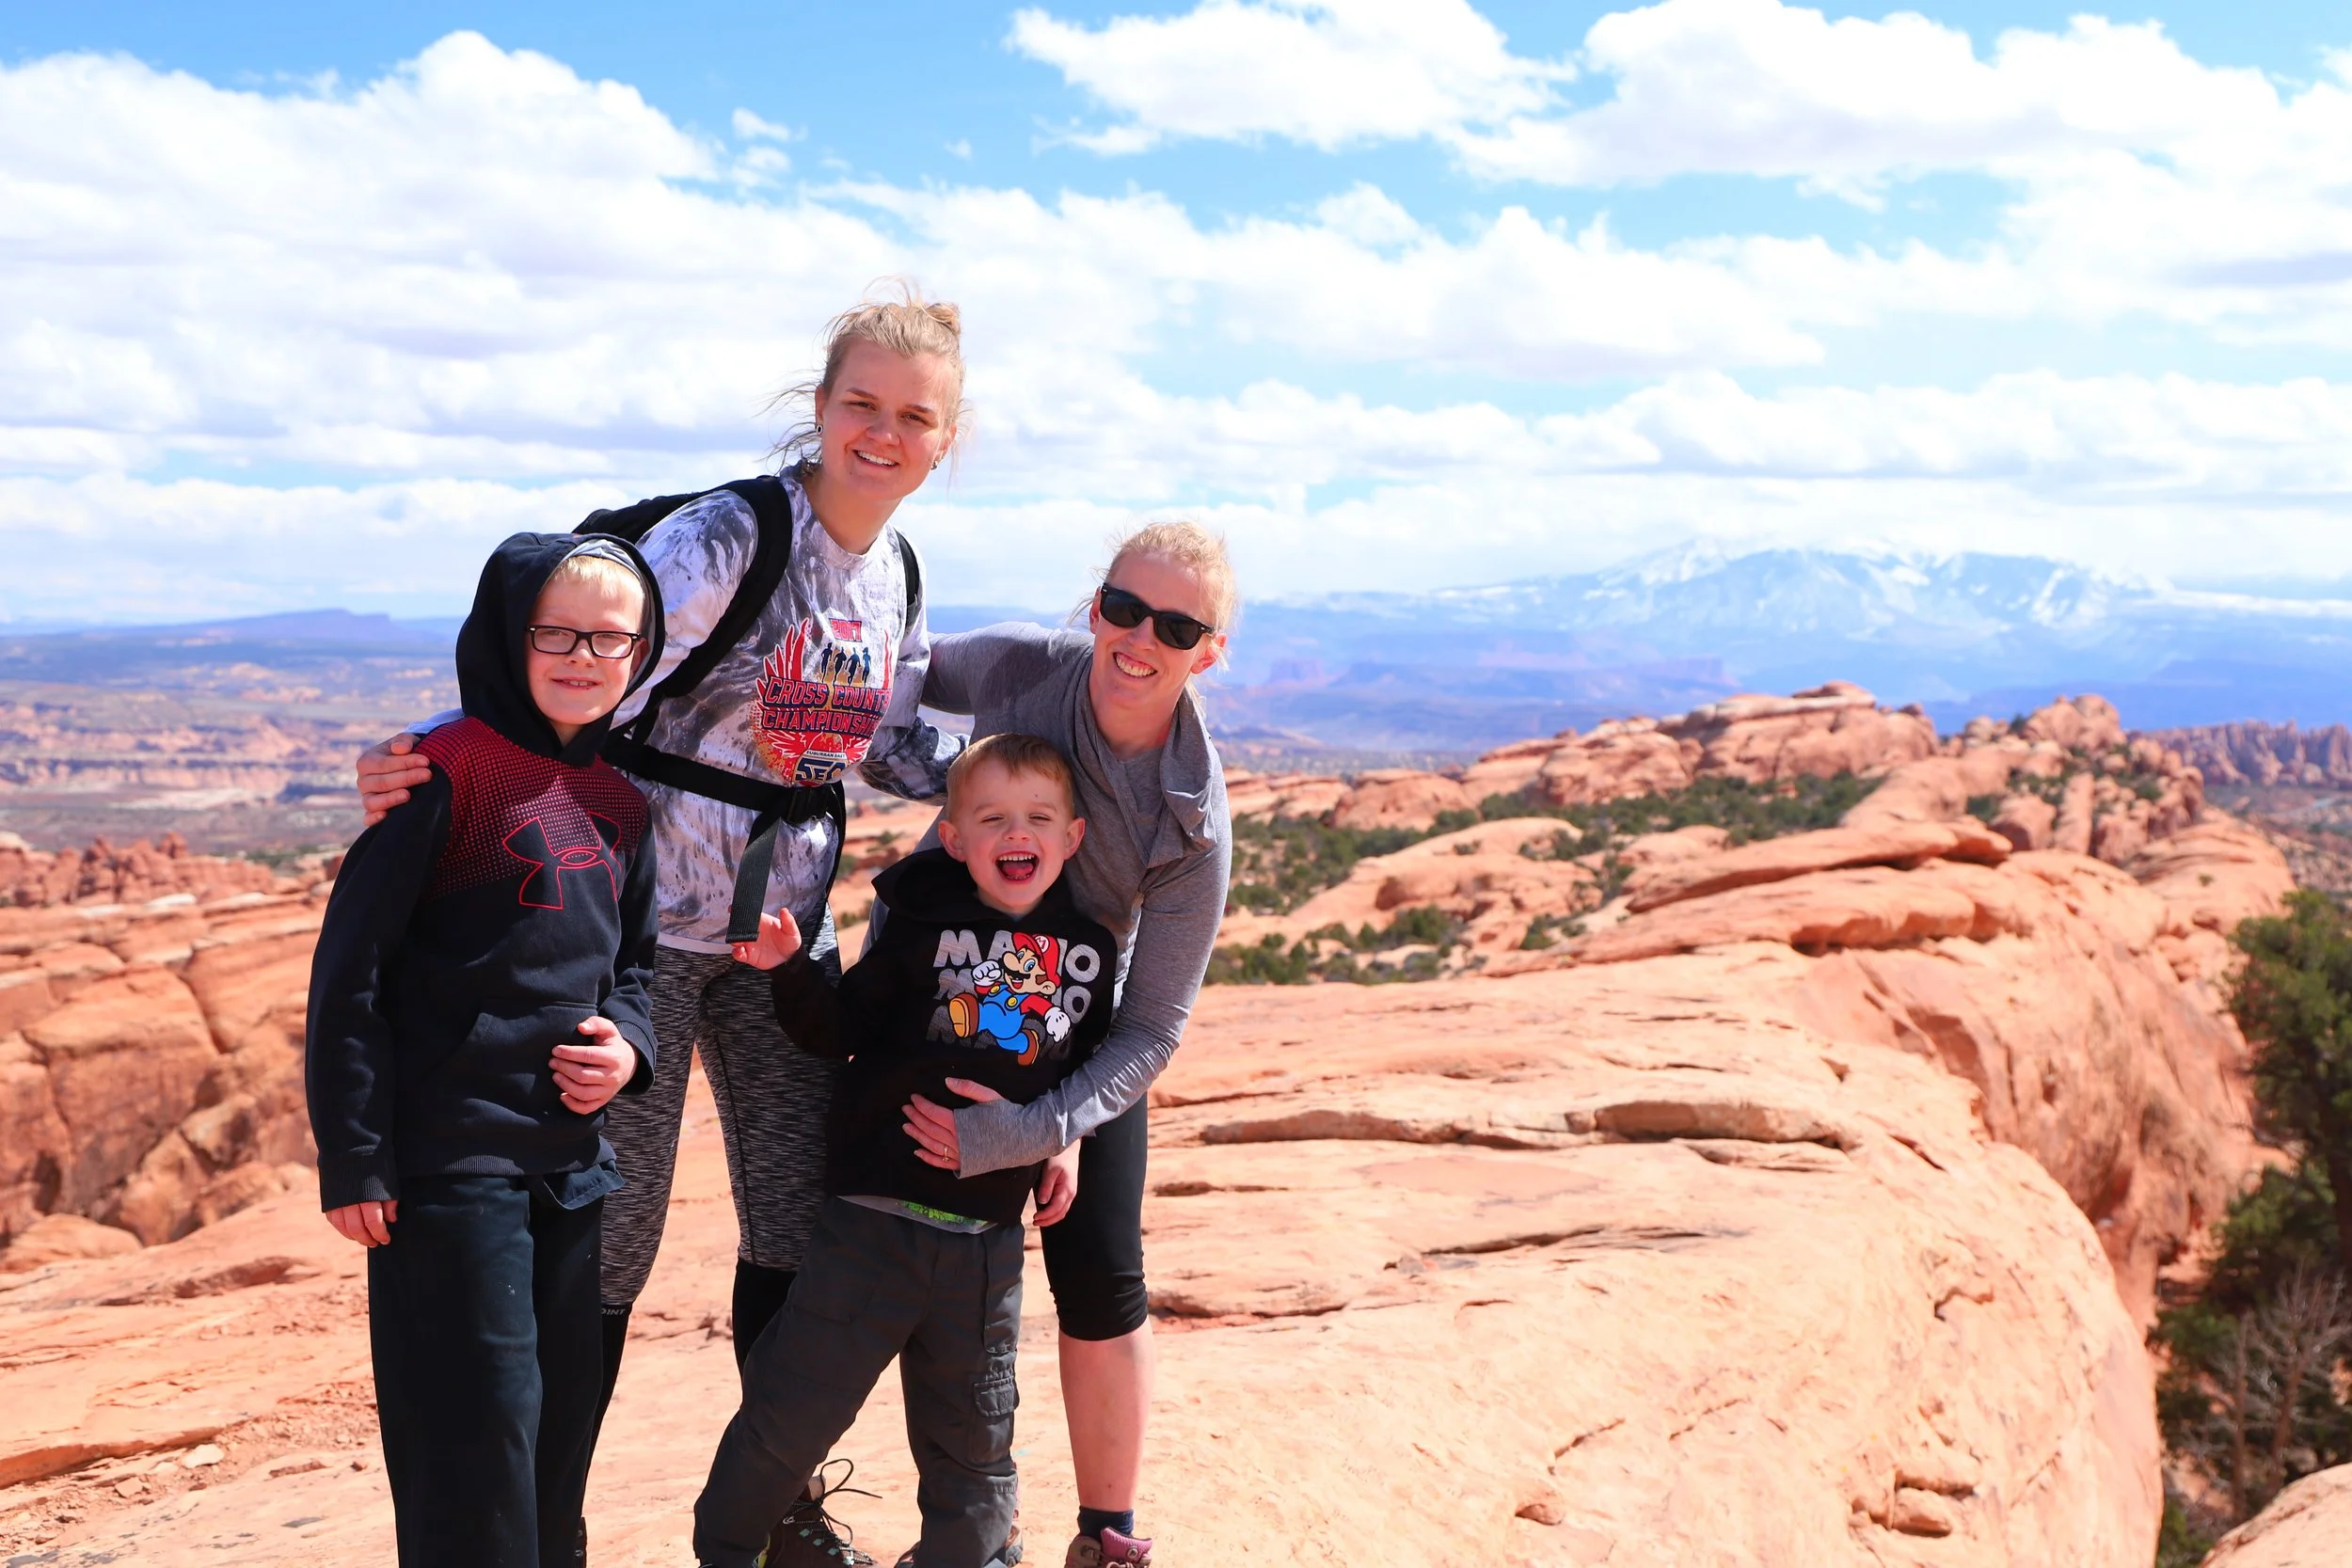
This is us - hiking up to the view from the fin along Devil’s Garden Loop in Arches National Park - one of the best viewpoints in the park
We made it to the top! The rest of the trail is downhill from here, and it’s more gradual going down this direction than the reverse.
Enjoying the views from Devil’s Garden Loop - Arches National Park
From here, we walked to the spur trails for Navajo and Partition Arch (previously mentioned) and past Landscape Arch again back to the car. This is a hard trail, but so rewarding.
Tower Arch
2.60 miles / elevation gain - 525ft
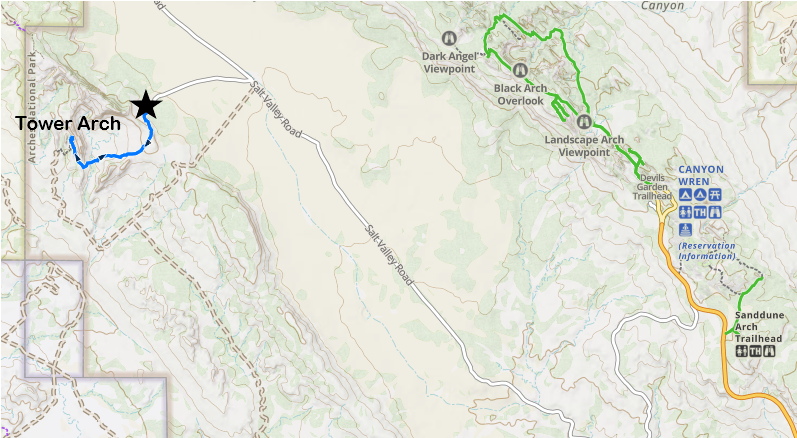
Driving to the Tower Arch Trailhead along Salt Valley Road
There are so many special places to explore within Arches National Park. My guess is that most people won’t give themselves enough time to see everything (me included - that’s why I’ve been here 6 times). It’s hard for me to suggest Tower Arch over Delicate Arch or Devil’s Garden Loop. But for any hiker that is looking for solitude and a “secret” arch - Tower Arch would be the place to go.
To get to the trailhead, you will have to turn left off of the main road just past the parking area for Sand Dune Arch onto Salt Valley Road, a grated dirt road where higher clearance wheels and are going to be preferred. Check with the Park Rangers at the visitor center to find out current road conditions. When the road is wet, there are impassable sandy sections. From the Sand Dune Arch parking area, it will take about 20 minutes to get to the Tower Arch trailhead.
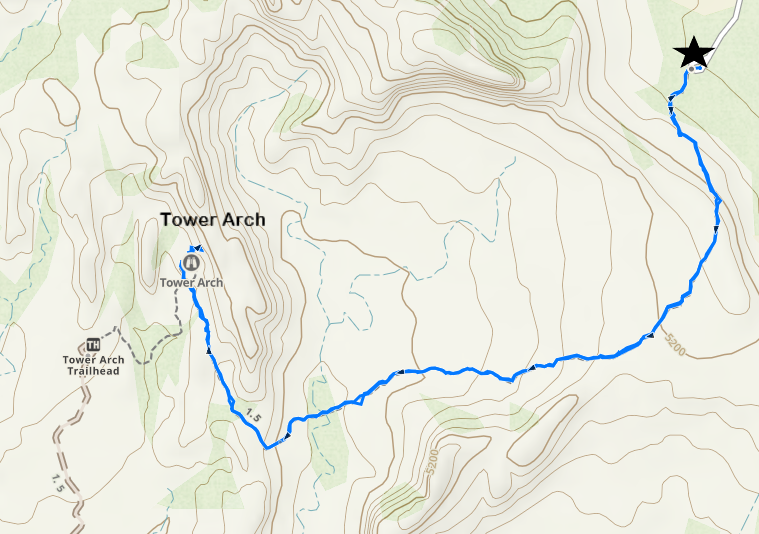
Tower Arch Trail - note there is a second 4x4 option on the opposite side of the trail. A 4x4 truck or SUV is required for that route option. Arches does not allow UTVs or ATVs within the Park.
I haven’t found much online about Tower Arch. I noticed it by staring at the Arches National Park map from our previous trip and realizing that I didn’t need a special vehicle to get out there. If there’s a “secret” place at Arches, this is it!

Tower Arch - Arches National Park
My boys and I hiked to Tower Arch in March 2023. There were zero cars at the trailhead parking lot. We did come across one other hiker who must have walked in from the 4x4 road. That was it. We were hiking in a National Park on a busy day and found a trail to ourselves!
The Park Ranger smiled when I asked if the road was drivable. I don’t think they tell people about this trail.

Hiking up the Tower Arch Trail from the trailhead
This trail is completely exposed to the sun, as are all trails within Arches National Park. Because there may not be any other hikers here, you are on your own for bringing everything you might need. Carry 3L of water per person, wear sunscreen, and consider packing an umbrella for portable shade. The trail isn’t that long but this would be a hike to pack extra on, just in case.
The majority of the elevation gain on this trail is at the very beginning. Once you get to the top, the trail goes down a bit, and then there’s a much smaller second hill. There’s no slick rock to hike on, just sand. I felt like this was a moderate trail from a difficulty standpoint, mostly due to walking on the sand.

View from the top of the first hill - La Sal Mountains are in the background
Once you are at the top of the hill, there are some beautiful rock formations on both sides of you as you walk down.

Tower Arch Trail - Looking off to the right
As you walk down the hill, on your left will be rock formations known as the “Marching Men.”
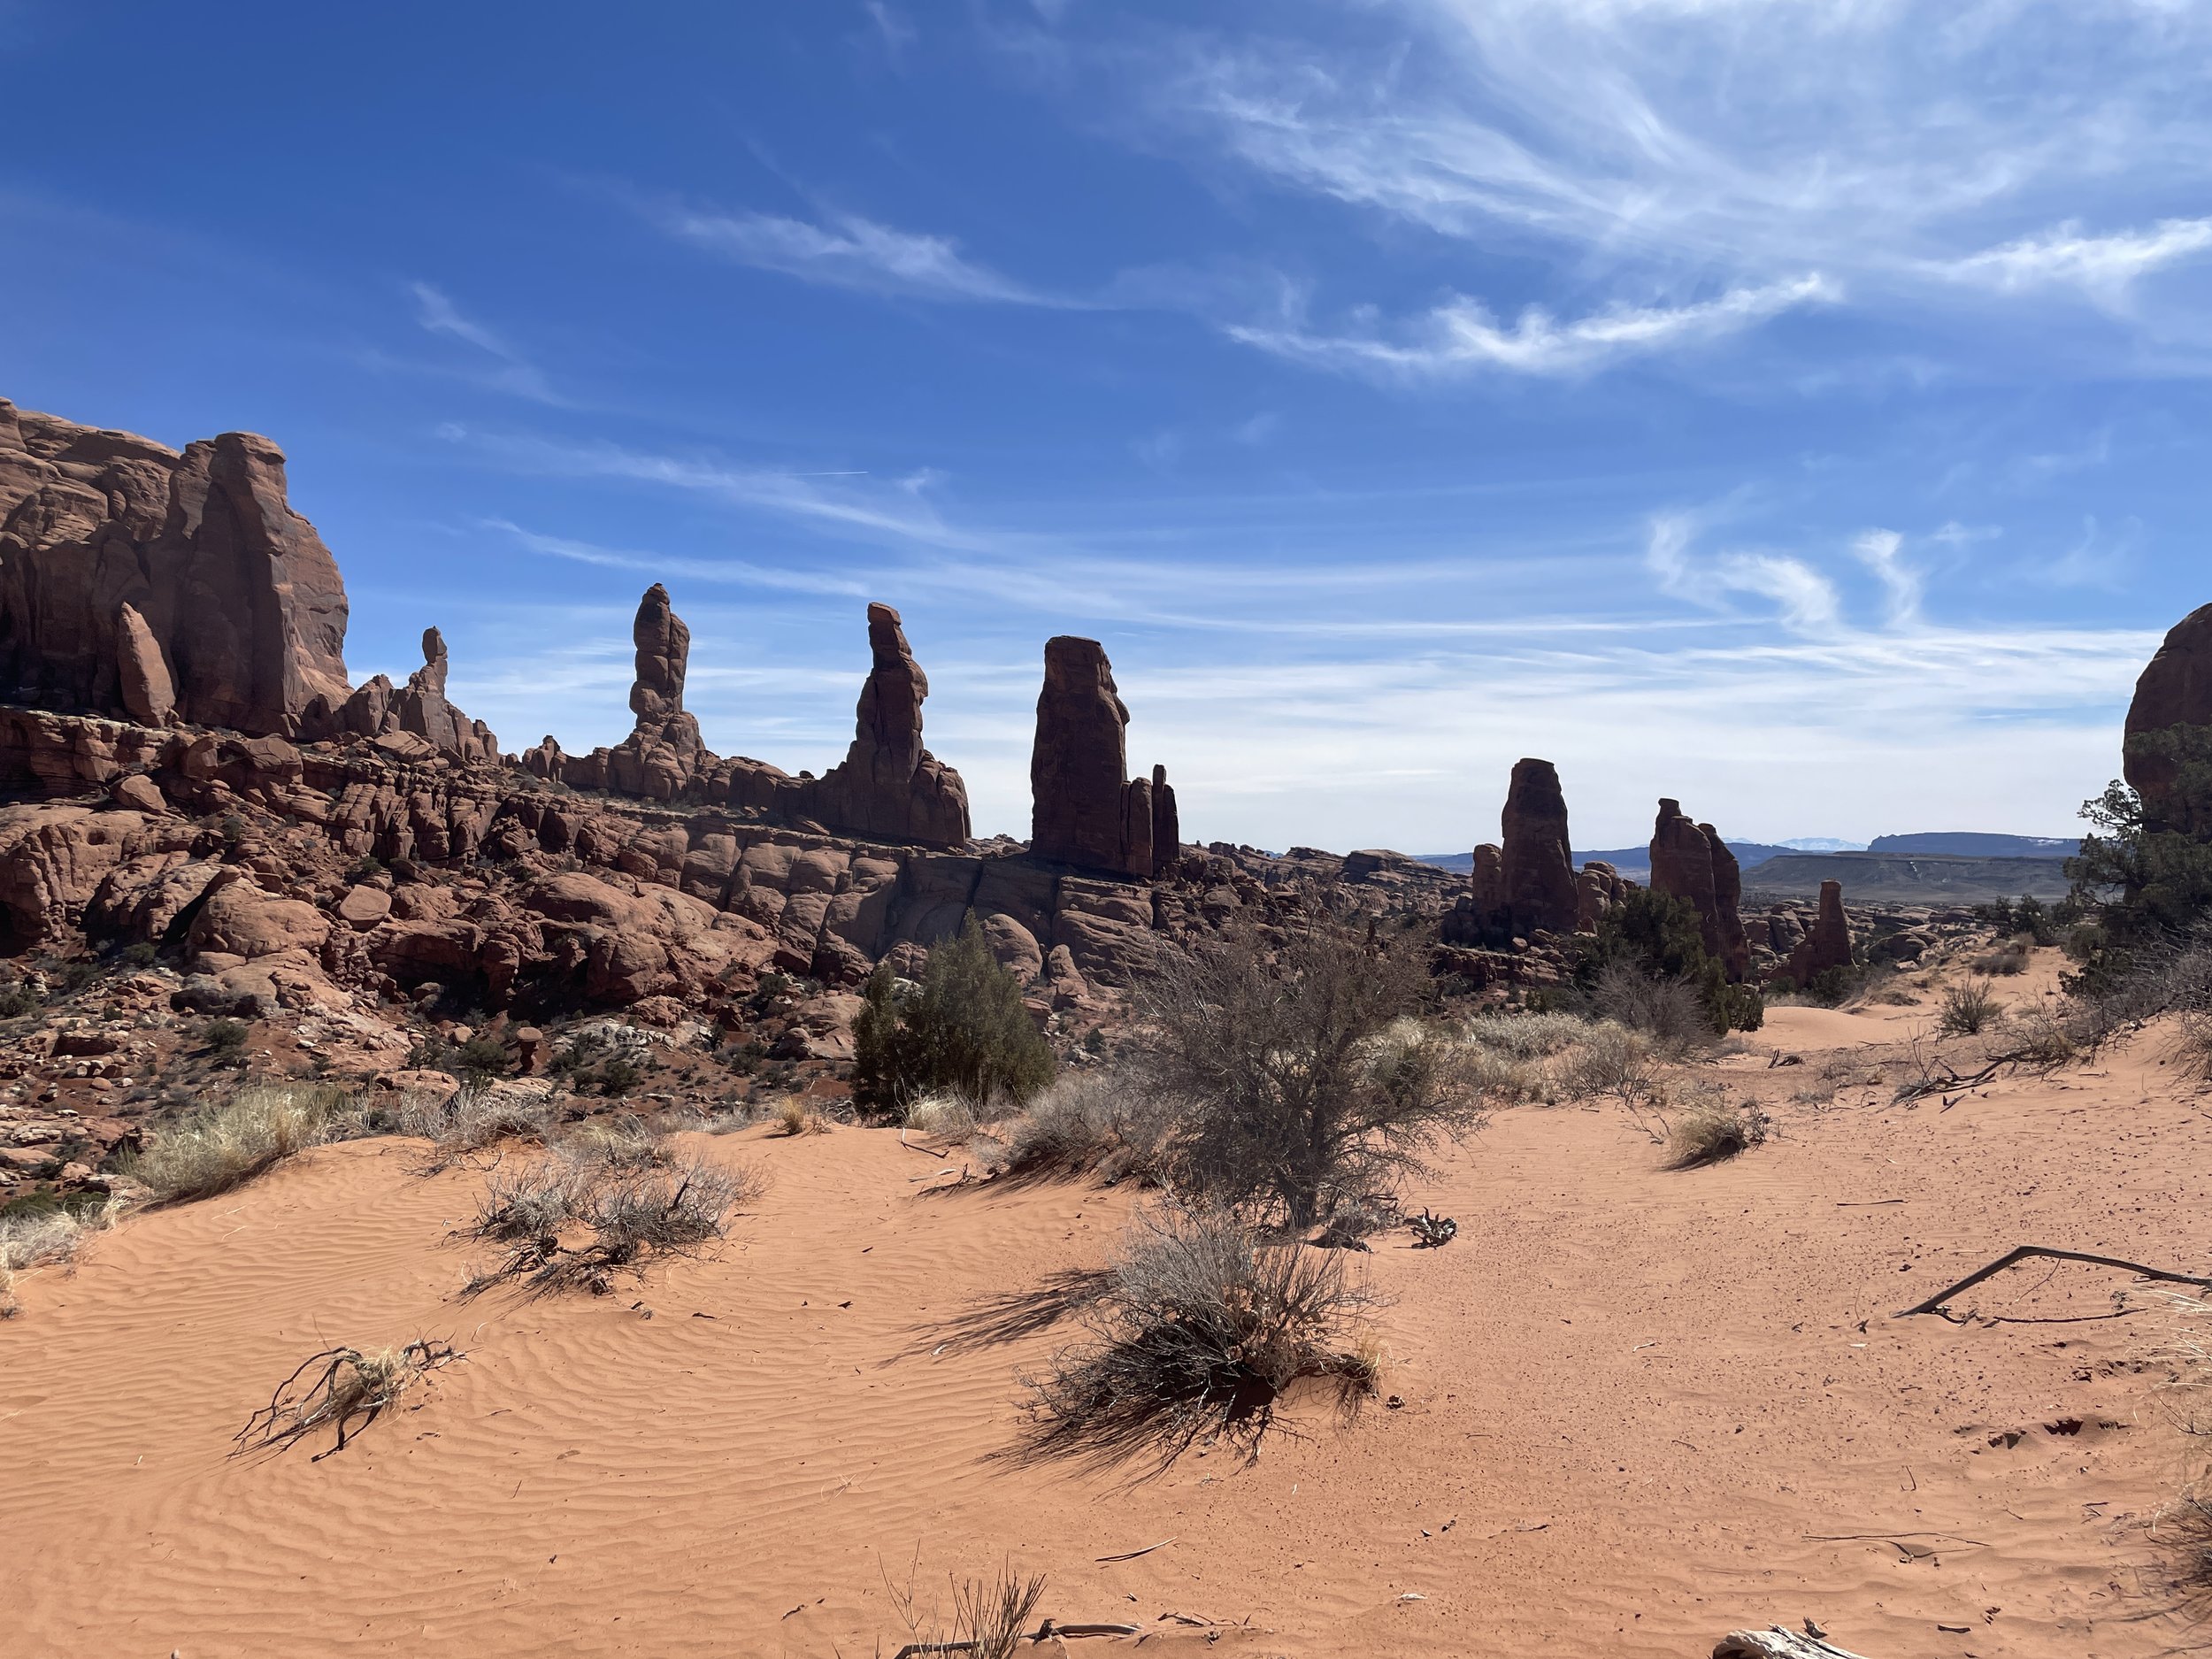
“Marching Men” along Tower Arch Trail - Arches National Park
There were several small undisturbed sand dunes along this trail, which were beautiful to observe the ripples from the wind.
Tower Arch Trail was easy to follow despite it not having much traffic. There are rock cairns marking the entire way.

Dunes along Tower Arch
The trail wraps around to the other side of the rock formations that you saw on the way. Tower Arch is just starting to be visible on the right.

Hiking along Tower Arch Trail - first glimpse of Tower Arch on the right hand side
The best part of this trail is the very impressive Tower Arch, but the surrounding scenery takes a close second. And we had this to ourselves! We had this whole thing to ourselves!

View from Tower Arch Trail near the arch
You can stop here, but I would recommend a small bit of rock scrambling to enjoy the view from under the arch.
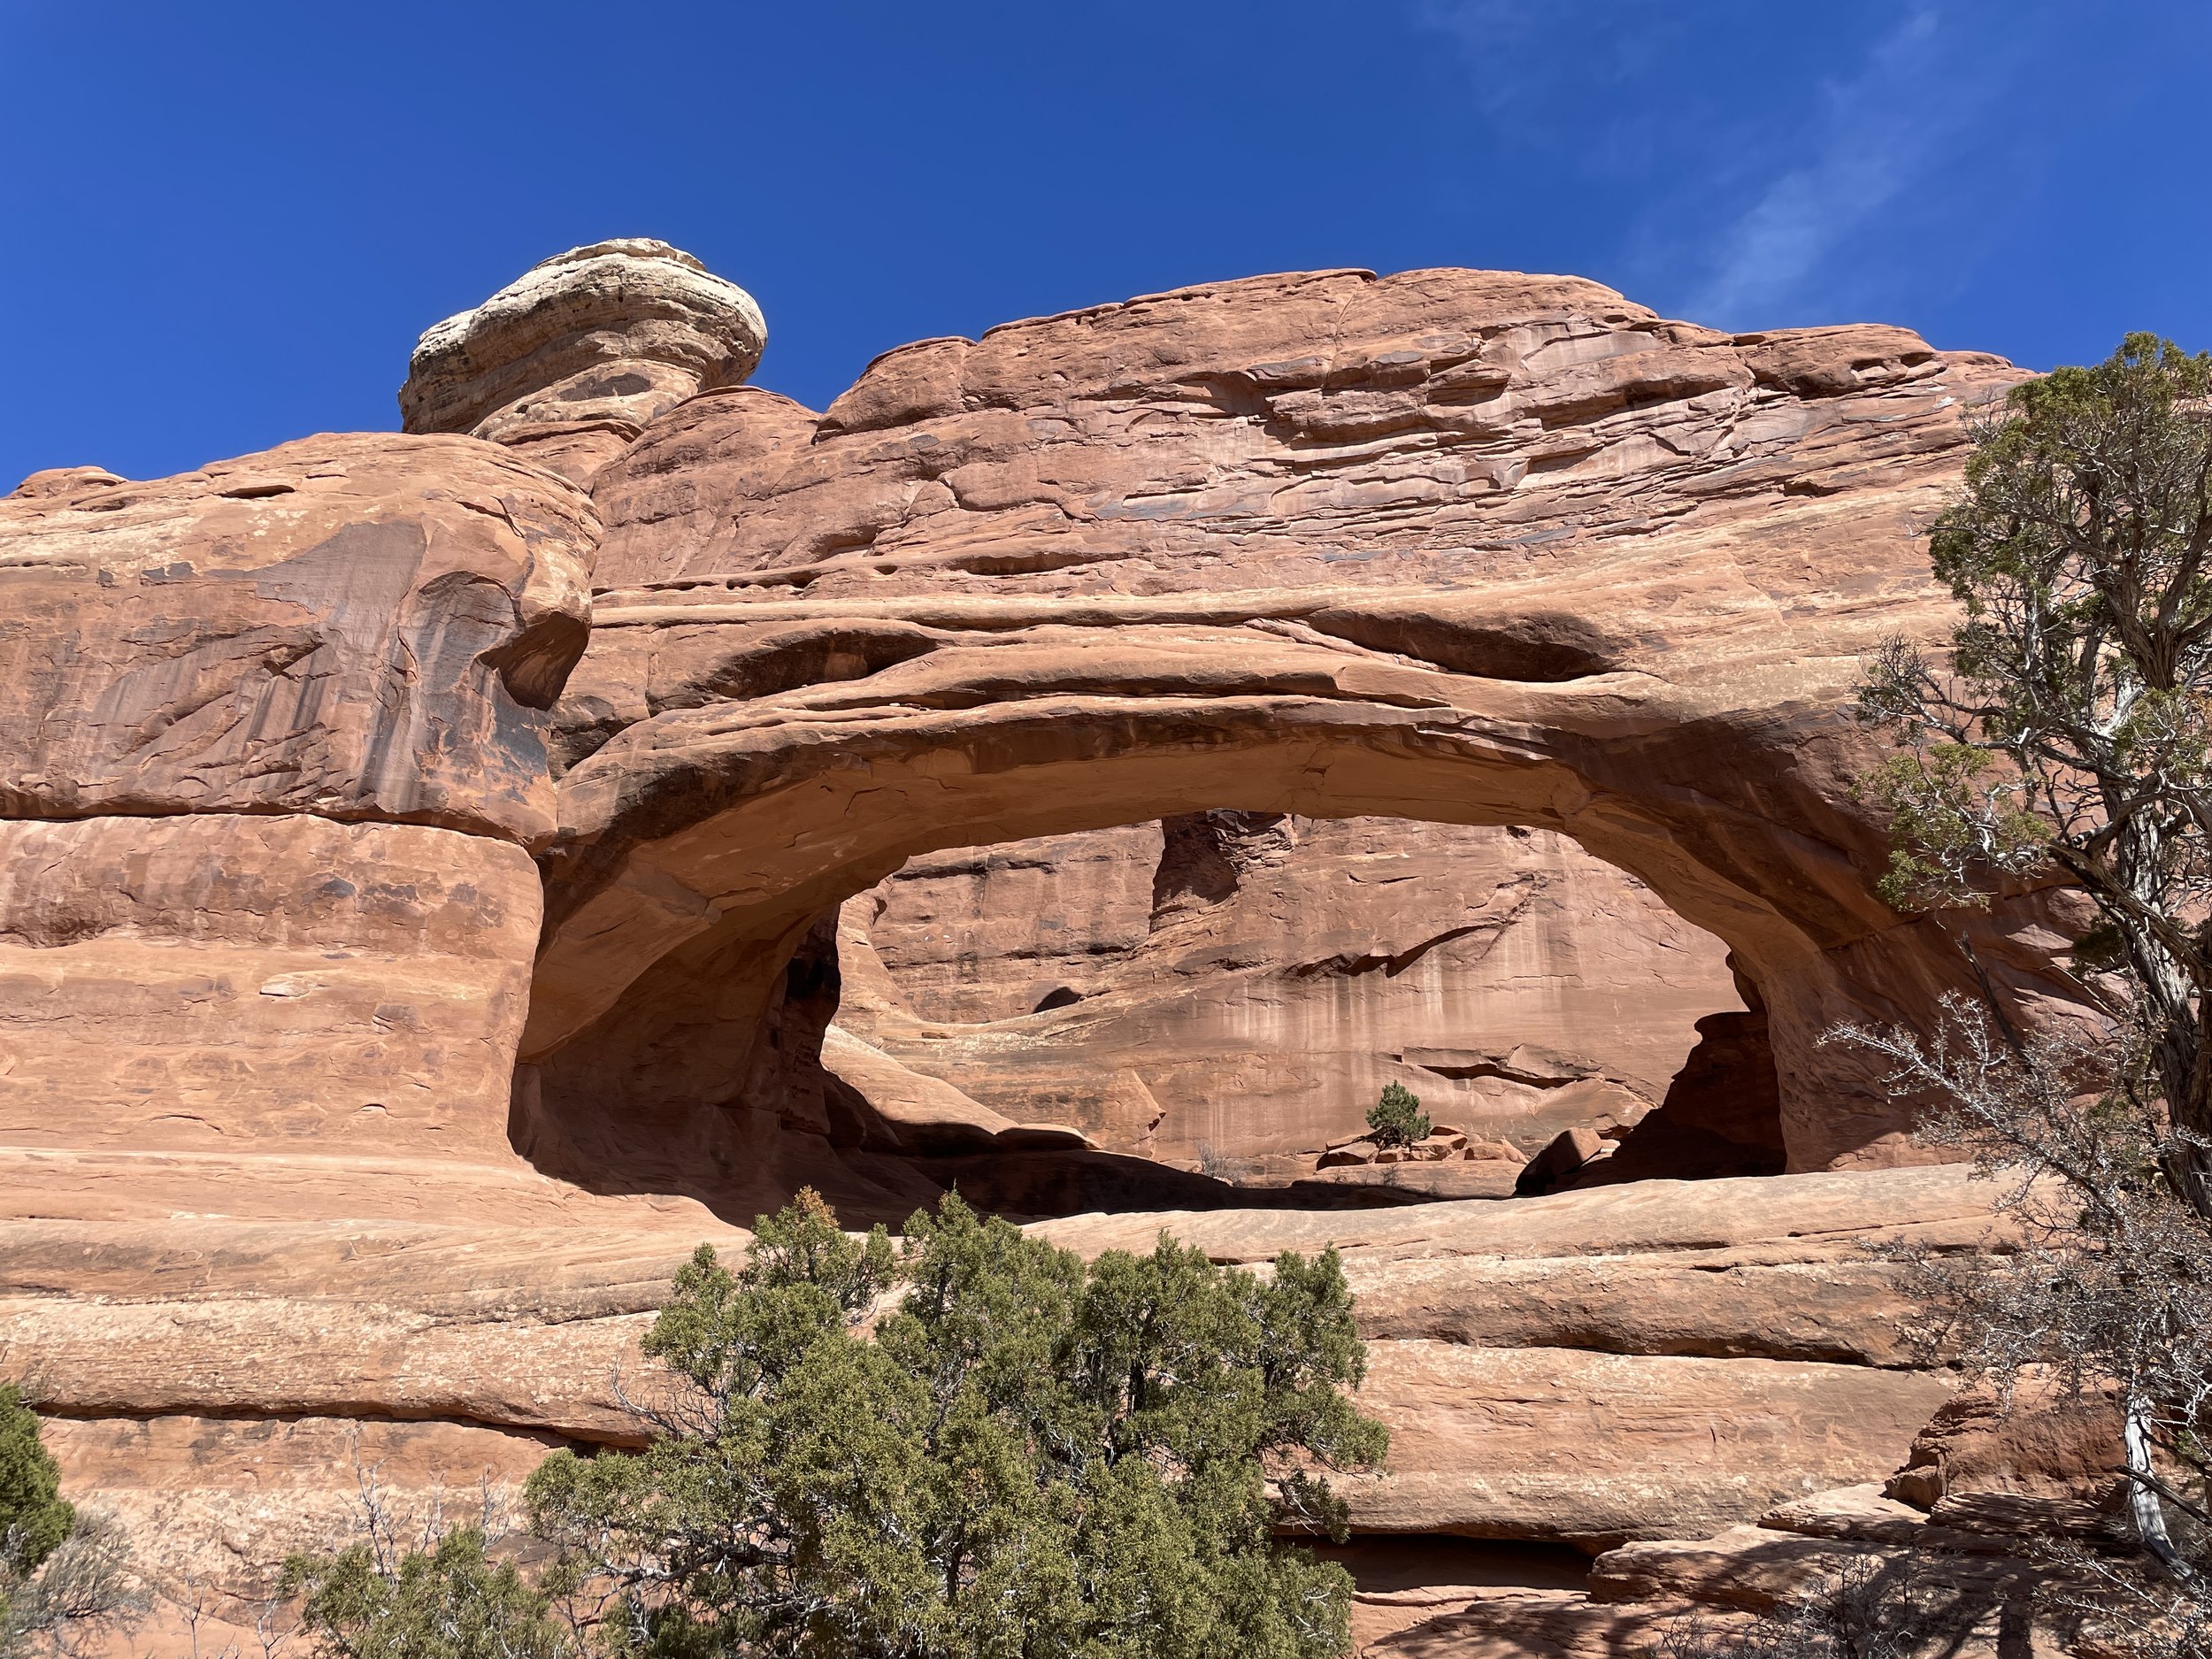
Tower Arch - Arches National Park
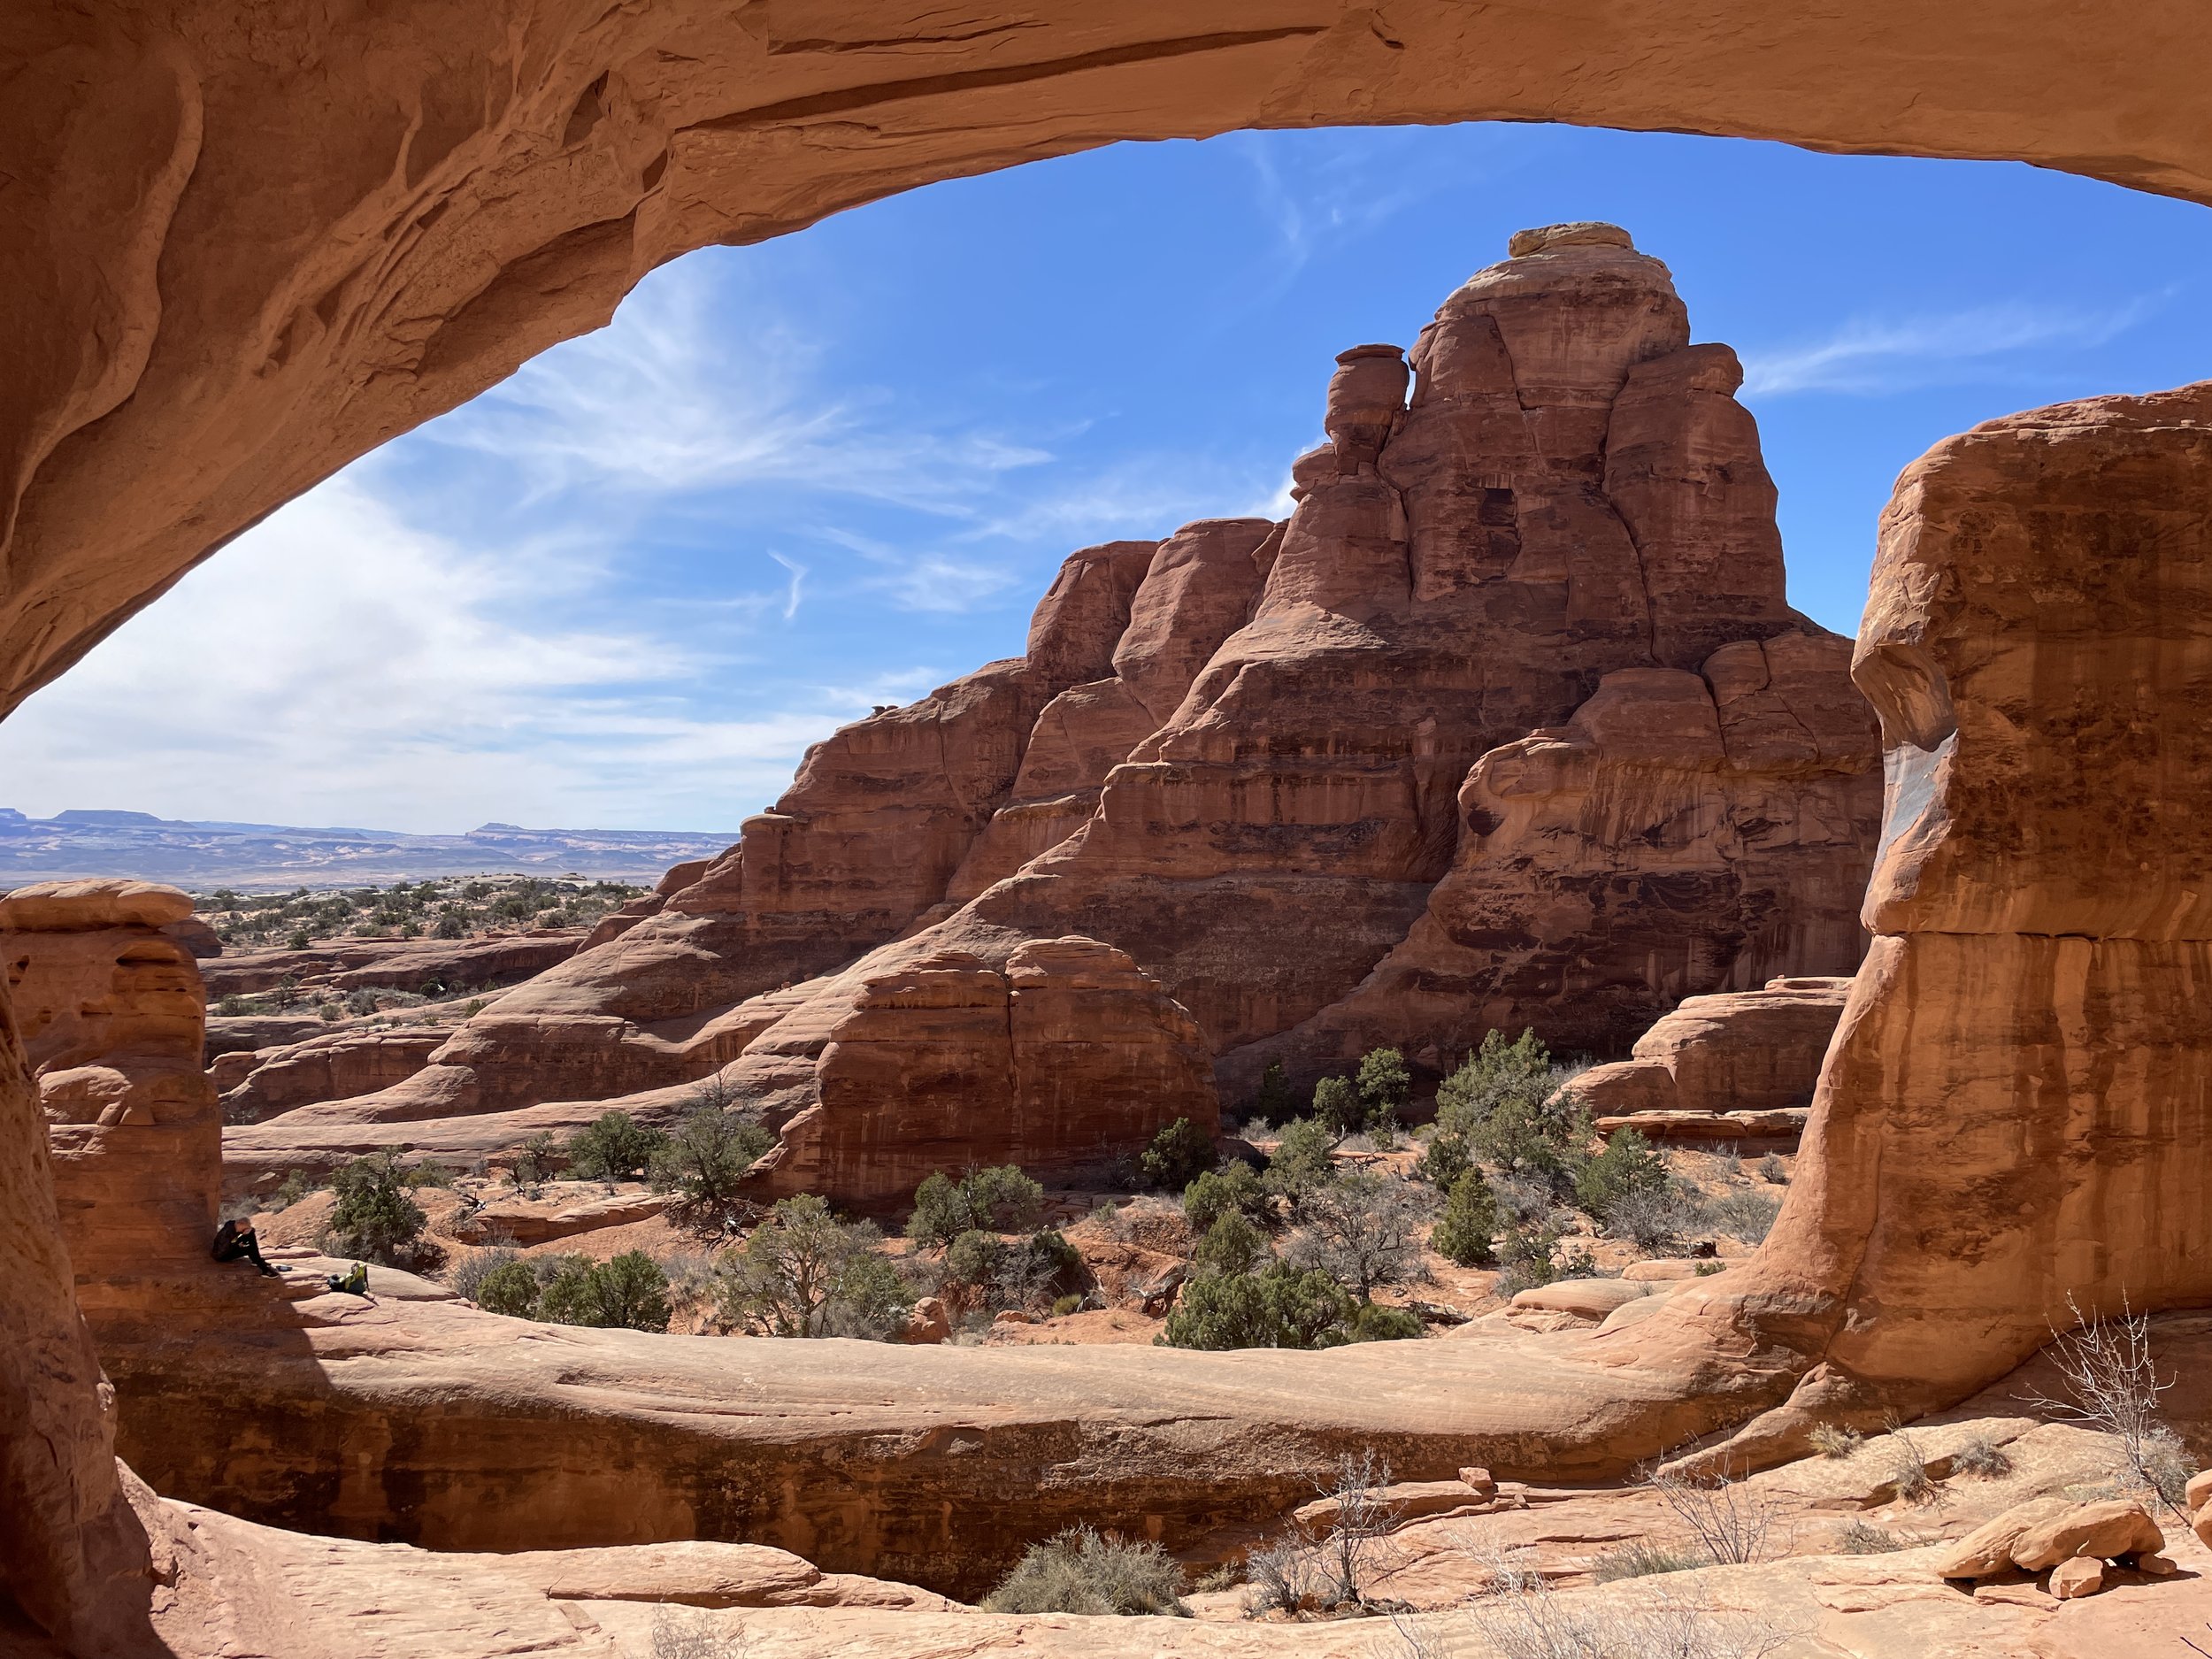
View from under Tower Arch
Other Hiking Options
If you are looking for more hiking suggestions, please check out my below map with additional posts linked to the pins.